When creating a local Windows 11/10 Account, the administrator will be prompted to set up three security questions. This is important and required to make sure there is an option to recover the account when the user forgets the password. That said, some could also look at it as a weakening of login security since some answers could be guessed by looking at the user’s social profiles and so on – but hey, who says the answers have to be true? You could always enter wrong answers that only you know if this concerns you. But if you are looking for a way to remove Security Questions from Windows 10, we share how to skip security questions when setting up a local user account in Windows 11/10.
The problem with the security questions in Windows
Windows offers some predefined set of questions while creating, and even they want to change it. While the user can set unrelated answers to those questions, remembering them is another problem. If the user sets the obvious answers, anybody who knows the person can guess it. This only creates more confusion. There are alternate ways to recover the Windows login account. An administrator can reset it for you, or if you have created a reset disk, you can use that as well.
Windows remove Security Questions?
That said, once an account is created, along with security questions, there is no way to remove it. There is no registry hack or an administrator tool to remove it – as of date!. You can at most change them. Period.
Skip security questions when setting up a Local account
However, there are still two ways of achieving this. This works only when the security questions have not been set up at all. One is when creating a new account, and the second is using a Microsoft account. However, stay assured that you cannot do it for existing accounts with security questions in place.
Skip Security Questions when creating an account
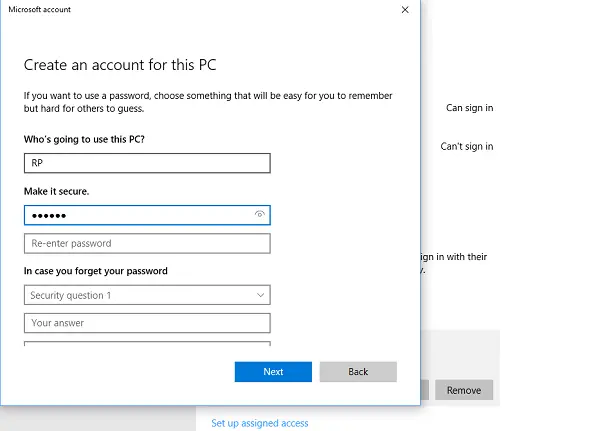
The only way not to associate security questions with a local user account is to skip them right at the start. When creating a local account, you will be asked to enter a password, along with a hint. Right when you select the password field, Security Questions shows up instantly.

To skip the questions, do not set a password for that account, and click next. It is possible to create an account without security questions if you leave them blank. You can set up the new password for yourself at a later stage. If you forget the password, you will have to ask your admin to reset it for you.

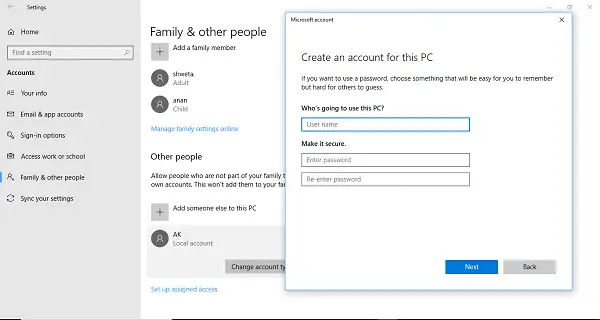
If you accidentally type something in the password field, cancel the process and restart. Just enter the name and click on the Next button.
Go to Settings > Accounts > Family & other people > Add someone else to this PC. This will open the new window which you can see in the screenshot above. Click next, and an account will be ready.
Use a Microsoft Account, and convert it to a local account
I did one small experiment of my own; it did work. I created an account using a Microsoft Account, and then followed the steps below:
- Log in to the account using the Microsoft credentials.
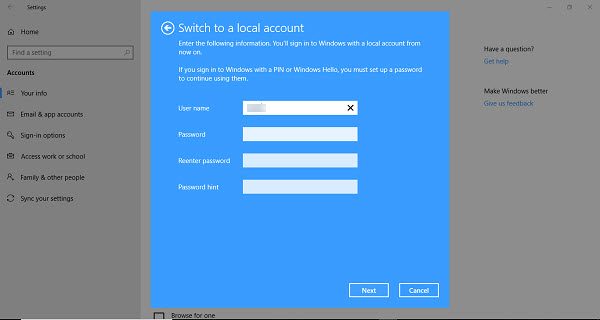
- Next, go to Settings > Accounts > Your Info
- Look for a link which says Sign in with a local account instead.
When you click on it, it will ask for your Microsoft account password, and then create a local account for you. You will have to set up a password for this account. There will be no security questions that will show up. It will also remove any association with your MSA account on that PC. While you can set up security questions later, it is better to create a recovery disk.

These are not straightforward ways, but they are the only ways to skip security questions when setting up a local user account. Do make sure to have a way to recover your password.
I hope this workaround helps!
Related reads:
Andy, MS trying to get security for your Windows account, is a real laugh. Sorry, but we both know that MS is not noted for security or privacy.
For me, this added “protection” is ludicrous, at best. One good, solid password is more than enough. For those who are extreme worry-warts, use a password generator like Roboform or LastPass or KeePass and so forth. They do work and can be the proper layer of protection needed.
I have used both LastPass and Roboform and like them both. Right now, I am using Roboform because I got a good discount for multiple devices. I also liked, that I was able to transfer all of my password information from LastPass to Roboform. As far as Roboform it is quite similar to LastPass, which as made it easier for my transition.
The hardest part of a Password Manager is building the information for all of your websites, emails and etc. that use a password. Once that is done, it really is a piece of cake.
I do wished I had know about just not answering the silly security questions, when I set up Windows 10, a couple of months ago. My original hard drive died and I had to get a new one, so that meant reinstalling Windows 10. What a great opportunity to bypass all of that, by simply clicking on Next.
Hi Anand, awesome article, just what I was looking for. Incredibly frustrating that they made this a mandatory selection if you use a password. I set up machines for our users, I can’t even comprehend how this could be useful in our case (unless I make every machine have the same questions, defeating the purpose…).
Moxie –
I’m glad to hear you’re using password managers and you’re definitely on the right track. Just to throw some more information at you, passwords, no matter how simple or complex, protect you from a single angle of attack only, which is guessing (including a brute force machine attack). Even a strong password is very weak protection in the greater scheme and “One good, solid password is more than enough” is most certainly not true if you take into consideration that most passwords are stolen through other means (breaches, phishing, disgruntled employees, accidental disclosure of data).
The most important protection you get from using a password manager with random passwords on every account is actually not that it makes your accounts that much more secure (I mean, it does to some degree if your password was your pet’s name or “password” or whatnot beforehand), but that it will protect all your other accounts when one gets breached.
Personally I would strongly discourage using any service that is of any importance to you that does not support multi-factor authentication, no matter how good your password is.
Just food for thought.
Windows passwords do nothing to protect you. I can break into your account with a usb drive and 30 seconds of time.
Just use Windows-r control userpasswors2 to set the password. No hint nor security questions that nobody over 30 can remember the answer to needed.
The engineers at Microsoft are of one mind. The person with the mind was off sick that day.
Can’t bypass this. The step to put in a blank password doesn’t work if there is a password policy in place that require a password. Trying to set up secondary local account for temporary use.