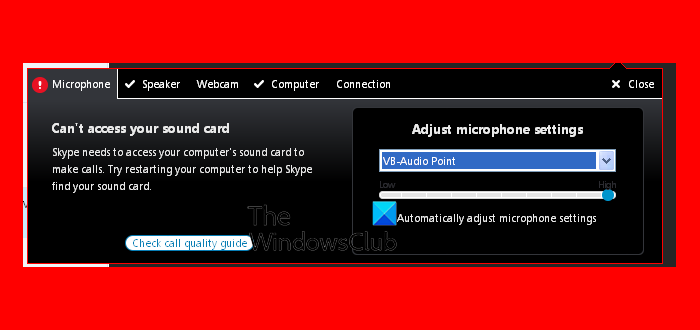
Audio not working on Skype? Skype can’t access your Sound Card? If Sound Card is not being detected or if sound is distorted,then this post will help you. Skype has been the premier video-calling application for Windows users. Video calling or voice calling needs a microphone, speaker & headphone, and this hardware then needs to communicate with the system and the Skype application. If either of these devices are unable to communicate with the system or application and you see an error message – Can’t access your sound card, then this post will show you how to get Skype to access the Sound Card if it is not being detected.

Skype can’t access Sound Card
The possible causes for the error are as follow:
- The sound card drivers might not be updated.
- A recent Windows update might have reset the settings to default and Skype might not have permission to use the microphone/speaker/headphone.
- Some files in the Skype application might be corrupt.
You could proceed with the following solutions sequentially to resolve the problem:
- Allow the Skype app permission to the microphone
- Update the sound card drivers
- Re-install the Skype application.
1] Allow the Skype app permission to the microphone
In case Skype’s access to the microphone was reset, do the following:
Click on the Start icon and then the gear-like symbol to open the Settings menu.
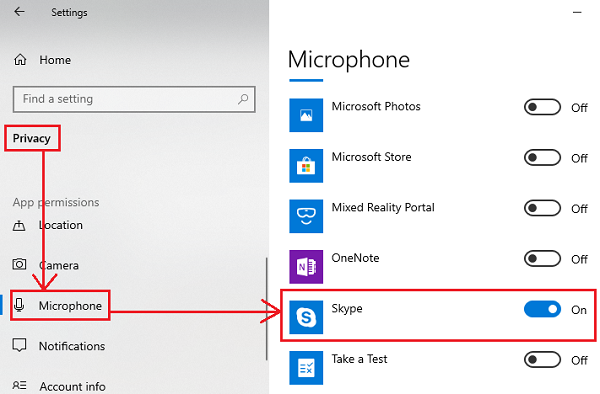
Go to Privacy and select Microphone under App permissions. Scroll down to Skype and turn the switch ON.

Skype would be able to access the Microphone now.
You would not need special app permissions to access the speaker and the headphone.
2] Update the sound card drivers
This issue could be caused if the sound card drivers are obsolete. You could update them as follows:
Press Win + R to open the Run window and type the command devmgmt.msc . Press Enter to open the Device Manager window.
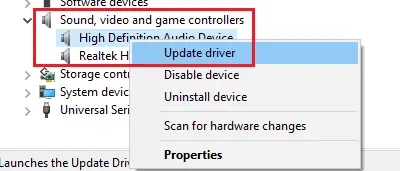
In the Device Manager window, expand the Sound, video, and game controller section.
Right-click on all the sound drivers one by one and select Update driver.

Restart the system once done.
3] Re-install the Skype application
You can uninstall the Skype application as follows:
Click on the Start icon and then on the gear-like symbol to open the Settings menu.
Go to Apps > Apps & Features. Find the Skype application. Right-click on it and select Uninstall.

Restart the system.
Now, you could re-install the Skype application after downloading it from Skype.com.
Hope this gets the microphone working for you on Skype.
Else read: Troubleshoot No Video, Audio or Sound in Skype calls.
Leave a Reply