Windows 11 and Windows 10, like the earlier Windows versions, include the Snipping Tool, which lets you take screenshots on Windows computers.
Snipping Tool for Windows 11/10
This Snipping Tool or SnippingTool.exe is located in the System32 folder, but it (shortcut) can also be accessed via the following location:
C:\ProgramData\Microsoft\Windows\Start Menu\Programs\Accessories

However, if you have installed it from the Microsoft Store, you may not be able to find the exact location. It doesn’t matter as it will be instantly available with a shortcut or when you search in the Start menu.
How to use Snipping Tool in Windows 11/10
The Snipping Tool allows you to take four different types of screenshots:
- Free-form Snip lets you draw and captures any irregular part of the screen
- Rectangular Snip will allow you to drag the cursor around an object to form a rectangle
- Window Snip will let you select an open window, such as a browser window or dialog box, and let you capture it
- Full-screen snip will capture the entire screen when you select this type of snip.
Once you have changed the settings to your requirements, you can click on New or Ctrl+PrtnScr to take captures. This will only work when you set the Snipping tool as the default browser. You can invoke using Win + Shift + S.
TIP: When you capture a shot from a browser & save it as an HTML file, the URL appears below the snip. To prevent the URL from appearing, open Options and clear the Include URL below snips (HTML only) checkbox.
Let us have a look at ways to use the Snipping Tool in Windows 11/10 effectively:
- Capture screenshots in Windows
- Win+PrntScr keyboard shortcut
- How to create Snipping Tool Shortcut
- Open Snipping Tool using Hotkey
- Snipping Tool Keyboard shortcuts
- Capture Context Menu using Snipping Tool
- Set Time delays for screen captures using Snipping Tool
- Capture part of the screen using Hotkey
- Disable white overlay
- Annotate Screenshots in Snipping Tool.
This will work with every user account.
1] Capture screenshots in Windows
Search for Snipping Tool using the Taskbar Search icon and click on the result. The tool will open, and you will find yourself immediately on your desktop.
TIP: You can now record Videos using the Snipping Tool in Windows 11
2] Win+PrntScr keyboard shortcut

Clicking on Win+PrntScr in Windows will let you capture the screenshot as per your settings. The image is automatically saved in your Pictures folder.
Read: How to add a Device frame to a screenshot.
3] How to create a Snipping Tool Shortcut
In Windows 11/10:
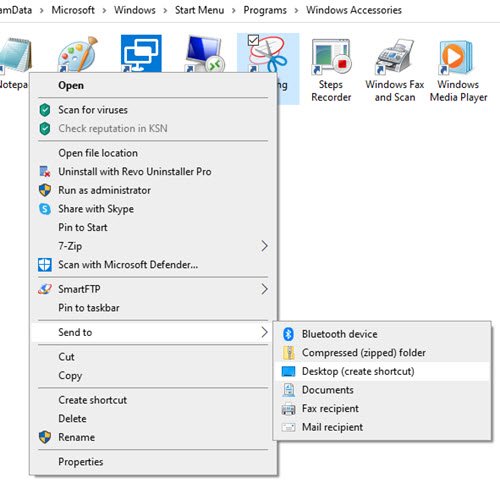
If you use it regularly, you can also create a Snipping Tool desktop shortcut to access it easily.
- Search for Snipping Tool using the Taskbar Search icon
- Right-click on the result and select Open file location
- In the folder that opens, locate Snipping Tool
- Right-click on it > Send to > Desktop
- The Snipping Tool shortcut will be created on your desktop.
Read: How to extract Text from Images with Snipping Tool in Windows 11
4] Open Snipping Tool using Hotkey

If you are a frequent user of the Snipping Tool, you can create a hotkey for it. To do so, open the System32 folder and right-click on SnippingTool.exe (or on its shortcut in the Program/Accessories folder). Select Properties. Here, you can set a hotkey for it. I have, as an example, selected F5. So to open the snipping tool, all I have to do next time is press F5.
Read: Snipping tool missing in Windows 11
5] Snipping Tool Keyboard shortcuts
- Alt+M – Choose a snipping mode
- Alt+N – Create a new snip in the same mode as the last one
- Shift+Arrow keys – Move the cursor to select a rectangular snip area
- Alt+D – Delay capture by 1-5 seconds
- Ctrl+C – Copy the snip to the clipboard.
6] Capture Context Menu using Snipping Tool

If you wish to capture screenshots of your context menu, start Snipping Tool and click on Esc. Next, right-click on the desktop, file, or folder and then press Ctrl+PrntScr. This will let you capture the right-click context menu. You can also capture the start menu using this trick.
Read: How to Screenshot only one Monitor on Windows
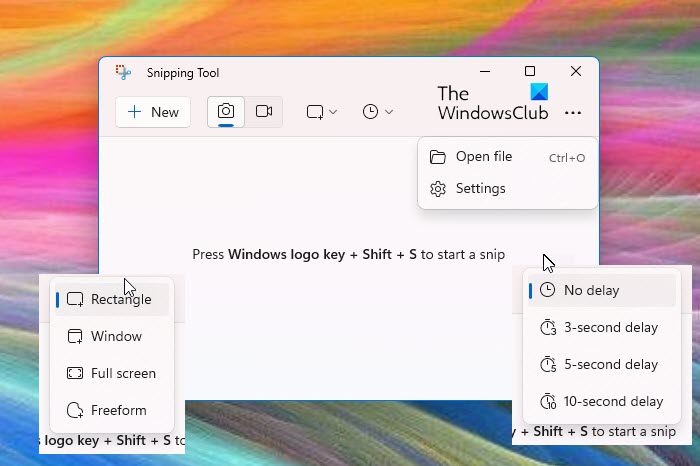
7] Set Time delays for screen captures using Snipping Tool

The new Snipping Tool menu in Windows 11/10 now lets you set up a 10-second delay to capture pop-up menus. Earlier it was available between 1 to 5 seconds, but not anymore.
Read: How to take Delayed Screenshots in Windows
8] Capture part of the screen using Hotkey
In Windows 10 and Windows 11 now, you can capture a part of your screen using a keyboard shortcut – WinKey+Shift+S. You can even create a desktop shortcut using the command snippingtool /clip in the Location box.
Read: How to take a screenshot with Mouse Pointer and Cursor included.
9] Disable white overlay
When the Snipping Tool is open and active, a white overlay appears. If you want to turn it off, you can do so via its Options. Uncheck the option to Show screen overlay when Snipping Tool is active.

To save the image, you have to click on the Save Snip button. An extra feature is that the full-screen shots are automatically saved in your Pictures folder.
If you wish to share a snip, you can click the Arrow on the Send Snip button and select an (email) option from the menu.

The Snipping Tool will not normally work on the start screen. You will be able only to capture the full start screen using the Win+PrntScr buttons and not a part of the start screen. If you click your allotted hotkey on the start screen, your windows will automatically switch to the desktop mode with the snipping tool opened. But there is a trick to do so, which we will see a bit later!
Read: How to take a scrolling screenshot in Windows.
10] Annotate Screenshots in Snipping Tool

This is one of the important and interesting features of the Snipping Tool. You can use Ballpoint pen and Highlighter options to annotate the captured screenshot on the Snipping Tool interface. There are 30 colors to choose from for the Ballpoint pen and 6 different colors for the Highlighter tool. The size for both annotation tools can also be adjusted using a slider.
In addition to that, it provides an Eraser tool, a Touch writing text tool, a Ruler, Protractor, and a Crop tool that you can use as per your requirements.
Once you have taken a screenshot using Snipping Tool and the screenshot is loaded on its interface, all these annotation tools will be visible on the top-middle part of its interface. Use those annotation tools and then use Save as icon to store the screenshot in JPG, PNG, or GIF image format.
TIP: A simple way to snip on Windows without using the Snipping Tool is to press the keyboard shortcut Alt + PrtScn. This captures the active window and saves it to the clipboard, which you can paste into an image editing software. This method provides a quick and effective way to take screenshots without relying on the Snipping Tool.
Customize Settings of the Snipping tool
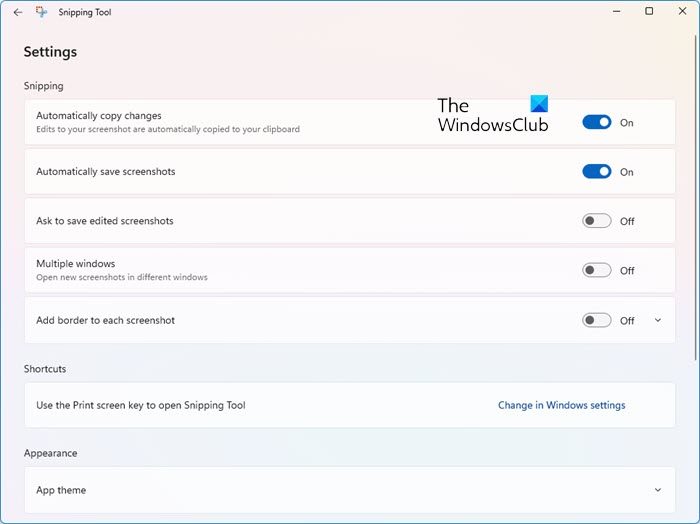
The Snipping Tool also lets you customize settings as per your comfort. For this, first, click on the See more icon (three horizontal dots) present in the top right corner of its interface and click on the Settings option. Now, in the Settings section, you can:
- Set the option to use the Print Screen button to open screen snipping. For this, you first need to click on the Change in settings. This will open the Settings app with the Keyboard section where you can turn on the associated option.
- Turn on the Multiple windows option. This is an important option as it helps to open each screenshot in a separate window of the Snipping Tool so that you can first capture multiple screenshots one after another and then make changes to them later.
- Toggle Auto copy to the clipboard
- Change the Snipping Tool theme to light, dark, or system setting, etc.
If you know any more tips or tricks for the Snipping Tool, please share them in the comments section.
Read: Where are Screenshots saved in Windows
You may also want to check out our freeware Windows Screen Capture Tool that allows you to capture full screen, selected screen areas, windows, webpages, and more. You can also add watermarks to your captured screenshot or edit the image using its basic image editor.
How to open Snipping Tools options?
While the shortcut invokes the screenshot-taking tool, if you want to configure the option, you will need to search for it. So press the Start button, click on the search box and type Snipping tool to find it. Once it appears, launch the tool, and then you can configure options such as delay timer, default mode, etc.
Can I take a screenshot of streaming services?
Some of the streaming services such as Netflix will turn their screen black whenever someone tries to take a screenshot. However, services like Amazon Prime don’t offer any restrictions.
TIP: Check this post if you find that, for some reason, your Windows is not saving captured Screenshots in the Pictures folder.

Thanks for a great tutorial. We just got a new computer and it has Windows 8 and honestly, I am going crazy with it! I do not like it at all so far. Anyway…that’s now what I was going to say here.
Actually I can’t figure out how to access the Systems 32 folder in Windows 8. I want to set the Snipping Tool as a hot key but can’t figure out where the folder is with this new Windows. Thanks!!
I just succeeded and I went to computer OS (C:) then Program Files. Go down to Windows. When you open this you will find the System32 file. Go down and you will find the Snipping Tool. Once there if you right click and save it to your desktop as an Icon it will be there. I hope my instructions are clear and it this will help you.
My thanks to the initial poster for the suggestion and the location of this tool. I like to take small pics with my genealogy research.
Richard
Thank you, I was able to figure it with your help. Much appreciate!
In order to make a shortcut key to SnippingTool in MS Windows 8, you have to go to the start screen, type “snipping”, select the tool with secondary click and select Open file location to get the OS shortcut to the tool and first there open “Properties” in the context menu. If you go directly to the System32 folder, you won’t see Shortcut tab in the properties.
But, this shortcut key only opens SnippingTool, it doesn’t capture any part of the screen, i.e. you have to click once more to capture… Not good. What is again so difficult here for MS? Mac has had a built-in key combination for partial capture (and for capture of the active window and for the whole screen) at least a decade. You have to resort to a third party tool to get the same functionality in MS Windows.
You could consider setting a hotkey for opening the Snipping Tool.
Thank you so much for this! I just purchased a Dell laptop last night with Windows 8 and it is extremely frustrated to say the least.
Thank you!
Interesting, but on the Surface there is no PrntScr key
Thanks for a helpful and informative entry about the snipping tool. Nicely written. I had assumed the snipping tool was completely bare-bones. But has some very handy features I didn’t know about.
Like the “Prnt Scrn” button?
Or possibly the “Alt + Prnt Scrn” option for capturing the active window?
Or perhaps the “Windows Key + Prnt Scrn” option to capture the entire screen and save it to the Pictures folder?
***note you may need to hold down the “Fn” button to get it to work on a laptop***
Try the WinKey+Volume down keys on Windows 8 / Surface tablet!
I can’t speak to other computer models, but my new Windows 8.1 “Samsung ATIV Book 9 Plus” (way too long of a name for a computer model) requires the inclusion of the Fn key in order to access the “Prt Sc” (print screen) button…
What that means is if I want to capture a screen shot, including a drop-down menu, I must take the following steps:
1. Open the window I want to capture.
2. Open the snipping tool.
3. Press the “Esc” (escape) button on the keyboard.
4. Physically drop down the menu I want to include in the capture.
5. Simultaneously press the Ctrl – Fn – Prt Sc buttons (three buttons in total).
This will leave the drop-down menu visible and will create the Snipping Tool “cross hairs”. I then have only to drag the cross-hairs where I want them (as normal for the Snipping Tool)
Again, this is only for this particular Samsung “Ultrabook” running Win 8.1. These steps may or may not apply to other Samsung models or computers from other manufacturers.
I recently purchased an HP Envy printer. Since then, when I use the snipping tool and paste it in a Word document, the imagine only partially prints. It looks fine in the print preview. Any suggestions?
How to snip 3 pages of document?
Snipping Tool is better than the keyboard shortcut way, but lacks annotating options. So I use Free Screenshot Capture to take screenshots on me Win 8.
Is Gmail part of the email option when clicking the arrow on the send snip button in Windows 7 or 8?
I think you can only snip what visible at any given time.
Some screenshot tools can do this. As far as I’m concerned, FastStone, Apowersoft Free Screen Capture are two options. Their “Window” capture mode enables you to capture all the contents within a window, including the parts that are not visible on the screen. Choose the Window capture mode, and click a window, then the contents in the window will scroll down, indicating that the contents are being captured.
http://www.faststone.org/
http://www.apowersoft.com/free-screen-capture
In win8 after pressed hotkey to call SnippingTool is ready to snip with no need press New in menu. But in Win7 needs to be press New button in menu to start capture.
(I know this is years old, but in case anyone else comes across it….)
The first 10 programs on your taskbar automatically have hotkeys assigned to them. Push the windows key + a number 1 – 0. This will open the program at that position in your taskbar. GIven that, you could move the Snipping Tool program to one of those spots.
Very nice! Thank you!!!
It may be old… but, it is new to me – and works with the new W10 :)
Again… this may be old, but it still works today (with W10 on a Dell laptop)!
Thanks!!!
Help please. I happily use and send Snipping Tool items at my work, so do know how to use it.
Problem at home is that my home desktop system says that I need to link an email programme to the snipping tool programme. How do I do that?
This shouldn’t be happening. SnippingTool.exe is an executable file/tool that is located in the System32 folder.
You could save then paste the snip job into an email composed separately if no email client is linked or if you rather not link one.
Great tutorial! On my Win 7 machines I have this setup so that Win+S goes right to the snipping screen (not the menu screen, where I have to click “new” to make a snip). I think I’ve used the same steps you describe here, but when I apply them in WIn 10, I can only get the menu with a KB shortcut. Hope that makes sense. Any thoughts?
Did anyone notice that if you assign a shortcut key to the Snipping Tool in Windows10, all that shortcut does is bring up the application to use it?
In Win7, if you made a shortcut to the Snipping Tool, and used it.. it would already begin giving you the ability to capture the screen.
I don’t like this change at all – do you think it’s an oversight in Win10?
Indeed it is.
This is the most unfriendly user interface I have ever used.
Microsoft introduced a new Windows 10 snipping app, called Microsoft Office Snipping Tool. (to be downloaded from http://www.mix.office.com/snip. Not in the Win10 Store yet). Great and cool app: one can add audio to its snip. So you can show and tell (explain) and after having taken the snip, save/email/add to reading list/etc….
Moreover there is an option ‘Camera’. To be used for taking snips from your embedded camera. However when you have an USB camera connected to your Desktop PC, this function doesn’t work ! So far Microsoft has no explanation on how to use it on a PC.
Is there anyone who has already experienced this new tool ? How to use an USB connected camera to snip ?
Thanks and regards.
Deram
Hi, once I activate snipping tool , the screen go grey , plz help
I was learning about the snipping tool and accidently added it to my word documents. I need to know how to remove it. Please and thank you
User @CoolblueIce’s method described just above my comment here is *the* only method I found that has worked for me.
I am an experienced and advanced Windows user running Windows 8.1 64bit on a Lenovo Y510P.
It’s important to emphasize that the first time you start the Snipping Tool must be followed by a press of the [Esc] key – CoolblueIce’s Step 3 above.
10 Internet points to user CoolblueIce. ;)
not work…i have to try create a shortcut key but in my sniping tools properties option,SHORTCUT option is not shown…so how can i create this?
I want to delay after I “start” the capture. Rather then delay before creating the capture. Anyone know if this is possible?
I love using SnapIt screen capture tool
just go to start in windows 8 , then naviagate to all apps arrow which is located below. after that you search all the apps go to snipping tool right click on it
click on open file location
right click again
properties
short cut bar
then to – shortcut key – press any key you would like I prefer F2
thats it you have a shortcut button with snipping tool thank you
Hi there,
The shortcut to activate Snipping Tool after Windows 10 Creators Update is actually Start + Shift + S, not Ctrl + Shift + S.
Thanks. Edited the error.
He doesn’t say how to make a desktop icon for it…. that’s what I want…
You can use any .ico file as its icon. That is out of the scope of this article. Pls see https://www.thewindowsclub.com/quick-any2ico-create-icons that.
Thanks for knowledge sharing…
Hello! I have a question about the hardcopy function which is called when you press Win-Shift-S, is there a mode for the Windows 7 snipping tool to mimic this functionality? Id like to make snips of parts of the screen automatically into the clipboard without having to have snipping tool open for that, or close after I made the snip. Thats a really neat functionality Id like to use under Win7 too!