If the Snipping Tool is not saving screenshots on your Windows 11/10 PC, this post will help. When we take a snip or record screen or videos using the Snipping Tool, it automatically saves the snip or recording to the default location. In case, the automatic saving feature is turned off, then snip is opened in the app interface automatically where we can annotate the captured screenshot and then save it as PNG, JPG, or GIF to a desired location. However, some users have complained these options don’t work for them. They can capture the screenshot and the snip goes into the clipboard, but the saving part doesn’t work. They have to manually paste the snip from the clipboard in MS Paint, Snipping Tool interface, or another program, and then save it. If you also face this issue, use the working solutions covered in this post below.
Snipping Tool not saving screenshots in Windows 11
If the Snipping Tool is not saving screenshots in Windows 11/10, use these solutions:
- Open the Markup and share notification and then save the snip
- Turn on Snipping Tool notifications
- Enable automatically save screenshots setting
- Restore or change the default save location for snips
- Delete the
{B7BEDE81-DF94-4682-A7D8-57A52620B86F}Registry value - Repair, reset, or re-install the Snipping Tool.
Let’s check these solutions.
1] Open the Markup and share notification and then save the snip
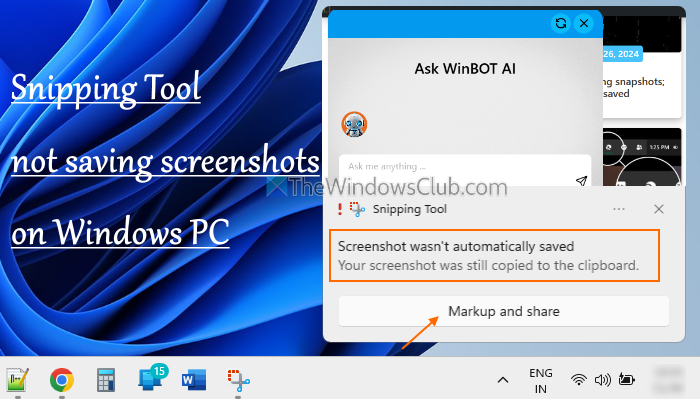
After taking a screenshot, a Markup and share notification appears with a snip preview on the bottom right part of the desktop screen. If the Snipping Tool doesn’t save the snip after capture and the app interface doesn’t open automatically, click on the Markup and share notification. This will open the Snipping Tool interface. Now you can use the Save as button to store snip to a particular folder.
2] Turn on Snipping Tool notifications
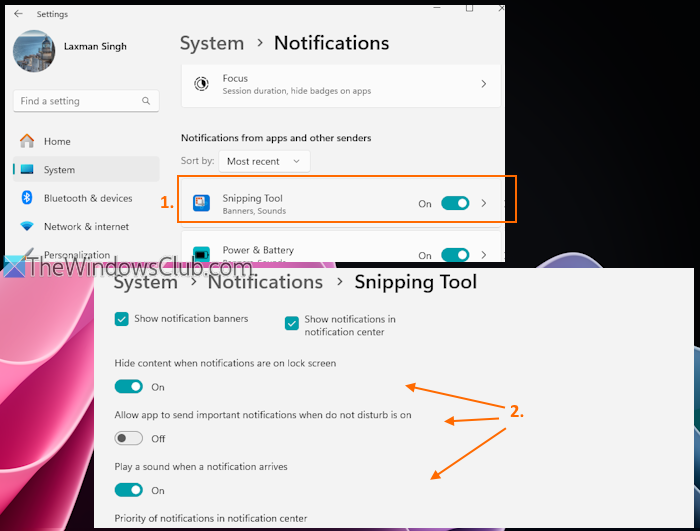
It is one of the best fixes as it has helped some users. This problem started for users when the Snipping Tool notifications were turned off. So, when you take a snip using the hotkey and neither the snip notification nor the app interface opens post-capture, use this solution. Here are the steps to turn on notifications for the Snipping Tool:
- Use the Win+I shortcut key to open the Settings app
- Navigate to System > Notifications
- Make sure that the Notifications toggle is turned on
- Scroll down to Notifications from apps and other senders section
- Click on the Snipping Tool toggle to turn it on. Next, access the notification settings, and turn on the Show notification banners and Show notifications in notification center options. You can also adjust other settings or keep the default settings.
Related: Screenshots not saving in Pictures folder on Windows PC
3] Enable automatically save screenshots setting
Check if the setting to save screenshots automatically is disabled or turned off. If yes, enable this setting using these steps:
- Open the Snipping Tool
- Click on the three horizontal dots (or See more) icon on the top right corner
- Select the Settings option
- Turn on the Automatically save original screenshots option,
Now take a screenshot using Snipping Tool and it will save the screenshot to the default folder.
Read: Snipping Tool screen recorder No sound problem in Windows PC
4] Restore or change the default save location for snips
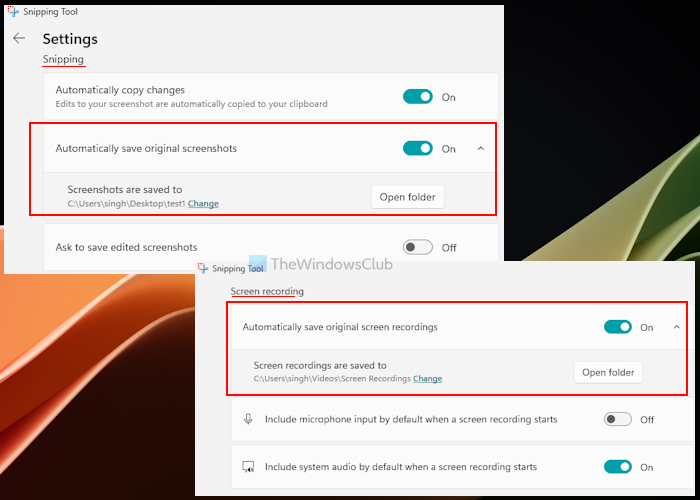
By default, the Snipping Tool saves all the snips to the C:\Users\username\Pictures\Screenshots folder. If there is a problem with that folder or it is missing, you may face trouble while saving screenshots. In this case, you need to restore or change the default save location for the Snipping Tool on your Windows 11/10 PC.
Also read: Recording Stopped error in Snipping Tool in Windows PC
5] Delete the {B7BEDE81-DF94-4682-A7D8-57A52620B86F} Registry value
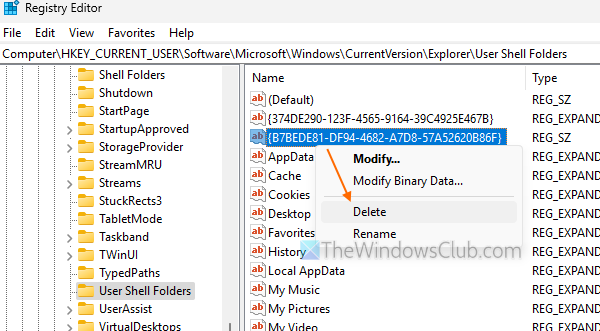
This fix worked for me and the solution is helpful if you prefer the default save location for Snipping Tool. Here’s what happened in my case. I moved the Screenshots folder to Desktop but didn’t select any folder there. As a result, the original Screenshots folder was gone and Snipping Tool didn’t get the location to save snips. Creating the Screenshots folder manually to the default location didn’t work either. So, whenever I take a snip, the notification appears and I see a Screenshot wasn’t automatically saved error. After some workaround, I found and deleted the culprit Registry entry, and the problem was solved.
Before using this solution, backup Windows Registry which might be needed in case something goes wrong. After that, carefully follow these steps:
- Type regedit and hit the Enter key to open the Registry Editor
- Access the User Shell Folders Registry key. Here is the path:
HKEY_CURRENT_USER\Software\Microsoft\Windows\CurrentVersion\Explorer\User Shell Folders
- Look for the
{B7BEDE81-DF94-4682-A7D8-57A52620B86F}String value - Right-click on that value and select the Delete option
- In the Confirm Value Delete box, press the Yes button
- Sign out and sign in to your PC or restart it.
The Screenshots folder should be created automatically to the original location and selected for the Snipping Tool. Take a snip and it will be saved to that location. If not, now you can create a Screenshots folder and then set this location for the Snipping Tool to save snips. This should work.
TIP: If you find the Location tab is missing in the Properties box of the Screenshots folder after restoring it, use this Registry trick to fix the No Location tab in the Properties issue.
6] Repair, reset, or reinstall the Snipping Tool
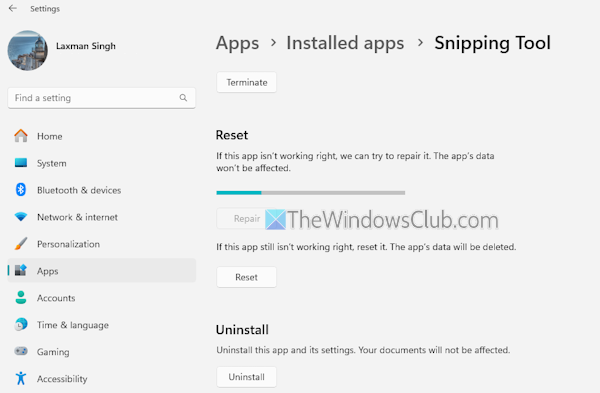
See if repairing or resetting the app works. Open the Settings app > Apps > Installed apps. There, access Advanced options of the Snipping Tool. Scroll down and click on the Repair button. This will try to fix the app without affecting your data. If this doesn’t help, use the Reset button. This will remove all the app data. If nothing works, you need to reinstall the Snipping Tool.
Hope this helps.
Now read: Fix Snipping Tool This app can’t open error
Can’t find your screenshots folder, Your screenshot wasn’t saved Snipping Tool
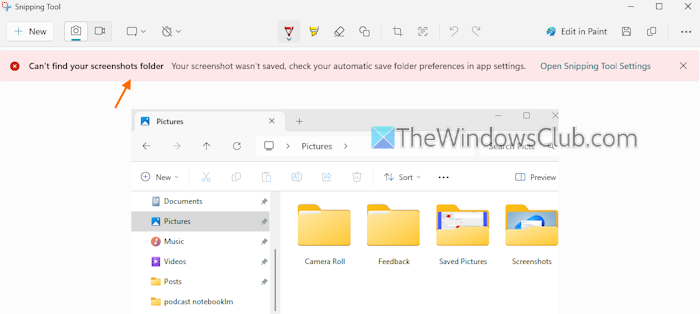
If you open the Snipping Tool app and take a snip, you may receive the following error:
Can’t find your screenshots folder. Your screenshot wasn’t saved, check your automatic save folder preferences in app settings.
This happens when the saved location or folder is blank or not set for saving snips. To get rid of this error, open the Snipping Tool Settings. There, turn on the Automatically save original screenshots setting and expand it. Click on the Change option and select a folder. Now you won’t see this error anymore and snips will be saved to the new location automatically.
Why won’t my Snipping Tool work on Windows 11?
Snipping Tool may not work if the app is corrupted, there are some conflicting third-party tools, etc. To fix this problem, repair the Snipping Tool, find and remove the conflicting programs, and relaunch the app. If the Snipping Tool is completely disabled, access the Do not allow Snipping Tool to run setting in the Group Policy Editor, and set it to Not Configured mode.
Read next: Snipping Tool locked, freezes, or crashes in Windows PC.
Leave a Reply