At times when playing a video or a game or listening to music, you may find that the sound is distorted. If you are facing the same problem, you can fix the sound distortion issues in Windows 11/10 PC with the help of these troubleshooting solutions.
Fix Sound Distortion in Windows 11/10
To fix sound distortion issues in Windows 11/10, follow these solutions:
- Check connections
- Disable Sound Effects
- Reinstall Driver software in Compatibility Mode
- Check your speakers
- Reinstall DirectX
- Set audio to 24-bit format
- Run Audio Playback Troubleshooter
To learn more about these solutions, continue reading.
1] Check connections
It is the very first thing you need to check when you are getting distorted sound from your speakers. If the wires are not plugged in correctly, there is a high chance of getting such problems.
2] Disable Sound Effects

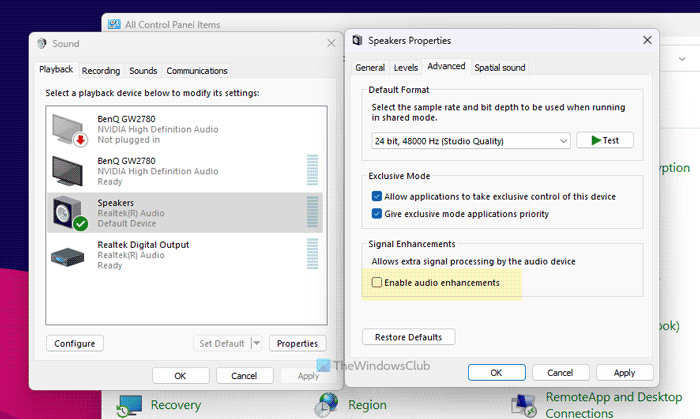
If you are using Windows 11, you need to follow these steps to disable sound effects:
- Open the Control Panel on your computer.
- Click on Sound.
- Select Speakers.
- Click on the Properties.
- Go to the Advanced tab.
- Uncheck the Enable audio enhancements box.
- Click the OK button.
However, if you use Windows 10, you can follow these steps to disable sound effects and enhancements:
- Press the Win + X and click on ‘Control Panel’ among the options.
- Double click ‘Sounds’.
- Click on ‘Speakers’ and then go to ‘Properties’. Click on ‘Enhancement’.
- Click on ‘Disable All Sound Enhancements’.
- Click ‘Apply’ and then ‘OK’ to complete this step.
This disables the audio enhancements.
3] Reinstall Driver software in Compatibility Mode

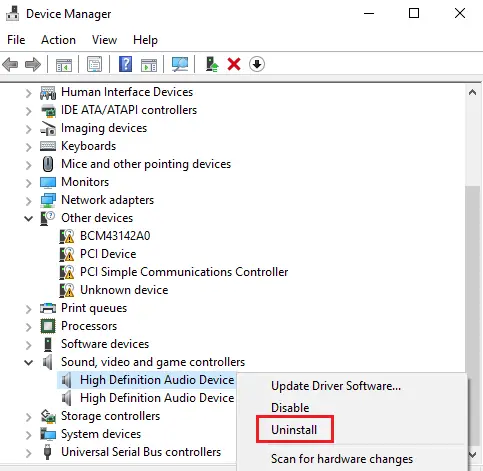
If disabling all sound effects didn’t work, you would need to uninstall and reinstall your Sound drivers in the Compatibility Mode. Before you begin, make sure that you have the driver installation setup for this device ready,
- Press the Win + X and click on ‘Device Manager’ among the options.
- Expand “Sound and Game Controllers.”
- Right-click on the ‘Sound’ device on the list and select ‘Uninstall’.
- Select ‘Delete driver software’.
Wait for the uninstallation to complete and then restart the device.
- After the restart, right-click on the ‘Driver setup file’.
- Go to ‘Properties’ and click on ‘Compatibility’.
- Select the ‘Windows 8.1 OS’ option on the drop-down menu. Click ‘Apply’ and then ‘OK’.
- Run the file and wait for it to install.
TIP: This post will help you if your Audio sounds funny and distorted like chipmunks.
4] Check your speakers
If you have VLC Media Player installed and have raised the volume to anything over 100%, chances are, you may have damaged your speakers. If the sound is distorted below 100% volume over speakers but fine with earphones, your speakers need replacing.
5] Reinstall DirectX
If only some programs or games are missing audio, re-install DirectX. You might also try running the DirectX Diagnostic Tool.
Read: Computer Freezes and makes Buzzing or High Pitched Noise.
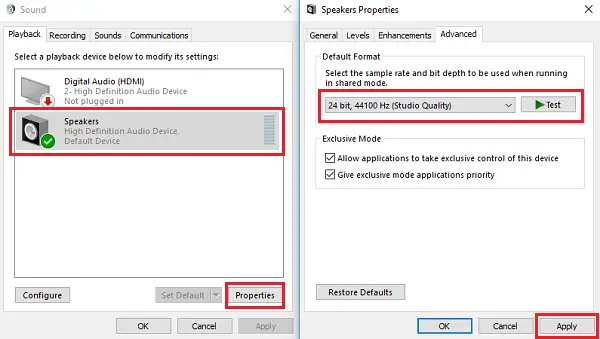
6] Set audio to 24-bit format

This is a pretty effective option.
- Press the Windows + S and enter Sound. Select ‘Sound’.
- Go to ‘Playback’ and then click ‘Speakers’.
- Go to ‘Advanced’ and click on ‘Default Format’. Then select ’24 bit’.
- Click ‘Apply’ followed by ‘Save changes’.
You will need to do this individually for every multimedia app you have.
7] Run Audio Playback Troubleshooter
In Windows 11, you need to use the Get Help app to run the Audio Playback Troubleshooter. For that, open the Get Help app and search for troubleshooting audio issues. Then, you can follow the screen instructions.
Play a media file to start your system’s multimedia app. and then follow this procedure to play the Audio Playback Troubleshooter in Windows 10:
- Press Win+S keys.
- Enter Troubleshoot and select ‘Troubleshooting’.
- Select ‘Troubleshoot audio playback’. It will troubleshoot the issue if it falls in scope.
Wait till your job is done.
I hope something helps!
Read: No audio input device found on Windows
How do I fix bad audio quality on Windows 11?
If you have a good pair of speakers, your problem is 50% solved. Following that, you need to adjust your sound, check the sound effects, set the audio output to a certain architecture, etc. Apart from this, you can check wires or connections, use a different port, if available, etc.
How do I fix the audio glitch in Windows 11?
To fix the audio glitch in Windows 11, you need to check the connection first. Then, you can set the audio format to the correct and supported level. However, if these do not fix your problem, you can disable audio enhancements.
Here is another guide that might help you troubleshoot Windows Sound and Audio problems.
In my case setting the audio to 24-bit format worked. Thanks