If sound randomly stops working on your Windows 11/10 computer, this article is for you. This issue usually occurs due to outdated sound drivers, a problem with the speaker, or the Audio Enhancement feature.

Fix Sound randomly stops working on Windows 11/10
Use the following fixes if your sound randomly stops working on your Windows 11/10 PC. Before you proceed with further troubleshooting steps, we suggest you check for Windows Updates and install them if any are offered.
- Run the Audio troubleshooter
- Disable and re-enable the Audio Enhancements
- Rollback the Sound driver
- Play audio in another application
- Restart Windows Audio Service
- Connect external speaker
- Uninstall and reinstall the Sound driver
- Hardware fault
Let’s start.
1] Run the Audio troubleshooter
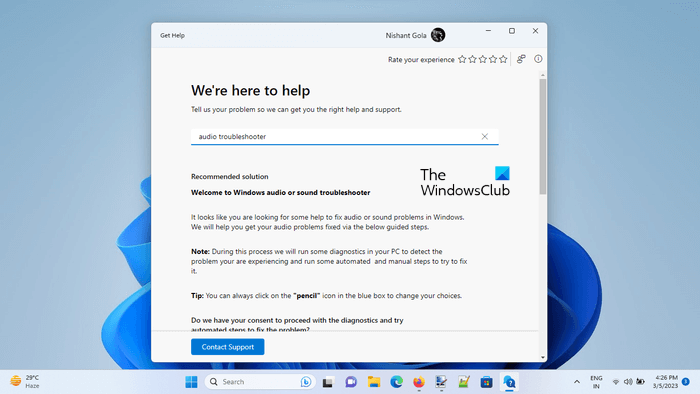
Running an audio troubleshooter by using the Get Help app can fix several issues. This is a built-in tool in Windows that helps to recognize audio-related issues. Run Get Help for Audio Troubleshooter on your Windows PC and see if it brings any changes.
2] Disable and re-enable the Audio Enhancements
Windows 11/10 comes with a built-in Audio Enhancements feature that you can use to increase the sound quality of particular audio hardware. However, this feature can also cause issues with some audio devices. In this case, you can disable and re-enable the Audio Enhancements feature to confirm whether this is the case with you. Use the following instructions:
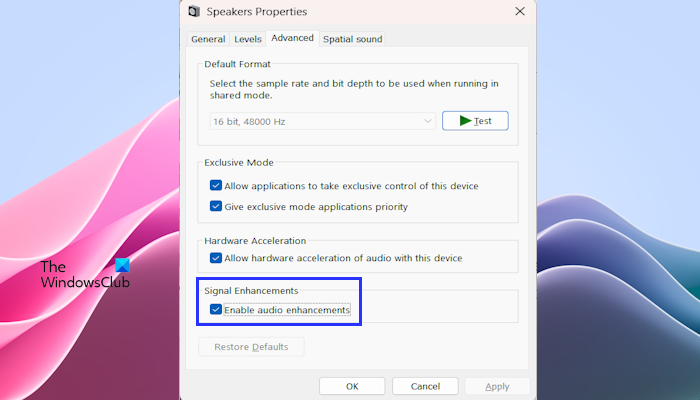
- Open the Control Panel.
- Type sound in the Control Panel search bar and click Sound.
- The Sound properties window will appear—Double-click on your Speakers to open its Properties.
- Click on the Advanced tab and uncheck the Enable audio enhancement box.
- Click Apply and then click OK.
Now, check if the issue gets fixed. If you are still facing the same issue, then you can re-enable the Audio Enhancement feature by following the same steps mentioned above.
Read: Sound is missing or not working on Windows
3] Rollback the Sound driver
We also suggest you rollback your audio driver. Sometimes sound issues can occur after a certain update. If this is the case, rolling back your audio driver can help to fix this issue (if available). To do so, use the steps mentioned below:
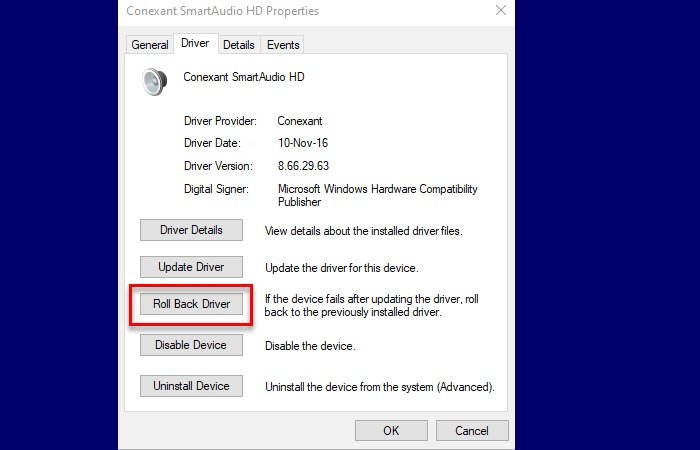
- Go to the Device Manager.
- Expand the Sound, video and game controllers.
- Right-click on your sound driver and select the Properties option.
- Select the Driver tab.
- Check if the Roll Back Driver button in your battery driver properties is clickable or not. If yes, click on that button.
- Now, follow the on-screen instructions.
- Restart your PC.
4] Play audio in another application
Sometimes issues are related to a particular application. To confirm whether a particular application is the culprit or not play the sound in another application. If sound starts working when you play audio in another application, it suggests the previous application you used might conflict with the audio system. Try reinstalling that specific application to see if it resolves the issue.
5] Restart Windows Audio Service
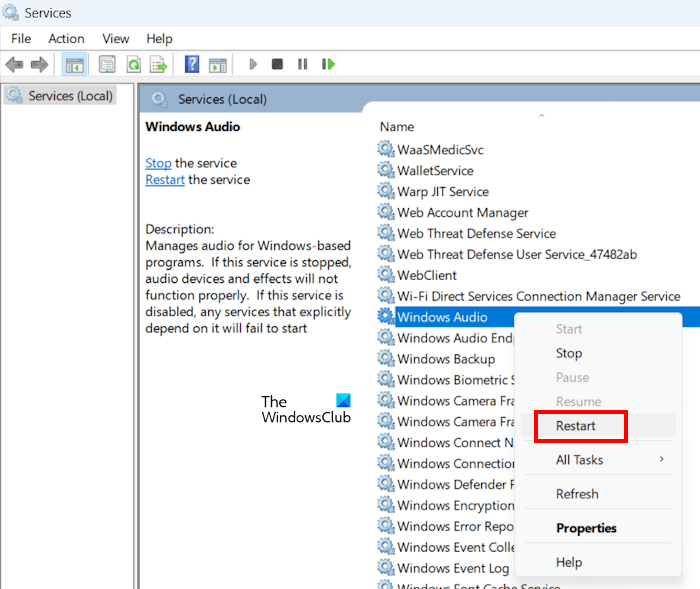
The Windows Audio service helps to manage running audio programs in Windows 11/10. If this service is stopped or disabled on your Windows PC, it will affect the sound devices. In this case, you need to start/restart the Windows Audio service. Use the instructions mentioned below:
- Press the Windows key + R to open the Run dialog.
- Type “Services.msc” and click OK.
- In the Services window, scroll and locate the Windows Audio service.
- Double-click on the Windows Audio service and select Properties.
- In the Properties window, click the drop-down on the Startup type and select Automatic.
- Next, make sure the service is running. If the service is already running, right-click the entry and select Restart from the context menu.
- Click Apply > OK to save changes.
- Restart your PC.
You can also try restarting other related services. For example, in Dell computers, you may find a service named Waves MaxxAudio Service. Restarting this service can fix the issue.
6] Connect an external speaker
There is a possibility that your internal speaker is faulty. To check whether there is a problem with the internal speaker of your Windows PC connect an external speaker. If your sound does not stop randomly and works well with an external speaker, then your internal speaker is faulty. In this case, take your laptop to an expert for repair.
7] Uninstall and update the Sound driver
An outdated sound driver can cause a sound problem. Make sure your sound driver is up to date. However, before you update your sound driver, uninstall your existing sound driver. To do so, use the below steps:
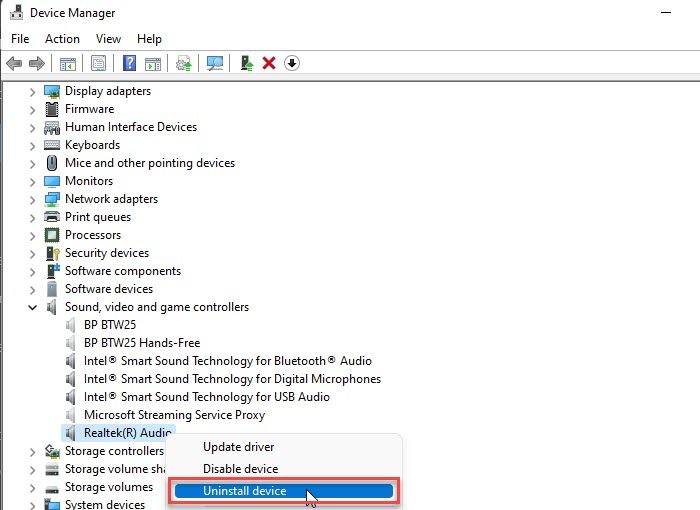
- Go to the Device Manager.
- Expand the Sound, video and game controllers.
- Right-click on your sound driver and click on Uninstall device.
After uninstalling the sound driver, download the latest sound driver from the manufacturer’s website. Once you download the latest sound driver install it on your PC and check if it brings any changes.
9] Hardware fault
If none of the solutions work for you, then there might be a hardware fault. In this situation, take your Windows PC to a professional for repair. If your Windows PC is under warranty, then take it to the service center.
How do I update my audio driver in Windows 11?
To update your audio driver for Windows 11, open the Device Manager. Expand the Audio inputs and outputs. Right-click on your audio driver and click on Uninstall device. After uninstalling it, you can download the latest version of the audio driver from its manufacturer’s website.
How do I reinstall my sound driver?
You can reinstall your sound driver from Device Manager. Go to the Device Manager and expand the Sound, video and game controllers. Right-click on your sound driver and click on Uninstall device. After uninstalling the sound driver, restart your PC to reinstall your sound driver. Alternatively, you can Scan for hardware changes.
Read next: Fix random Notification Sound keeps playing on Windows.