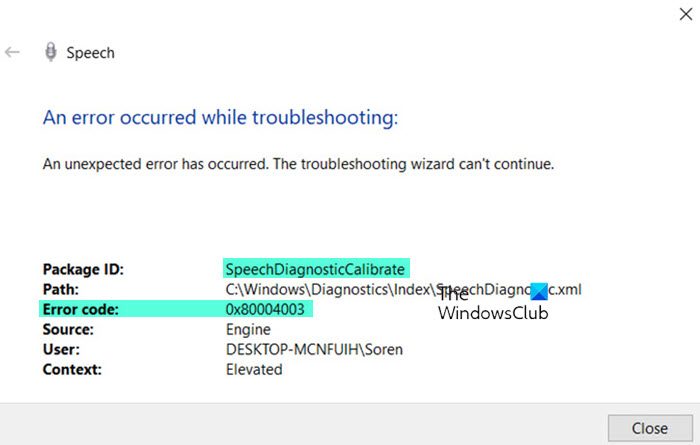
Is the microphone on the laptop not recognizing and picking up your speech. If it displays Speech Diagnostic Calibration Errors 0x80004003 or 0x800706BE, it could be because of outdated/corrupt audio drivers and applications not having access to the microphone. In this post, we have suggested some troubleshooting methods to help you resolve this error.

Fix Speech Diagnostic Error Codes 0x80004003 or 0x800706BE
If you see Speech Diagnostic Errors 0x80004003 or 0x800706BE on your Windows 11/10 laptop, you can follow the below methods to fix this issue:
- Run the Speech Troubleshooter in Clean Boot State
- Update Audio and Microphone Drivers
- Set Microphone as the Default Device
- Allow the App to Access your Microphone
Let’s see these methods one by one.
1] Run the Speech Troubleshooter in Clean Boot State

These error codes are seen when you run the Speech Troubleshooter. Try running the Speech Troubleshooter in Clean Boot State or Safe Mode with Networking and see if it helps.
Microsoft has developed the Speech Troubleshooter utility to check the speech-related issue in the system. It fixes the issue without requiring much effort from the users. Follow the below steps to run the speech troubleshooter.

- Click on the Window icon and then open the Settings
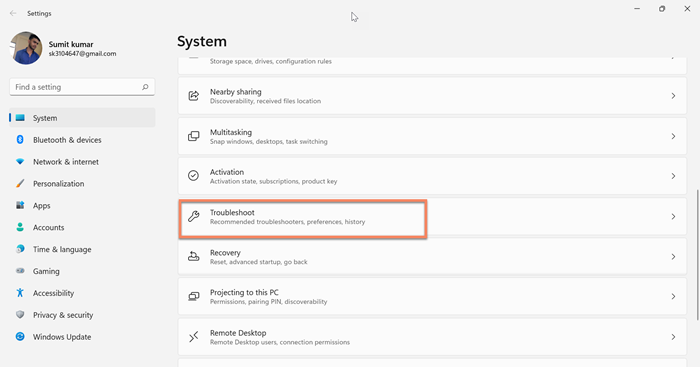
- Scroll down the page and you will see the Troubleshoot option in the left pane
- Open the Troubleshoot option
- Click on the Other troubleshooters
- Scroll down the page to locate the Speech troubleshooter
- Click on the Run button associated with it and wait for the scanning to complete
- If the troubleshooter shows you any problem, click on the Apply this fix to implement the solution.
If the troubleshooter fails to identify any issue, it means there is no problem on the troubleshooter side, then switch to the next method.
2] Update Audio and Microphone Drivers
You can correctly & properly update device drivers in Windows 11/10 in the following ways:
- You may check for Driver & Optional Updates via Windows Update to update your drivers
- You may visit the manufacturer’s site to download the drivers.
- Use a free driver update software
- If you have the INF driver file already on your computer then:
- Open Device Manager.
- Click the Sound, Video and Game Controller to expand the menu.
- Then choose the relevant Audio driver and right-click on it.
- Select Update Driver.
- Follow the on-screen wizard to finish updating your audio drivers.
Read: Skype Audion or Microphone not working
3] Set Microphone as the Default Device

You can also find this error when your microphone is not set as the default device. In this case, your computer will have an issue while picking up your speech. You can simply set your microphone as a default device by making a few changes to your Windows PC. Follow the below steps to change it.
- Click on the Window icon, type the control panel in the search bar, and open it
- Change the View by to the Large icons
- Click on the Speech Recognition > Advanced speech options
- Now, click on the Audio input under the Microphone
- Go to the Playback tab and right-click on the microphone you are using and click on the Enable
- Now, right-click on your microphone again, and then click on the Set as Default Device and Set as Default Communication
- Go to the Recording tab and right-click on the microphone you are using
- Click on the Set as Default Device and Set as Default Communication Device
- Click OK to save the changes
- Again go to the Advanced speech option > Speech properties and click on the Configure Microphone under the Microphone
- Choose your microphone
- Finally, click OK to save the change and looks check if the issue is resolved
4] Allow App to Access your Microphone

You can also face this error when the application you are using is not allowed access to your microphone. In this case, you need to allow apps to access your microphone. So that you will not face this error on the application while using. So, just try to do it by using the following steps.
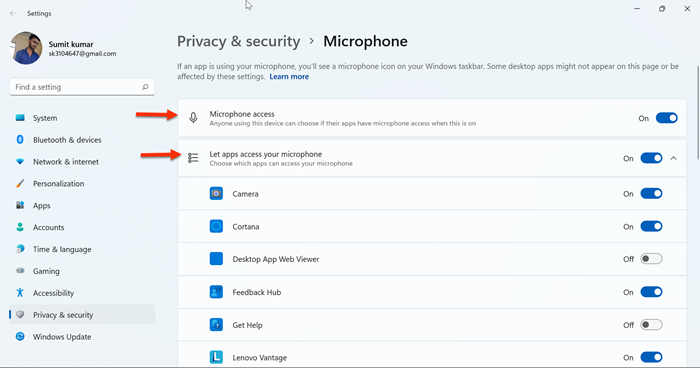
- Click on the Window icon and type Microphone privacy setting and open it
- Turn the toggle on for Microphone access and Let apps access your microphone
- Expand the Let apps access your microphone option and enable microphone access for the application you want to use
Read: Mic or Microphone not working on Windows
What does error 0x800706be mean?
Error 0x800706be can also be seen in Windows Update, Xbox, and the Printer too. You may face this error 0x800706be on your computer screen after running Windows Update. The most likely cause of this error is the corruption in Windows system files & components. Running the Windows Troubleshooters and the System File Checker are the best ways to resolve these issues.
Read: HP laptop internal microphone not working
How to fix error code 0x800706be?
Error 0x800706be in Windows update might be due to corrupted Windows Update files or registry entries. By using the following methods you can fix this error.
- Repair Windows Update using DISM
- Restore Windows to a prior good point
- Run the Windows Update troubleshooter
- Restart Windows Update services
- Clear SoftwareDistribution folder contents.
Read:
Leave a Reply