Spellcheck is a wonderful tool that helps users correct misspelled words in their documents without putting in much effort. It is an essential feature in Microsoft Office and is provided in all apps, including Word, Excel, PowerPoint, etc.
However, it can get really troublesome when the spellcheck doesn’t work correctly. Earlier, we discussed spellcheck not working in Word and how you can fix it. Now, we will show you what to do when the Spellcheck tool is not working in Excel.
How do I get spell check to work in Excel?
You can manually use the spellcheck tool in Excel from the Review tab or by pressing the F7 key. Besides that, you can also enable the autocorrect feature to automatically correct typos, capitalization, and spelling mistakes in your worksheet. You can go to File > Options, move to the Proofing tab, and click on the AutoCorrect Options button to configure the options according to your requirements.
But, many Excel users have complained that the spellcheck tool is not working correctly. Even after clicking on the Spelling tool, nothing happens. This issue can occur when the cell contains a formula or if your worksheet is protected. Or, if the Custom Dictionaries option is disabled in your settings.
If you see a grayed-out Spelling button, it might be the case that the selected text has no text in it or the worksheet is password protected. Now, in any case, we got you covered. In this post, we bring you all working fixes to resolve this issue.

Fix Spell check not working in Excel
Here are the methods that you can use if spellcheck is not working in Microsoft Excel on your Windows PC:
- Check if the cell contains a formula.
- Unprotect the worksheet.
- Enable Custom Dictionaries.
1] Check if the cell contains a formula

It might be the case that the spell checker tool is not working in cells containing formulas. So, you can try using the Spellcheck tool manually and see if it helps. You can also use this method when the autocorrect function is not working in Excel.
Here’s what to do:
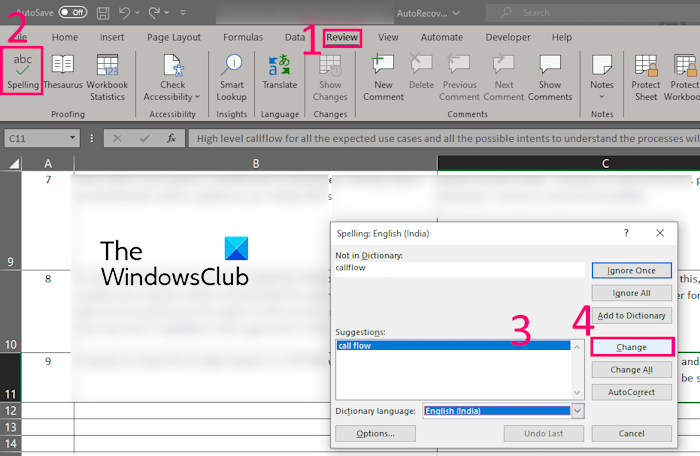
- First, go to the target formula cell and double-click on the consisting word in the formula.
- Now, click on the Review tab and select the Spelling option.
- After that, you will get some spelling suggestions in the newly appeared dialog box.
- Next, you can choose the correct spelling suggestion and then press the Change button to correct the spelling in the formula.
Read: Fix OneNote Spell Checker not working.
2] Unprotect the worksheet

If your worksheet is password-protected, you might not be able to use the spellcheck tool. When a workbook is protected, there are limited actions that can be performed on it, such as you can only view the worksheet. So, unprotect your worksheet and then check if the problem is resolved.
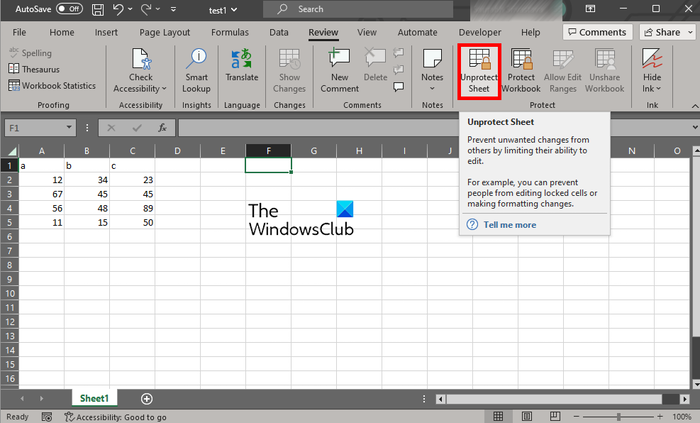
You can remove password protection from an Excel worksheet from the Review tab. Go to this tab from the ribbon and then press the Unprotect Sheet button. You can now enter the correct password and press the OK button to unlock it. See if the spellcheck tool has started working now.
To unprotect an entire workbook, you can use the Review > Unprotect Workbook option and then enter the right password. See if this helps.
Read: Spell check not working in Microsoft Edge.
3] Enable Custom Dictionaries

You might be experiencing this issue because you have not enabled custom dictionaries in Excel. Hence, if the scenario is applicable, you can enable custom dictionaries and then see if the issue is fixed.
Here are the steps to do that:
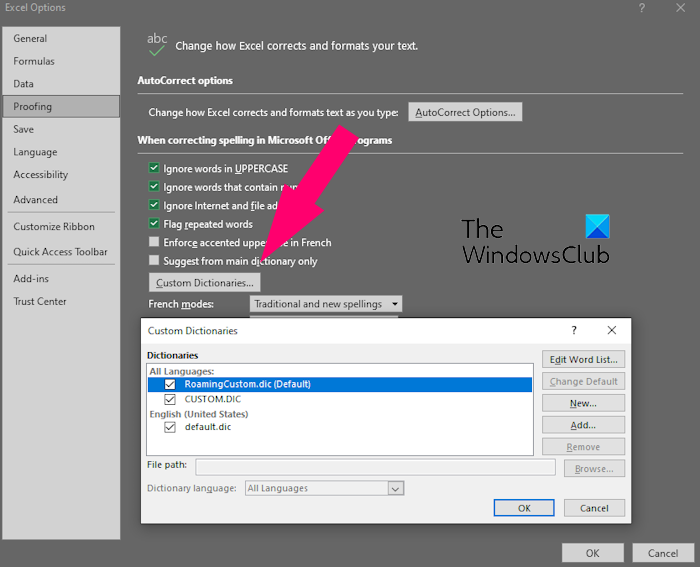
- First, open Excel and go to the File tab.
- Now, click on the Options from the bottom left section.
- After that, move to the Proofing tab in the Excel Options window.
- Next, click on the Custom Dictionaries option.
- Then, tick all the checkboxes in the prompted window and press the OK button to save the change.
- Finally, go back to your workbook and see if you can use the spellcheck tool correctly or not.
See: Fix Google Docs Spellcheck not working properly.
I hope the above fixes help you get the spellcheck tool to work correctly in Excel.
Why is my AutoCorrect not working in Excel?
If the AutoCorrect function is not working in Microsoft Excel, it is likely that you haven’t configured the respective options correctly. So, set up the autocorrect options correctly. For that, open Excel and click on File > Options. After that, move to the Proofing tab from the left-side pane and then tap on the AutoCorrect Options button. Now, from the AutoCorrect tab, make sure to tick the checkbox associated with the Replace text as you type option and press the OK button.
Now read: Fix Spell Check not working in Outlook.
Leave a Reply