Some PC users have reported they noticed that Spell Check is not working in Outlook on their Windows 11 or Windows 10 computers. This post offers working fixes to resolve the issue.

You may encounter this issue due to any of the following reasons:
- The Automatic Spelling and Grammar feature is off.
- Incorrect language.
- A corrupt patch or installation of Outlook.
- The Outlook version is old.
- An update is pending for Outlook.
- Any other third-party add-ins have stopped the grammar checker from working.
- Malware attacks
Spell Check not working in Outlook
If Spell Check is not working in Outlook on your Windows 11/10 PC, then the following suggestions we have outlined below in no particular order should help you resolve the issue on your system.
- Restart Outlook
- Set Outlook Auto Check
- Change the default language in Outlook
- Run Spell Check manually
- Disable Message Ignoring
- Repair Outlook
Let’s see these suggestions in detail. Restart Outlook after each troubleshooting step to ensure that any changes are applied.
1] Restart Outlook
If Spell Check is not working in Outlook, you can restart Outlook and see if that helps.
2] Set Outlook Auto Check

Make sure Outlook is set to check your spelling every time you send an email message by following these steps:
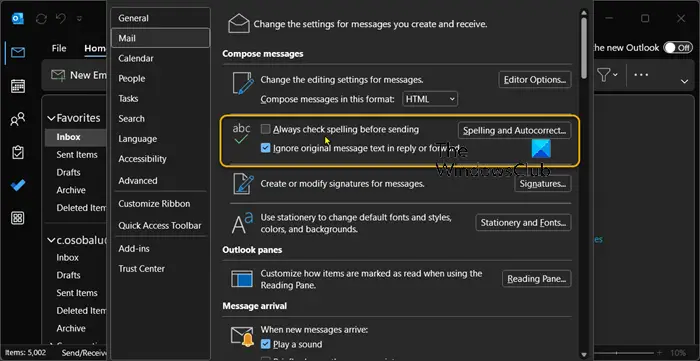
- Select File > Options > Mail.
- Under Compose messages, check the Always check spelling before sending box.
You may also want to check or uncheck the Ignore original message text in reply or forward so it won’t flag spelling and grammar in those cases. If you select this automatic function, it will run when you select Send for each message.
3] Change the default language in Outlook

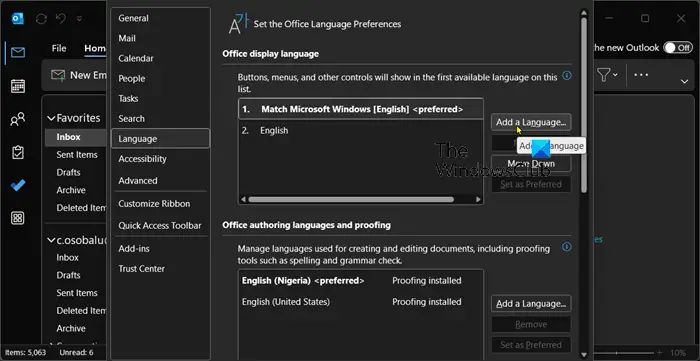
A linguistic difference could give the impression that the spell checker isn’t functioning properly. You might want to double-check what language Outlook is set to since it uses MS Word for writing. For instance, many terms are spelled somewhat differently in US English and UK English.
To perform this task, click File > Options > Language.
Read: How to change Spell Check language in Outlook
4] Run Spell Check manually
You can check for spellings with the F7 shortcut key on your keyboard or you can click the Review tab from the menu bar and click on the Spelling & Grammar.
In a new email message, type many incorrect words. Then, choose Review > Spelling & Grammar to manually run the Spelling and Grammar check. This enables you to check the spell check’s functionality.
5] Disable Message Ignoring
Verify whether spell check overlooks any particular portions of your email messages. The tool might not function if Outlook is configured to disregard text in replies and forwarded messages.
To perform this task, do the following:
- Go to File > Options > Mail.
- Clear the Ignore original message text in the reply or forward option under Compose messages.
- Click OK.
6] Repair Outlook

This solution requires you to repair Microsoft Outlook and see if that helps in resolving the issue at hand. To repair Outlook on your Windows 11/10 PC, do the following:
- Open Control Panel.
- Click Programs and Features.
- Right-click the Office program that you want to repair, and select Change.
- Next, click Repair > Continue. Office will start repairing the apps.
- Restart PC after the repair operation completes.
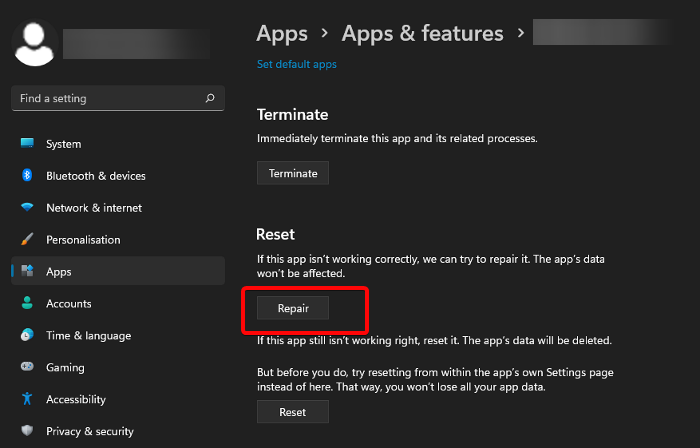
You can also repair Office Outlook via the Settings app on Windows 11/10. Here’s how:
- Open Settings for Windows 11 or open Settings for Windows 10 (if unable, see Windows Settings not opening or working).
- Select Apps and Features.
- Scroll to find your Microsoft Office installation.
- Click on the entry and click on Modify.
- On the popup dialog, choose Quick Repair or Online Repair.
- Click on the Repair button.
Alternatively, you can reset Outlook.
We hope this helps!
Read next: How to limit Spell Checks to Main Dictionary in Word or Outlook
Why isn’t my spell check working?
If the spell check in Microsoft Word isn’t working, check that the right language is selected under Options. Also, check to see if “Check spelling as you type” is enabled and if your chosen document has a spell-check exception.
Read: How to disable Spell Check in Office 365
How do I add to AutoCorrect in Outlook?
To add an entry to the AutoCorrect list, follow these steps:
- Go to the AutoCorrect tab.
- Select the + sign at the bottom left of the dialog and type a word or phrase that you often misspell in the Replace column.
- In the With column, type the correct spelling of the word.
- Press Enter.
Also read: How to customize Spelling and Grammar Checking Settings in Outlook.
Leave a Reply