Many users complain that Spotify Local Files are not showing on their computers. The Local Files are the ones you add to the Spotify player from your computer. As per the reports, Spotify is either not able to fetch some of the files or show them to the user. In this post, we will discuss this issue and see what you can do to resolve it.

Fix Spotify Local Files not showing on Windows PC
If Spotify Local Files are not showing, execute the following solutions to resolve the issue.
- Turn on Show Local Files
- Configure the Pref file
- Delete Spotify Cache
- Allow Spotify through Firewall
- Move Local Files to a different location
- Reinstall Spotify
Let us talk about them in detail.
1] Turn on Show Local Files

First of all, we need to check if the Show Local Files option is enabled on Spotify. If the feature is disabled in Spotify Settings, you won’t be able to see the files. To do the same, follow the prescribed steps.
- Open Spotify.
- Click on your profile pic and then select Settings.
- Scroll down to Local Files and then enable the toggle of Show Local Files.
You can also add the location where your songs are stored by clicking on the Add a source button. If this doesn’t work, move to the next solution.
2] Configure the Pref file

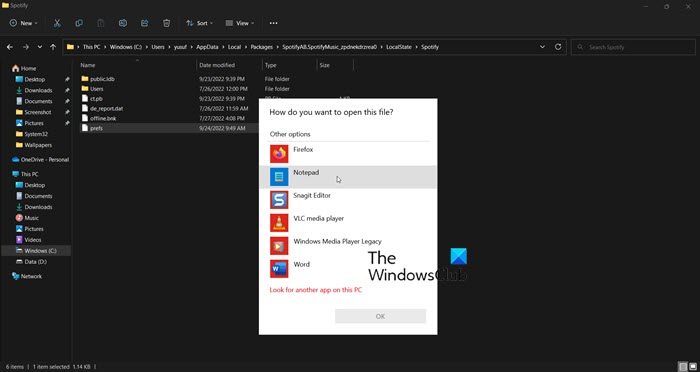
Next up, you need to configure the Pref file of Spotify as that will resolve the issue for you. This solution worked for a lot of users and might work for you as well. However, before that, close Spotify, not just by clicking on the Cross button but by opening Task Manager, right-clicking on Spotify and selecting End Task. Then open File Explorer, click on View > Show > Hidden items, and go to the following location.
If you have downloaded it from Microsoft Store
C:\Users\<user>\AppData\Local\Packages\SpotifyAB.SpotifyMusic_zpdnekdrzrea0\LocalState\Spotify
If you downloaded Spotify from the website
C:\Users\<user>\AppData\Roaming\Spotify
Look for a file called Pref, open it with Notepad or Notepad++, add the following string to the 4th line of the text file and save the changes.
ui.experience_override="classic"
Now, we need to make the file Read-Only. To do the same, right-click on the Pref file, select Properties, tick the Read-only and click Apply > Ok.
Finally, launch Spotify and hopefully, you will be able to see the Local Files.
3] Delete Spotify Cache

You may also encounter weird issues if Spotify caches are corrupted. However, the good news is, if we delete the cache, the newly created ones will not be corrupted. Also, since we are not deleting the data, but the cache, you won’t notice any difference in the Spotify app.
- Open the Spotify app.
- Click on your profile and select Settings.
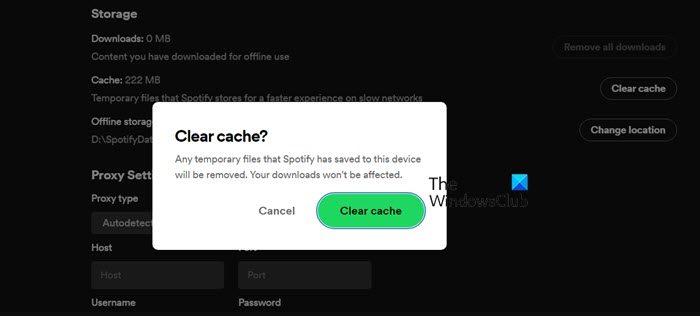
- Scroll down to reach Storage > Cache.
- Click on the Clear Cache button and then confirm your action by clicking on the Clear Cache button again when prompted.
Once your cache is cleared, open the app and check if the issue is resolved. Hopefully, this will do the trick for you.
4] Allow Spotify through Firewall
In case you are not aware of this, Windows Firewall always scans every app that you install and keeps an eye on its activities. It does this to make sure that your computer is always safe and sound and that no app is giving you a feature in exchange for your data. However, the same can be said in this case, as you yourself are giving Spotify the rights to play the files stored on your computer. Therefore, if you want Spotify to fetch Local Files, you need to allow it through the Firewall. To do the same, follow the prescribed steps.
- Search out Windows Security from the Start Menu.
- Go to Firewall & network protection > Allow an app through firewall.
- Click on Change Settings.
- Look for Spotify Music and allow it through the Public and Private networks.
Finally, save your changes and see if the issue is resolved.
5] Move Local Files to a different location
Spotify might fail to recognize the Local Files because of some sort of glitch. In order to resolve the issue in this case, we need to move the files to a different location and then move them back to their current location and see if that works. So, first of all, go to the address where your Local Files are stored, and copy and paste them somewhere else. Now, delete all the files from the current location. Finally, move back all the files to their original location. This will force Spotify to refresh its files and in the process, your issue might get resolved.
6] Reinstall Spotify
If nothing works, your last resort is to reinstall the Spotify app and see if that works. This should be your last option because we don’t want you to lose your data and system configuration for no reason. That being said if nothing worked, go ahead and uninstall Spotify. To download a fresh copy of the app, you can either go to apps.microsoft.com or Spotify.com. Finally, after reinstalling the application, check if the issue is resolved.
Hopefully, this will do the trick for you.
Also Read: How to see Spotify listening history on Desktop and Website
How do I get local files on Spotify for Windows?
Adding Local Files is pretty easy on Spotify for Windows, all you have to do is access the Settings, which can be done by clicking on your profile and then selecting Settings. Then, scroll down to Local Files, turn on the toggle of Show Local Files, click on Add a source, go to the location where your files are stored, and then add the folder.
Why won’t some of my local files show up on Spotify?
If some of the Local Files are not showing up on Spotify, then try to refresh the library. To do the same, you can follow the 5th solution mentioned in this post. If that doesn’t work, there are half a dozen solutions listed here, do follow them to resolve the issue. Hopefully, you will be able to resolve the issue using the solutions mentioned in this post.
Leave a Reply