Is your microphone not working in the Squad game? The Squad game is a multiplayer first-person shooter video game loved by millions of gamers. But, some Squad players have recently reported that their microphone is not working in the game and they are not heard by other players. This issue is very annoying as it keeps you from communicating with your fellow players.

The problem is most likely to occur if your microphone is not working fine or is poorly connected. However, there can be some other reasons for this issue. Now, if you are experiencing the same problem, we got you covered. In this post, we are going to show you multiple fixes to get your microphone working again in Squad.
Before we talk about fixes, let and try and understand the scenarios that might trigger this issue.
Why is my microphone not working in Squad?
Here are the potential causes why your microphone might not work in Squad:
- If your microphone is physically damaged, it won’t work. So, make sure your microphone is in proper working condition.
- In case your mic is not connected to your PC properly and securely, you will face the issue at hand. Hence, properly connect your mic or try changing the USB port to connect your headset to your PC.
- You are likely to experience this issue because of out-of-date sound drivers. If the scenario is applicable, update your audio drivers to the latest version.
- Some sound settings on your PC can also be a reason for the same issue. So, reconfigure your sound settings like setting your default input audio device, changing the audio format, disabling unused input devices, etc.
- Your in-game settings can be another cause of the issue at hand. Hence, try modifying your game settings on Steam to fix the issue.
- If you are dealing with corrupted and broken game files, you might face this problem. So, verify the integrity of your game files to fix the issue.
Fix Squad mic not working on Windows PC
If your microphone is not working in the Squad game on Windows 11/10 PC, follow these suggestions to resolve the issue.
- Make sure your mic is properly connected to your PC.
- Configure your sound settings.
- Make sure your sound driver is up-to-date.
- Check and modify your in-game settings on Steam.
- Detect Audio Device on Steam.
- Verify the integrity of game files.
Let us discuss the above fixes in detail now.
1] Make sure your mic is properly connected to your PC
The first thing you should try to fix the issue at hand is to ensure that your mic is working fine and is properly connected to your PC. So, check if your microphone cables are properly connected. You can test your mic in other applications and see if it works fine. Also, you can plug your mic into another device like a tablet or smartphone and check if you are able to speak through it or not.
In case you have a wired headset, try plugging it into a different UBS port correctly and see if the issue is resolved or not. If you are using a wireless headset, unplug and replug the UBS wireless receiver and then connect it.
Also, it is recommended to connect your mic before you open the game. So, exit the game, connect your headset, and then relaunch the Squad game to see if the problem is fixed.
If there is no issue with your microphone and it still is not working in Squad, you can try the next potential fix to resolve the problem.
Read: Fix Discord Mic not working in Windows
2] Configure your sound settings
The next thing you should do is check whether your mic is set as the default input device or not. Generally, the connected microphone is set as the default input device. But, if your sound settings are changed due to some Windows updates or something else, you are likely to face the issue at hand. Plus, there are some other sound settings that you need to modify, e.g., disable unnecessary input devices, etc. Hence, you can try reconfiguring your sound settings to fix the issue.
You can try reconfiguring your sound settings using the below steps:
- Firstly, open Control Panel and tap on the Sound category to launch the Sound window.
- Next, navigate to the Recording tab, right-click on the unused devices, and press the Disable option.
- After that, select your active microphone in the Recording tab and tap on the Set Default option.
- Now, right-click your primary microphone and click the Properties button.
- In the new Microphone Properties window, move to the Levels tab and make sure the microphone volume slider is set to maximum.
- Then, go to the Advanced tab in the Microphone Properties window and choose the 2 channel, 16 bit, 48000 Hz (DVD Quality) option under Default Format.
- Finally, press the OK to save the changes.
If this method doesn’t help, you can move on to the next potential solution to fix the issue.
Read: Fix Oculus Quest 2 Mic not working on Windows PC.
3] Make sure your sound driver is up-to-date
If you have outdated audio device drivers on your system, you are likely to face such issues. You have to keep updating your device drivers to make sure there are no device malfunctions. So, if the scenario is applicable, you can try updating your audio drivers and check if the issue is resolved or not.
You can update your audio drivers via the Settings app. Just launch the Settings app and then go to the Windows Update > Optional Updates section. Here, you will get the pending driver updates which you can download and install.
If you prefer getting drivers from an official source, visit the official website of the device manufacturer. On the website, you can search for the audio driver model and then download and install the driver on your PC.
Another method is to open the Device Manager app, locate and expand the Sound category, and right-click on your active input audio device. Then, select the Update Driver option and complete the update process. A free third-party driver updater can also be used to update audio and other device drivers.
If the problem still persists even after updating audio drivers, there must be some other underlying cause of the issue. So, move on to the next potential fix.
See: Microphone not working in Microsoft Teams.
4] Check and modify your in-game settings on Steam
Your in-game settings on Steam can also be a reason for the mic not working in Squad. So, you can check your in-game settings and change them accordingly. Here’s how to do that:
- Firstly, open the Steam app and select the Friends menu option in the top left corner.
- Now, click on the View Friends List option and press the cogwheel icon present next to the chatbox.
- After that, go to the Voice tab from the left pane.
- Next, check the Voice Input Device setting and ensure that your active microphone is selected. If not, select the microphone you are currently using and exit the settings window.
- Finally, relaunch the Squad game and see if the mic is working fine now.
If you still face the same issue, move on to the next potential solution.
Read: Fix Dread Hunger Voice Chat or Mic is not working.
5] Detect Audio Device on Steam

You can use the Detect Audio Device feature on Steam to fix the issue at hand. It helps you fix the sound issues in your games. Here’s how to do that:
- Firstly, properly connect your mic to your PC before opening the game.
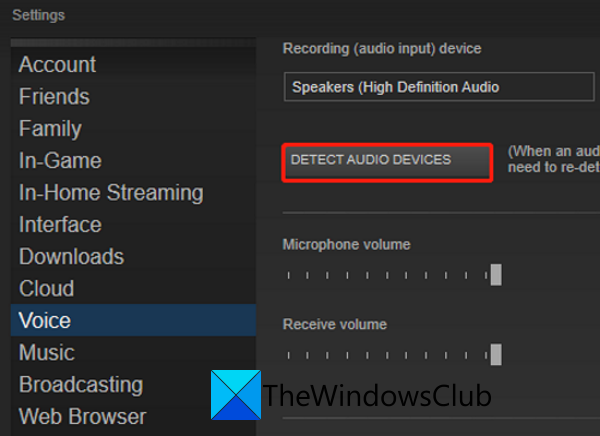
- Now, start the Steam app and click on the Steam menu option from the top-left corner.
- Next, tap on the Settings option and go to the Voice tab.
- After that, press the Detect Audio Device button present in the right-side panel.
- Finally, reopen your game and try speaking through your microphone.
If this doesn’t work, we have one more fix for you. So, move on to the next solution.
Read: Fix Oculus Quest 2 Mic not working on Windows PC.
6] Verify the integrity of game files

If none of the above solutions worked for you, you can try verifying the integrity of your game files. You might be dealing with corrupted and missing game files which are causing the problem at hand. So, verifying and repairing the game files should fix the issue. Here’s how to do that:
- First of all, open Steam and navigate to LIBRARY.
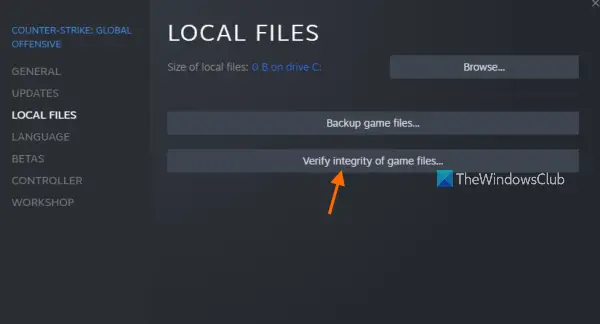
- Now, right-click on the Squad game and select Properties from the appeared context menu.
- Next, go to the LOCAL FILES tab and click on the VERIFY INTEGRITY OF GAME FILES button.
- When the verification is done, relaunch your game and see if the issue is resolved or not.
Hopefully, your mic will now start working fine.
How do I test my mic on Squad?
To test your microphone in Steam, open the Steam client and go to the settings menu. Under the Voice tab, you will find the Test Microphone button. Click on it to initiate the test, speak into your microphone, and see the level indicator moving. This indicates that the microphone is working correctly. If the level indicator does not move, check your microphone’s connection. If the volume is on and if the microphone is not mute.
Now read: Ground Branch Mic not working.