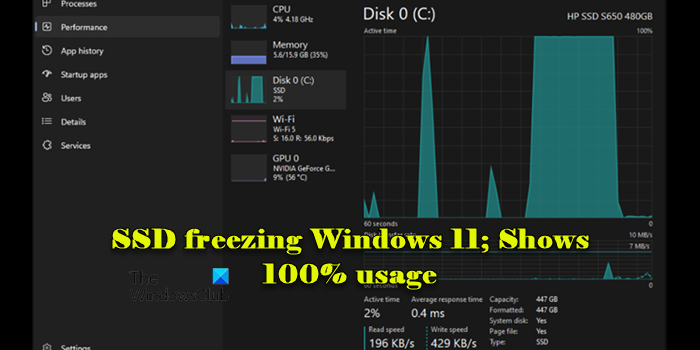
This post discusses what to do if your SSD is freezing Windows 11 and showing 100% usage. A few users have been experiencing a persistent issue where their computer’s disk usage spikes up to 100% with 0 kb/s read and write, every few seconds or sometimes at irregular intervals, causing the entire system to freeze. This disrupts productivity and makes their computer nearly unusable.
Why is my SSD always at 100% usage?
If your SSD shows 100% activity in the system’s resource monitor or Task Manager but no actual data read or write operations are occurring, it could indicate a system or software issue. This may include problems like corrupted system files, outdated drivers, background processes, malware infections, insufficient RAM, or a failing SSD.
Fix SSD freezing on Windows 11
If your SSD is causing Windows 11 to freeze and shows 100% usage, check Task Manager for high disk usage by specific applications or services and disable any unnecessary startup programs that might be using disk resources. Also, enable the TRIM command and AHCI mode on your Windows 11/10 PC, and then monitor your SSD’s performance to see if the 100% usage issue is resolved.
If the problem continues, use these solutions to fix the issue:
- Adjust Power Settings
- Update SSD firmware and drivers
- Check disk health
- Move Windows to a new drive and wipe the SSD
- Clean Install Windows
Let us see this in detail.
SSD shows 100% usage
1] Adjust Power Settings
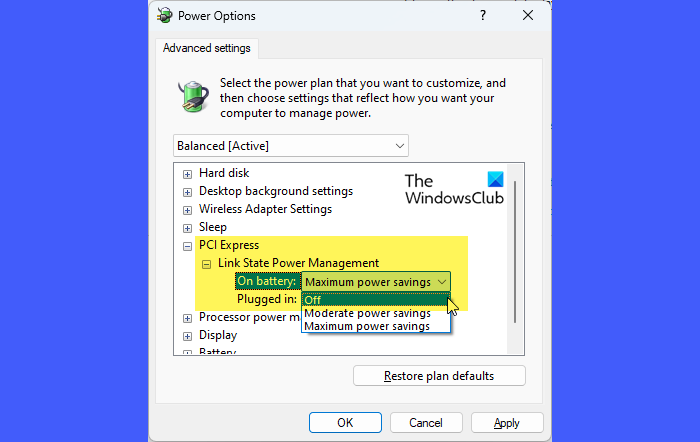
Some power-saving features, such as PCI Express Link State Power Management and AHCI Link Power Management, can cause the SSD to enter a low-power state too aggressively, leading to performance issues and freezing. Adjust these power settings and see if it helps resolve the issue.
AHCI Link Power Management is a hidden power option. To modify this option, you need to first enable it on your Windows 11/10 PC.
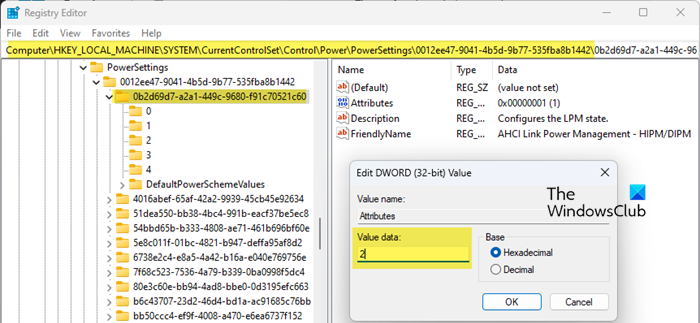
Open the Registry Editor (Win + R > regedit > Enter) and navigate to the following key:
HKLM\SYSTEM\CurrentControlSet\Control\Power\PowerSettings\0012ee47-9041-4b5d-9b77-535fba8b1442\0b2d69d7-a2a1-449c-9680-f91c70521c60
Right-click Attributes > Edit, and change the Value data from 1 to 2.
Next, navigate to the following key:
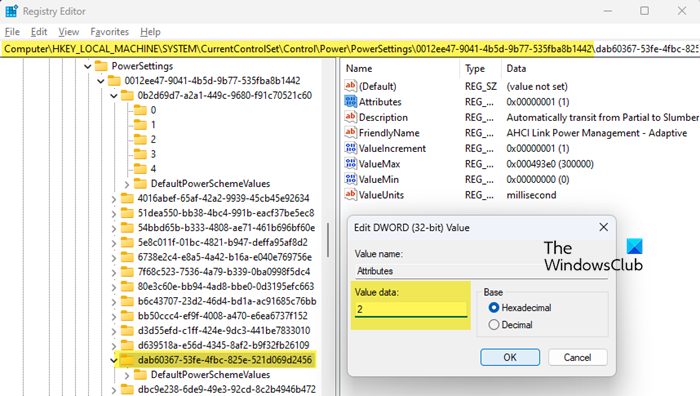
HKLM\SYSTEM\CurrentControlSet\Control\Power\PowerSettings\0012ee47-9041-4b5d-9b77-535fba8b1442\dab60367-53fe-4fbc-825e-521d069d2456
Again, right-click Attributes > Edit, and change the Value data from 1 to 2. Exit Registry Editor.
Next, open Control Panel and navigate to Hardware and Sound > Power Options > Change plan settings (next to your selected power plan). Click on Change advanced power settings.
You should now see the AHCI Link Power Management – HIPM/DIPM and AHCI Link Power Management – Adaptive options under ‘Hard disk’ in the Power Options window.
Change the HIPM/DIPM setting to Active (for both ‘On battery’ and ‘Plugged in’ options). This disables power management for AHCI.
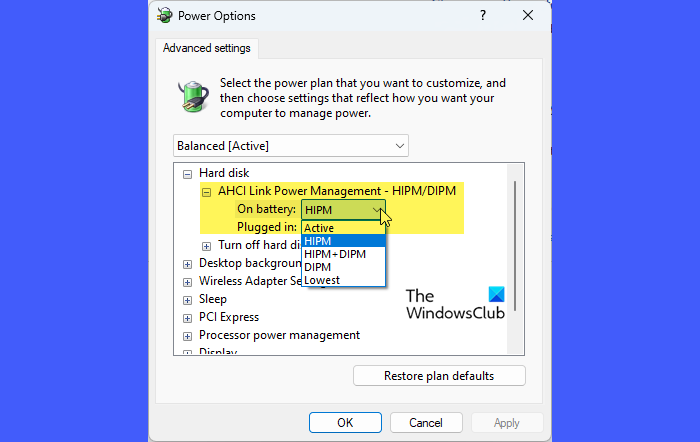
Then, set Adaptive to 0 milliseconds.

Finally, under PCI Express, change Link State Power Management to Off. Reboot your PC and see if the issue disappears.
Read: How to check SSD Lifespan on your Windows 11 computer
2] Update SSD firmware and drivers
Manufacturers often release firmware and driver updates to enhance device performance, fix bugs, and improve compatibility with operating systems. By ensuring that your SSD firmware, SSD driver, and storage controller driver are up-to-date, you may resolve issues related to freezing and high disk usage in Windows 11.
Open Device Manager (Right-click Start button > Device Manager) and expand the Disk drives section. Right-click on your SSD and select Update driver. Choose ‘Search automatically for updated driver software’ and follow the prompts to install any updates.

Next, expand the Storage controllers section, right-click the storage controller (e.g., Intel SATA Controller), and repeat the above steps to update storage controller drivers. You can also go to the manufacturer’s website to download the latest drivers.
To update your SSD firmware, visit the manufacturer’s website, download the firmware update tool for your specific SSD model, and run the tool following the on-screen instructions.
Ensure you back up your data before proceeding and restart your computer after the update is complete.
Read: SSD Optimization Tips for better performance on Windows PC
3] Check disk health
Checking disk health can help determine if your SSD has underlying issues such as excessive wear, temperature issues, or many bad sectors. Though SSDs handle bad sectors differently from traditional HDDs, often marking them as ‘unusable’ and reallocating data to healthy sectors automatically, despite this, running diagnostics and repair tools can help improve its stability and performance, potentially fixing issues like SSD freezing in Windows 11.
Use tools like WMIC, CrystalDiskInfo, Samsung Magician, or the SSD manufacturer’s diagnostic tool to assess the overall health of your SSD.
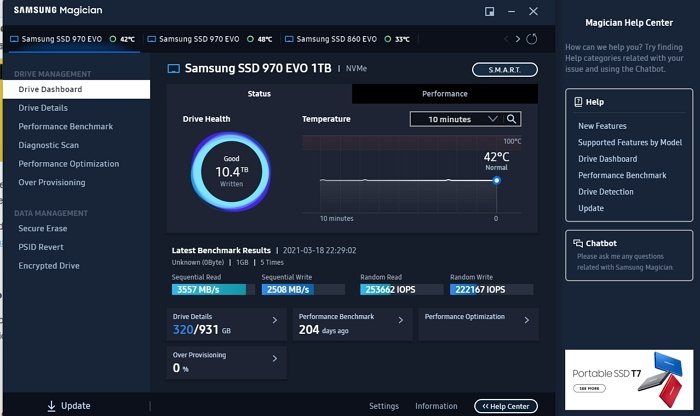
If the health check indicates bad sectors or other errors, proceed with running a repair utility like CHKDSK.
Read: Warning signs that tell if your SSD is failing in Windows
4] Move Windows to a new drive and wipe the SSD
This process involves transferring your existing OS installation, applications, and files to a new SSD or HDD, typically using cloning software; then wiping the disk to eliminate bad sectors, corrupted data, or any residual problems from the old system setup that might have been contributing to freezing and high disk usage issues.
For this, back up all important data and use a reliable disk cloning software, such as Macrium Reflect or AOMEI Backupper, to move your Windows installation to another drive.
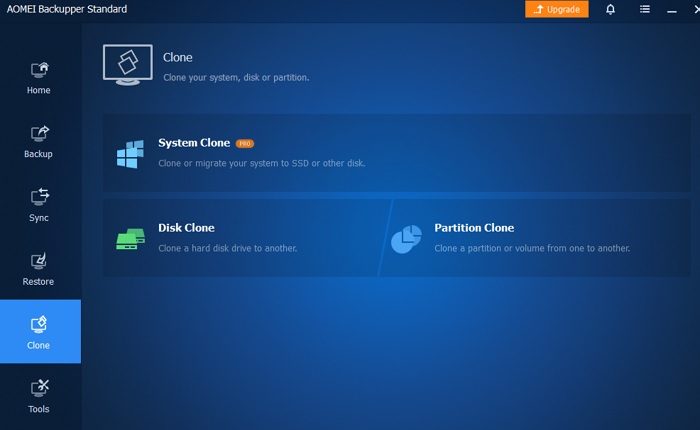
After cloning, shut down your computer and disconnect the old SSD. Enter the BIOS/UEFI settings (press F2/F12/Delete/Esc during startup) and set the new drive as the primary boot device. Save and exit BIOS/UEFI settings.
Boot into Windows from the new drive and ensure all your files, programs, and settings are intact. Reconnect the old SSD, open Disk Management (Win + X > Disk Management), and identify the old SSD.
Right-click each partition on the old SSD and select Delete Volume until all partitions are deleted, leaving unallocated space. Right-click the unallocated space and select New Simple Volume. Follow the wizard to format the SSD with the NTFS file system.

If the old SSD performs well after wiping, you might consider moving Windows back to it, but if the new SSD is performing well and meets your needs, it may be best to leave Windows there and use the old SSD for additional storage or other purposes.
If the problematic SSD is not a system disk (one that houses the OS), move the data to another disk and use DISKPART to reinitialize the disk with the CLEAN command. If the disk works well after quick format, copy the data back to its original location.
5] Clean Install Windows
A clean install installs a fresh copy of an operating system, erasing all existing data and settings on the target drive. If moving Windows to a new drive and wiping the old SSD doesn’t resolve the issue, a clean install can still help by eliminating any residual problems from previous configurations or software, ensuring that the operating system is free from past issues that might be causing freezing or high disk usage.
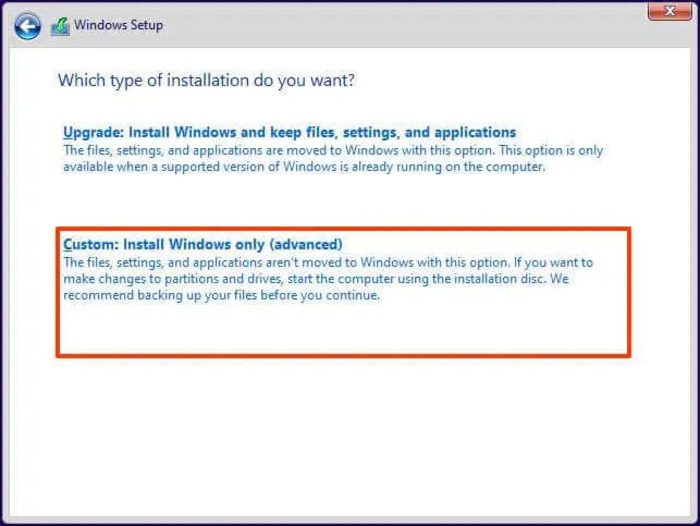
Before performing a Clean Install, ensure you have backed up all important files and data to an external drive or cloud storage. After the installation, reinstall drivers and essential software.
If the issue persists after trying these solutions, consider replacing the SSD.
I hope this helps.
Read: Slow SSD Read or Write speed on Windows.
Why does Windows 11 freeze so much?
Windows 11 may freeze frequently, including software, hardware, and system configuration issues. Ensure Windows is fully updated, and if a recent update causes the system to freeze, consider rolling it back. Use tools like Windows Memory Diagnostic to identify and replace faulty hardware. Update all drivers via Device Manager or from the manufacturer’s website. Also, a Clean Boot will be performed to identify and resolve software conflicts.
Read Next: High Disk & Memory Usage when playing Games on Windows.