Does your Windows Security app display the Standard hardware security not supported error message in Windows 11? Windows Security is the default security app in Windows 11. It enables you to protect your system against viruses, malware, and other attacks. It has modules that offer different kinds of protections like Virus & threat protection, Device security, Account protection, etc.
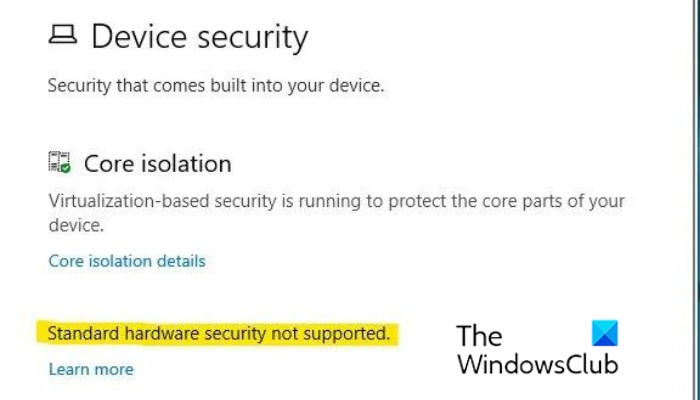
Some Windows users have reported seeing the Standard hardware security not supported error message under the Device security section in the Windows Security program. The error message indicates that your device does not meet at least one of the requirements of standard hardware security.
Standard hardware security not supported in Windows 11
If you see Standard hardware security not supported error message in Windows Security on Windows 11, you can use the following methods to address the issue:
- Enable CPU Virtualization, TPM 2.0, Secure Boot, and other security features.
- Turn on Data Execution Prevention (DEP).
- Activate Memory Integrity.
- Reset Windows Security.
- Reregister the Windows Security app using PowerShell.
- Take ownership of the SecurityHealth folder.
- Downgrade to Windows 10.
In some cases, you may be required to upgrade your hardware; nevertheless, where possible, see if you can implement these suggestions on your device. You may have to contact your hardware manufacturer to see what features are supported by your hardware.
1] Enable CPU Virtualization, TPM 2.0, Secure Boot, and other requirements
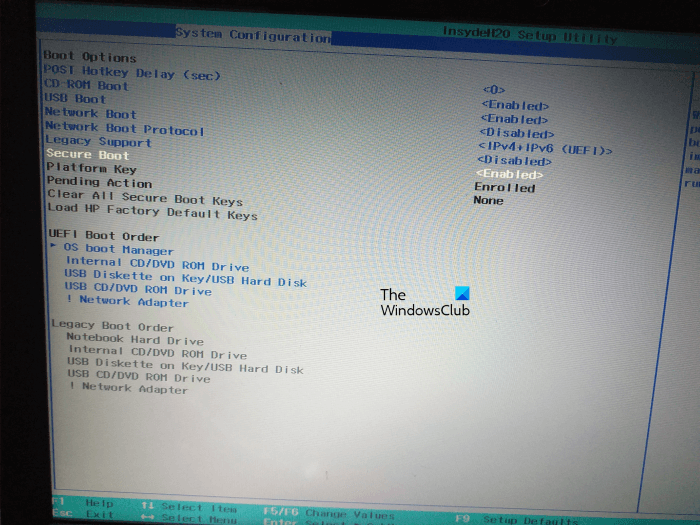
You will see this error message when your PC doesn’t fulfill the minimum hardware security requirements. These requirements include CPU Virtualization, TPM 2.0, and Secure Boot. You need to have these features enabled in your BIOS settings. So, turn on these functions and check if the error message is resolved.
To do that, enter your BIOS settings by pressing the correct key (depending on your motherboard) while the computer is booting, F1, F2, F10, etc. After that, enable the following configurations:
- Go to the Security tab and set TPM to Enabled.
- Navigate to the Boot tab and enable the Secure Boot option.
- Move to the Advanced tab and tap on CPU configuration. And then, enable SVM Mode (for AMD CPU) or Intel Virtualization Technology (for Intel CPU).
Once done, save the settings and exit BIOS settings to restart your PC. You can now check if you still see the Standard hardware security not supported error message in Windows Security or not. If you do, move on to the next potential solution to fix it.
Read: Remove System Requirements Not Met notification on Windows 11.
2] Turn on Data Execution Prevention (DEP)
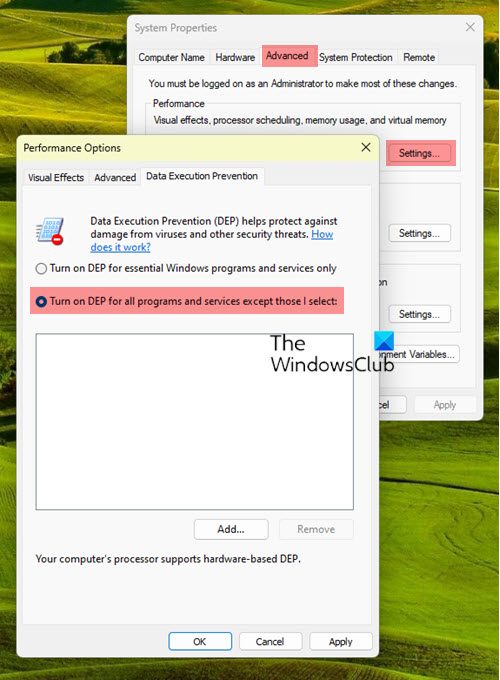
The next thing you should do is enable Data Execution Prevention (DEP). Here are the steps to do that:
- First, press the Win+R hotkey to open the Run dialog box and enter sysdm.cpl in it to launch System Properties.
- Now, move to the Advanced tab inside the System Properties window and tap on Settings under Performance.
- After that, navigate to the Data Execution Prevention tab and select the Turn on DEP option that suits your requirement.
- Next, press the Apply > OK button to save changes.
Open Windows Security now and check if you have stopped seeing the Standard hardware security not supported message.
3] Activate Memory Integrity
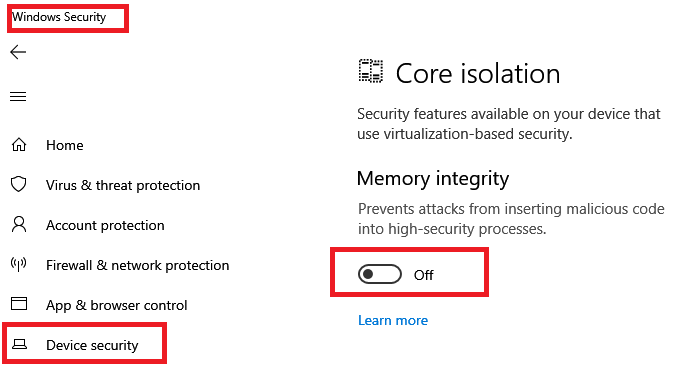
You might be seeing this error message on the newest version of Windows if Memory Integrity is disabled. Hence, if the scenario is applicable, you can enable Memory Integrity to fix the error. Here are the steps to do that:
- Firstly, open the Windows Settings app using Win+I and navigate to the Privacy & security tab.
- Now, click on the Windows Security option from the right-side pane.
- After that, select the Device security option and press the Core isolation details option under Core isolation.
- Next, turn on the toggle associated with the Memory integrity option.
- Finally, exit the Settings window and open Windows Security to check if the error message is gone.
If you still see the same error message, move on to the next fix.
See: This PC can’t run Windows 11
4] Reset Windows Security
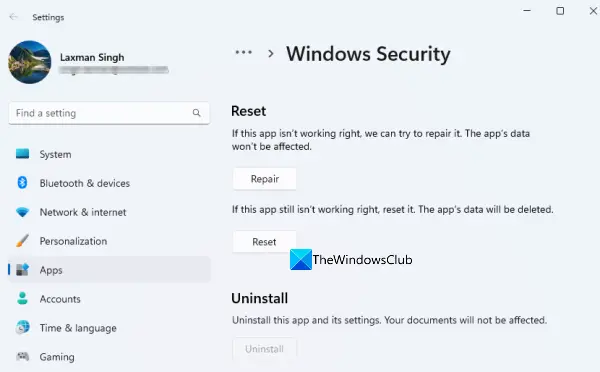
If you still receive the same error message even after trying the above solutions, it might be caused due to corruption associated with the Windows Security program. Hence, in that case, you can reset Windows Security to its default state and check if the error is fixed. To do that, follow the below steps:
- Firstly, press Win+I to open Settings and move to the Apps tab.
- Now, click on the Installed apps option and locate the Windows Security app.
- Next, press the three-dot menu button present next to Windows Security and click on Advanced options.
- After that, scroll down to the Reset section, press the Reset button, and confirm the process to reset the app.
- Once done, restart your computer and check if the error is gone.
5] Reregister the Windows Security app using PowerShell
If resetting the Windows Security app doesn’t work, you can reregister Windows Security via PowerShell to fix the error. Here’s how you can do that:
- Firstly, open Windows PowerShell with admin rights; search for PowerShell in Windows search, right-click on Windows PowerShell, and select Run as administrator.
- Now, type and enter the below command:
PowerShell -ExecutionPolicy Unrestricted -Command "& {$manifest = (Get-AppxPackage *Microsoft.Windows.SecHealthUI*).InstallLocation + '\AppxManifest.xml' ; Add-AppxPackage -DisableDevelopmentMode -Register $manifest}" - Once done, reboot your computer and check if the error message has disappeared or not.
6] Take ownership of the SecurityHealth folder
We have to mention first that from a security point of view, it is not a good idea to take ownership of this SecurityHealth folder.
As per some affected users on Reddit, taking ownership of the SecurityHealth folder and deleting certain sub-folders helped them fix the error. You can also try doing to same and check if the error is resolved.
Before doing that, we will recommend you create a system restore point to be on the safe side.
Here are the steps to do that:
Firstly, open File Explorer using Win+E and navigate to the following location: C:\Windows\System32\SecurityHealth. Now, right-click on the SecurityHealth folder and select the Properties option.
Next, go to the Security tab, click on the Advanced button, press the Change button present next to Owner, and tap on Advanced.
After that, click on the Find Now button, and from the Search Results section, select Administrators and press OK.
Now, click Check Names, press OK, tick the Replace owner on sub containers and objects checkbox, and click Apply > OK. Once you return to the Properties window, choose Administrators and press the Edit option. Then, select Administrators and tick the Allow checkbox associated with the Full Control option.
Now, open the SecurityHealth folder and create a backup of all the consisting folders on your desktop. After that, navigate to the 1.0.2109.27002-0 folder and run the Microsoft.SecHealthUI_8wekyb3d8bbwe.appx file. Then, restart your computer in safe mode.
Next, go to the SecurityHealth folder and delete the 1.0.2207.20002-0 folder, and rename the 1.0.2109.27002-0 folder to 1.0.2207.20002-0. Once done, restart your PC and check if the message is gone.
If you do not like the results, go back to the created restore point right away.
I hope this helps.
Read: Bypass TPM and Secure Boot during Windows 11 Installation.
Leave a Reply