Transparency adds an aesthetical touch to your overall system. And Windows 11 and Windows 10 have quite strategically embedded the Transparency effect into their computers. However, for some users, Start Menu Transparency is not working. In this article, we are going to talk about this issue and see what should be done to resolve this issue.

Why is the Start menu not transparent?
The rational explanation will be corrupted system files or a faulty configured registry. Luckily, there are some strategic solutions that one can take to fix them. It can also be resolved by updating the Graphics driver because needless to say, if you run an outdated GPU driver, there will be some incompatibility issues.
Sometimes turning off the battery saver mode also resolves issues related to Start Menu transparency. Whatever the case is, we are going to resolve it pretty easily using some very simple solutions that everyone can try. So, without wasting any time, let us hop into it.
Start Menu Transparency not working in Windows 11/10
Is Start Menu Transparency not working on your computer? Following is the list of solutions that you can try for the problems.
- Look out for the battery saver mode
- Turn on transparency effect
- Update your Graphics Driver
- Run SFC and DISM
- Change Registry setting
- Troubleshoot in Clean Boot
- Reinstall Start Menu using PowerShell
Let’s get started with the first fix.
1] Look out for the battery saver mode

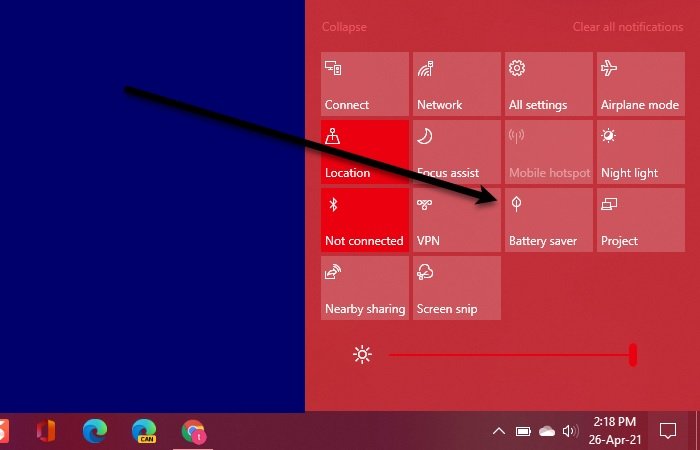
Don’t get mixed up in complicated fixes. First of all, check whether your battery saver mode is on or not. If it is on then you can’t access graphical customization and features. Here’s how you can check the battery saver mode.
- Click Win+A to open the Quick Setting Panel.
- If the Battery Saver option is on, turn it off.
Check for the issue and if it still persists, check the next fix.
2] Turn on Transparency Effect

It would be bizarre if you expect the Start Menu to go translucent before enabling Transparency Effect. So, let us check the Settings and make sure that the option is enabled. Follow the prescribed steps to do the same.
- Open Settings.
- Go to Personalization > Color.
- Enable Transparency effects if it is disabled.
If the effect was already enabled, then check some more suggestions to fix the Transparency Effect not working issue.
3] Update your Graphics Driver
Next up, we need to check the Graphics Driver. If it is not up to date then you’ll not only face Start Menu Transparency issues but many more. Here are three ways to update Graphics Driver.
- Use Manufacturer’s website and download the driver.
- Use free Driver update software
- Update your driver by installing Windows Optional update.
Restart your device, and fingers crossed, there won’t be any issues. However it still persists, move to the next fix.
4] Run SFC and DISM
Start Menu Transparency always stems from your own PC issues such as corrupted system files. We can easily repair the corrupted files by running SFC and DISM tools.
Click Win+R to open the Run dialog box.
Now type cmd in the box and press Ctrl+Shift+Enter to open the Command Prompt with admin access.
Execute the following command and then click on the Enter button.
sfc /scannow
If this doesn’t work, try the next command.
DISM.exe /Online /Cleanup-image /Restorehealth
Once the process is completed, Restart your PC. Hopefully, this will do the job for you.
5] Change Registry setting

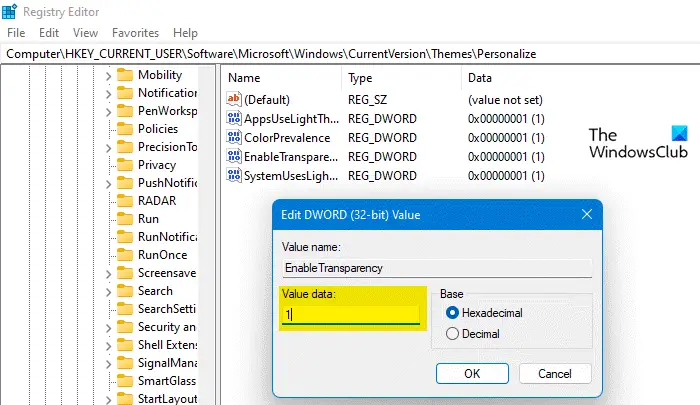
If you have already enabled the Transparency option, but the issue didn’t seem to go away, try changing registries. To do that, open Registry Editor from the Start Menu and navigate to the following location.
Computer\HKEY_CURRENT_USER\Software\Microsoft\Windows\CurrentVersion\Themes\Personalize
Double-click on Enable Transparency and set Value data to 1. Hopefully, this will do the trick for you.
Now, go to the following location.
Computer\HKEY_LOCAL_MACHINE\SOFTWARE\Microsoft\Windows\Dwm
Right-click on any empty space, and select DWORD (32-bit) Value. Now, name it “ForceEffectMode”, and set the Value data to 2.
Hopefully, this will do the job for you.
6] Troubleshoot in Clean Boot
Maybe there is a third-party app that’s interfering with the Transparency process and causing issues for you. In that case, you need to perform Clean Boot and disable/enable processes manually until you stumble upon the culprit. Then, all you have to do is remove or disable it and you will be good to go.
7] Reinstall Start Menu using PowerShell
If nothing works, then reinstalling the Start menu is your last resort.
Open PowerShell as an administrator and run the following commands.
You will be asked to click Yes by UAC, so, do that.
Get-AppXPackage -Name Microsoft.Windows.ShellExperienceHost | Foreach {Add-AppxPackage -DisableDevelopmentMode -Register "$($_.InstallLocation)\AppXManifest.xml"}
The command will delete and reinstall the Start menu. Restart your PC once it reinstalls and see if the issue persists.
Hopefully, these solutions will do the job for you.
How do I make the Start Menu Transparent in Windows 11?
To make the Start Menu transparent, all you have to do is enable the Transparency Effect on your system. This will not only make your whole UI a bit glassy but will also make the Start Menu a bit translucent. To do the same, just open Settings, go to Personalization > Colors, and enable Transparency Effect.
That’s it!
Read: How to make Taskbar transparent or blurred in Windows 11/10.
Leave a Reply