If the Steam client is not opening on your Windows 11/10 PC even after multiple tries, this guide will help you fix the issue. Some may see a Steam Application not found error message, as well. Steam is one of the most popular game launchers that you can use to play a variety of video games on a PC. It provides a lot of handy features including social networking, game streaming services, game server matchmaking, anti-cheat measures, etc. But, as reported by some users, the Steam client just doesn’t launch on their PC even after several tries and they are unable to play any game.

There can be different reasons why you can’t launch or open Steam on your system. It might be due to the fact that Steam didn’t close completely the last time or because you are missing the necessary permissions to run the app. Apart from that, the problem might also be caused due to interference by your antivirus or firewall. It might be blocking Steam from launching due to a false positive alarm. Outdated device drivers can be another reason for this problem. If you have opted for the Steam beta version, it might not open as it is an unstable version. Besides that, a corrupted installation of Steam and a corrupted cache associated with the app are other potential causes of this issue.
Steam is not opening on Windows 11/10
If the Steam client is not opening or launching on your Windows 11/10 computer, the quickest and easiest way to resolve it is to restart your computer. You should be able to open Steam on your next startup if the problem was temporary. However, if the issue remains the same, you can use the below fixes to resolve the issue:
- Close Steam tasks using Task Manager.
- Run Steam with admin rights.
- Allow Steam through your security software.
- Delete the Steam cache.
- Make sure your drivers are up-to-date.
- Power cycle your network devices.
- Remove the beta file.
- Repair Steam.
- Reinstall the Steam client.
1] Close Steam tasks using Task Manager

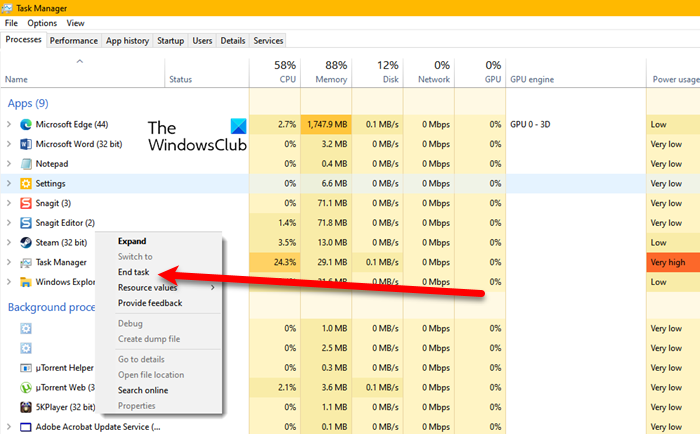
It might be that Steam was not closed completely the last time you used it. A Steam task running in the background might be preventing you from opening Steam correctly. Hence, if the scenario is applicable, you need to end all Steam tasks and then launch the Steam app to check if it opens correctly or not.
You can use Task Manager to do so. Just right-click on your taskbar and choose Task Manager from appeared options to open it. After that, in the Processes tab, look for tasks related to Steam. If there is a Steam process running, select it and then press the End task button to close that task. You need to do the same for all Steam-related processes and then try opening the client. Hopefully, the problem is resolved now. If the problem is not resolved yet, there might be a deep cause of the issue. So, you can apply the next fix.
2] Run Steam with admin rights

Sometimes, a lack of necessary permissions to run an app causes launch issues. Hence, if the scenario is applicable, you can try opening the Steam app as an administrator and check if the issue is resolved. To do that, you can follow the below simple steps:
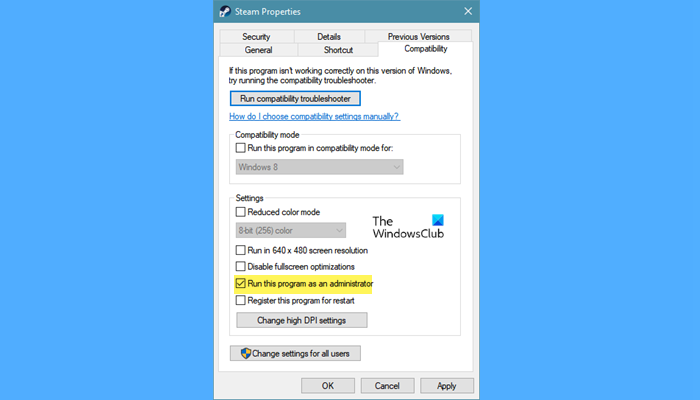
- First, right-click on the Steam shortcut on your desktop and select the Properties option from the appeared right-click context menu.
- Now, in the Properties window, simply go to the Compatibility tab.
- Next, tick the checkbox called Run this program as an administrator and then press the Apply > OK button to save changes.
- After that, open the Steam client, and hopefully, it will run without any issues.
Read: Fix Steam stuck on Allocating disk space.
3] Allow Steam through your security software
Your overprotective security suite might be preventing Steam from being launched. To check if your antivirus or firewall is causing the blockage, temporarily disable it and then check if the problem is resolved. If so, you can allow the Steam app through your antivirus/firewall to permanently fix the problem.
If you are using a third-party antivirus, you can add the Steam executable to its Exclusions or Exceptions list. By default, Steam is installed at C:\Program Files (x86)\Steam\. Browse this directory and add its main executable to your antivirus’s exceptions.
For example, if you use Avast antivirus, go to Home > Settings > General > Exclusions settings and add Steam. Similarly, in the case of AVG, move to Home > Settings > Components > Web Shield > Exceptions.
As for Windows Security, navigate to Virus & threat protection > Manage settings > Add or remove exclusions > Add an exclusion and then import the Steam.exe file.
Also, you can allow your game through your firewall using the below steps:
- First, open Windows Security, navigate to the Firewall & network protection tab, and press the Allow an app through firewall option.
- After that, click on the Change settings button, and then scroll down and select the Steam app. In case it is not on the list, you can manually add it by clicking the Add an app button.
- Now, tick both the Public and Private checkboxes for the Steam app and press the OK button, and exit the window.
- Next, open the Steam app and see if the problem is resolved.
If the problem is not caused because of your antivirus or firewall, move on to the next fix.
Read: Fix Steam Error Codes 53 and 101 on Windows PC.
4] Delete the Steam cache
A corrupted cache associated with the Steam app might prevent it from being launched. Hence, in that case, you can clear the Steam app cache stored on your computer to fix the problem. Here are the steps to do that:
- Firstly, open the File Explorer using Win+E and move to the below location:
C:\Users\<Username>\AppData\Local\Steam
You need to replace <Username> with your PC’s username in the abovementioned address.
- After that, use the Ctrl + A hotkey to select all files and folders stored in the above location.
- Now, press the Delete button to clear all the Steam cache.
- When done, reboot your computer and try opening the Steam client to check if the problem is fixed or not.
TIP: To flush the Steam cache, you can also run the following command in an elevated CMD:
steam://flushconfig
5] Make sure your drivers are up-to-date
Another thing you should take care of is that your device drivers, especially graphics drivers, are up-to-date. Outdated and faulty device drivers can cause launch issues with Steam and its games. So, make sure you have up-to-date graphics and other device drivers.
To do that, open Settings and move to Windows Update. After that, click on the Advanced options > Optional Updates option to check for any pending device driver updates. If so, download and install those updates and then reboot your computer. If you want, you can even use dedicated programs to update drivers such as AMD Driver Autodetect, Intel Driver Update Utility, and Dell Update utility, or simply download the latest version from the website of your device manufacturers.
Once your drivers are up-to-date, open Steam and see if the problem is gone. If not, you can use the next solution.
Read: Fix Steam needs to be online to update error on Windows PC.
6] Power cycle your network devices
Network issues might be causing the “Steam not opening” problem on your PC. The app might be stuck and not open if you are dealing with a bad network. Hence, make sure you are connected to a stable and active internet connection. You can also perform a power cycle on your network device and then check if the problem is resolved. To do that, switch off your router and modem and then unplug them. Leave them unplugged for at least a minute, and then plug and turn on the devices. Now, connect to the internet and open Steam to check if the issue is resolved.
Read: How to make Steam VR Games run better?
7] Remove the beta file
The problem might be caused if you have opted for the beta version of Steam. Steam’s beta version is unstable and causes various issues. Hence, you need to opt out of the beta version of Steam to fix the problem. This option is available in the Steam settings. But, since you can’t open Steam, you will need manually delete the beta file inside Steam’s installation directory to fix the issue. Here’s how you can do that:
- First, open the installation directory of Steam; you can right-click on Steam’s shortcut and select the Open file location option to do that.
- Now, locate the package folder and open it.
- After that, find the file named beta inside the package folder.
- Next, select the beta file and press the Delete button to remove it.
- Finally, try launching the app and see if it opens correctly or not.
See: How to fix Steam Error E502 L3 on Windows PC.
8] Repair Steam client

The next thing you can do is repair the Steam app. If there is corruption in the app, it won’t open correctly and you will also experience several errors and issues. Hence, simply repair your Steam client and then check if you can open the app or not. To do that, you can use the following steps:
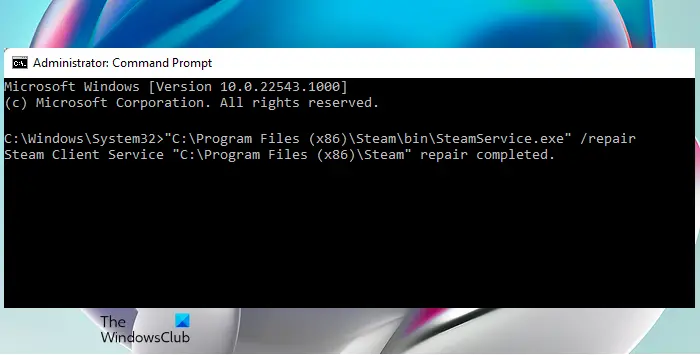
- First, open Command Prompt with administrator privilege; enter cmd in the search box, right-click on the Command Prompt app, and choose the Run as administrator option.
- Now, enter the below command:
"C:\Program Files (x86)\Steam\bin\SteamService.exe” /repair
Once the command is successfully completed, you can try launching Steam and see if the problem is fixed. If not, there is one more fix that you can use.
9] Reinstall the Steam client
If none of the above-listed solutions worked for you, the last resort is to uninstall and then reinstall the Steam client on your computer. There might be some deep corruption associated with the installation of your Steam app which is why you can’t open the client. So, you will have to remove the corrupted copy of Steam from your computer and then reinstall a new and fresh copy to fix the problem.
Do note that uninstalling Steam will remove all your games and related data. Hence, make sure you create a backup of your essential game data. You can find all your games at C:\Program Files (x86)\Steam\steamapps\common. Copy this folder and save it in some other safe location before you uninstall the app.
To uninstall Steam, open Settings, go to the Apps > Installed apps section, and tap on the three-dot menu button present next to Steam. After that, select the Uninstall option and follow the onscreen instructions to remove it. when done, reboot your computer and then download the latest version of Steam from its website. Run the installer and complete its installation. You can then open the app and see if the problem is resolved.
Related read: Steam Games are not launching on Windows PC.
How do I fix Steam Application not found in Windows error?
If you see a Steam Application not found error message, even if is installed and there on your PC, we recommend that you verify the integrity of the game files, and if that does not work, Repair or Reset the game via Windows Settings. If that does not help, sign in as administrator and reinstall the game.
Leave a Reply