Some Steam users are facing connectivity issues while using the Steam Client. According to them, the Steam Client connects to and disconnects from the internet randomly which makes Steam unusable. Due to this, some users lose their current game progress as the Steam Client disconnects from the internet while playing the game. If Steam keeps disconnecting and reconnecting on your gaming rig, while playing or downloading, the solutions provided in this article may help you fix the problem.

Steam keeps disconnecting and reconnecting
The following solutions will help you fix the connection issues with the Steam Client. But before you proceed, we recommend you switch from a Wi-Fi connection to a wired connection. You can use an Ethernet cable to connect your computer with your router. Because the wired internet connections are more stable than the wireless ones, switching from the wireless connection to the wired internet connection fixes the internet connection issues in most cases. If your internet connection is working fine but Steam keeps disconnecting and reconnecting, repair the Steam Client and see if it helps.
If Steam keeps disconnecting and reconnecting while playing or downloading here are some suggestions that may help you fix the issue.
- Clear your web browser cache
- Clear Steam browser cache
- Switch to another internet connection (if available)
- Add the Steam folder as an exception to your antivirus software
- Change the DNS Server
- Troubleshoot in a Clean Boot state
- Uninstall and reinstall Steam
Below, we have described all these fixes in detail.
1] Clear your web browser cache
If you are experiencing connectivity issues with the web version of Steam Client, clearing your web browser cache can fix the issue. In addition to this, you can try one more thing, open Steam in another web browser and see if this brings any changes.
2] Clear your Steam Browser cache
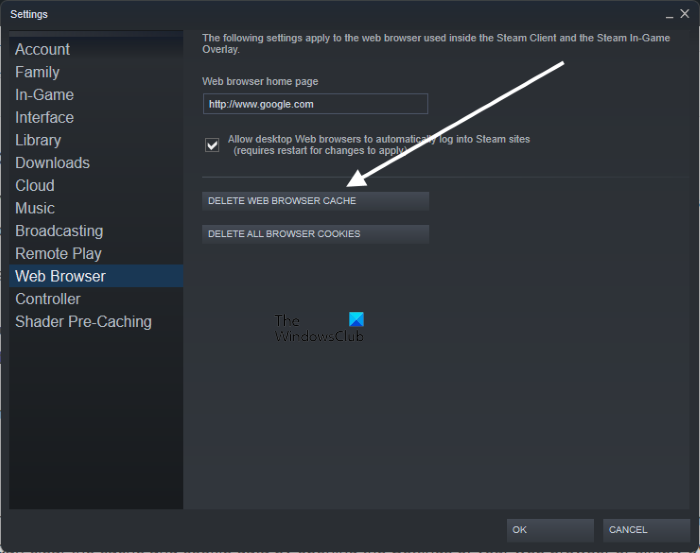
This solution is for the users who are facing connectivity problems on Steam Client. Open your Steam Client and clear its browser cache. The steps to do this are written below:

- Open the Steam Client.
- Go to “Steam > Settings.”
- Select Web Browser from the left side.
- Click DELETE WEB BROWSER CACHE. Also, delete all the browser cookies.
3] Switch to another internet connection (if available)
Some users connected their computers to another internet connection, after which the Steam Client started working properly. You can also try this if another internet connection is available to you. If this works, contact your Internet Service Provider.
4] Add the Steam folder as an exception to your antivirus
Sometimes, antivirus software blocks some genuine apps from accessing the internet due to which users face internet connectivity issues with those apps. This is a false positive flag from antivirus. This might be the case with you. To check this, disable your antivirus temporarily and then launch Steam. Now, monitor Steam for some time and see if it disconnects from the internet. If not, the problem is with your antivirus software. If you are using Windows Defender, you can add the Steam folder as an exception to Windows Security. Also, temporarily disable your Firewall.
If you are using a third-party antivirus or Firewall, refer to its user manual to add Steam as an exception to it or you can contact its customer support team.
5] Change the DNS Server
If the issue still persists, changing the DNS Server can fix the problem. go through the following instructions to change the DNS Server.

- Open the Run command box (Win + R hotkey).
- Select Category in the View by mode.
- Click Network and Internet.
- Now, select Network and Sharing Center.
- Click on your Wi-Fi or Ethernet connection. It will open the Status window of your internet connection.
- Now, click Properties.
- Select Internet Protocol Version 4 (TCP/IPv4) and click on the Properties button.
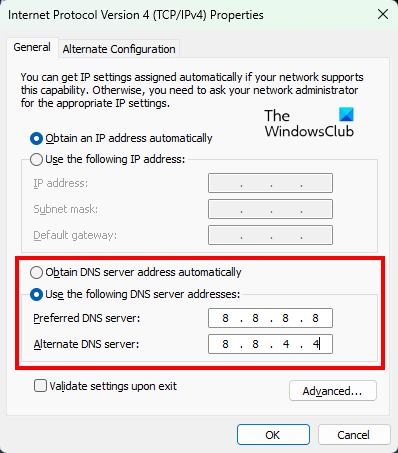
- In the IPv4 properties window, select the Use the following DNS Server address option.
- Now, enter 8.8.8.8 in the Preferred DNS Server and 8.8.4.4 in the Alternate DNS Server. These are the Google DNS Servers.
- Click OK to save the changes.
After changing the DNS Servers, you have to register them. To do so, open the Command Prompt as an administrator and type the following commands. Press Enter after typing each of the following commands.
ipconfig /flushdns

ipconfig /release

ipconfig /renew
Now, open the Steam Client. The problem should get fixed this time.
6] Troubleshoot in a Clean Boot state
If the problem still persists, there might be a third-party app causing the problem. Some software or app asks us to run on system startup. If we allow them, they run in the background as we turn on our computer. Sometimes, the background applications conflict with other apps or software and cause issues in a user’s system. To identify such apps or software, you can troubleshoot your computer in a Clean Boot state.
In a Clean Boot state, only the necessary services remain enabled and all other services and startup apps remain disabled. This helps a user identify the culprit program. After starting your system in a Clean Boot state, launch Steam and monitor it for some time to check if it disconnects randomly as before. If not, some of your startup apps are the culprit. To identify the problematic app or software, enable some of the startup applications in the Clean Boot state and restart your computer in the normal state. Now, launch Steam and see if the problem appears again. If yes, one of the programs that you have just enabled is the culprit. Now, start disabling the enabled apps one by one and monitor the Steam Client for some time after you disable each app or software.
Once you find the problematic app, uninstall it or check for its updated version on the official website.
7] Uninstall and reinstall Steam
If nothing helps you, uninstall the Steam Client from your system. Visit the official website of Steam and download the latest version of the Steam Client. Now, install the Steam Client on your system.
Read: Fix Steam doesn’t recognize installed games.
Why does Steam keep losing connection?
One of the reasons why Steam keeps losing connection is an unstable internet connection. To fix this problem, connect your computer to your Wi-Fi router via an Ethernet cable and check if the problem persists. In addition to this, you can try some other fixes, like clearing your web browser and Steam browser cache and cookie data, repairing the Steam Client, etc.
In some cases, a firewall or antivirus generates false-positive flags for a particular app or software and prevents it from accessing the internet. To confirm this, we suggest you disable your antivirus or Firewall temporarily and check if this brings any changes. If the problem disappears after disabling the antivirus or Firewall, add the Steam folder as an exception to your firewall or antivirus.
Why does my PC Wi-Fi keep disconnecting?
Getting disconnected from the internet is among the most common Wi-Fi problems that occur on a Windows PC. This usually happens when the signal strength of your internet connection is too weak. To confirm this, connect your computer to another internet connection (if available). You can use your mobile data for this purpose. Connect your PC to your mobile data via mobile hotspot and see if the issue occurs. If not, contact your ISP to fix the problem. One more thing that you can try is to switch to a wired internet connection. You can use an Ethernet cable for this purpose.
Another cause of this problem is outdated or malfunctioned network drivers. A driver is a piece of software that helps an operating system connect with a hardware device. Therefore, updating the network driver can fix this problem.
Read next: Steam Cloud not syncing, uploading, or working properly.
Leave a Reply