Steam is a great video game digital distribution service used by millions of gamers. But, what if Steam is stuck in offline mode and just doesn’t go online? There are many Steam users who have reported facing the issue where their Steam app is forever stuck in offline mode. This issue can be a result of several factors. However, it could be a temporary app or system glitch too. Hence, you can try restarting the app a couple of times or rebooting your PC to fix the issue. If that doesn’t help, we are sure this guide will help you with several troubleshooting methods to resolve the problem.
Why can’t Steam start online mode?
Steam being stuck in offline mode and not going online can be caused due to different reasons. Here are some potential causes of the issue at hand:
- If there is an ongoing server issue, you are likely to face the problem. Hence, make sure Steam servers are up and running.
- In case there is an issue with your internet connection, it may result in the same issue. So, ensure that your internet connection is stable and optimal.
- If the download cache on Steam is corrupted, you might face the issue at hand. Hence if the scenario is applicable, delete the Download cache on Steam to fix the issue.
- Your internet settings can be another reason for the same issue. If you have enabled the Enable Enhanced Protected Mode option, it may block the connection between the Steam client and servers. So, you can try changing your internet settings to fix the issue.
- The corrupted installation of the Steam app can also be a reason for the issue at hand. Hence, if the scenario is applicable, you can try reinstalling Steam to fix the issue.
Now, based on the above scenarios, you can try a suitable fix to resolve the issue.
Steam won’t go online and is stuck in offline mode
Here are the fixes you can try to resolve the issue of Steam not going online or being stuck in offline mode:
- Make sure Steam servers are not down.
- Test your internet connection.
- Clear Download cache.
- Modify your internet settings.
- Add –tcp to your Steam shortcut.
- Reset Winsock.
- Rename ClientRegistry.blob.
- Open Steam in Safe mode with networking.
- Reinstall Steam.
1] Make sure Steam servers are not down
The first thing you should check is that the Steam servers are not down at the moment. Steam might be stuck in offline mode if there is an ongoing server issue. So, ensure that the servers are up and running. If you find out that the current status of the Steam servers is down, there is nothing much you can do about it. You will have to wait for Steam servers to be up again to go online on Steam.
If there is no server issue, you can try the next potential fix to resolve the problem.
See: An error occurred while installing or updating the Steam game.
2] Test your internet connection
Another thing you should make sure of is that you are connected to a stable internet connection. If your internet is poor or you are facing WiFi disconnection issues on your PC, you are likely to encounter the problem at hand. Hence, you can try fixing the WiFi issues on your PC.
And also, you can optimize your internet connection using various tips and tricks. You can try using a wired internet connection instead of wireless, switch to a different network connection, or power cycle your networking device.
If you are sure there is no internet issue at your end, you can move on to the next potential fix to resolve the problem.
Read: How to Fix Steam Error Codes 53 and 101 on Windows PC?
3] Clear Download cache

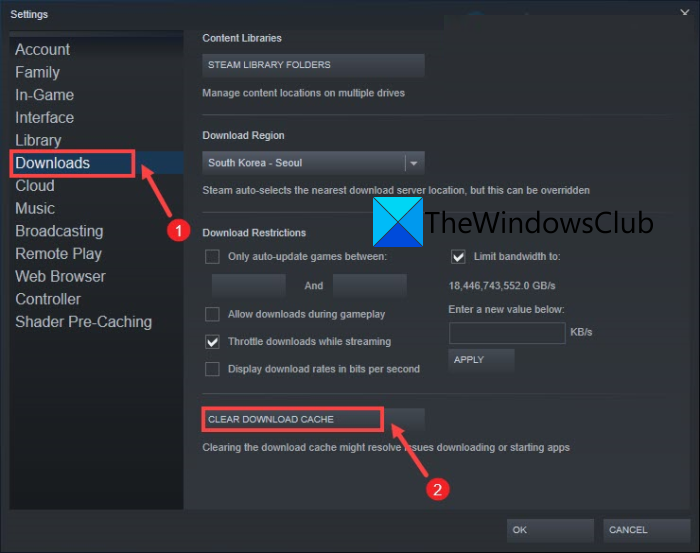
In many cases, the corrupted download cache on Steam can cause issues like Steam won’t go online or being stuck in offline mode. Hence, you can try clearing your Download cache on Steam and see if the problem is fixed or not. Here’s how to do that:
- Firstly, open the Steam client.
- Now, go to Settings and then click on the Downloads option from the left side pane.
- Next, tap on the CLEAR DOWNLOAD CACHE button.
- After that, press the OK button in the confirmation box.
- Finally, relaunch the Steam app and check if the issue still persists or not.
If Steam still doesn’t go online, there might be some other underlying cause of the issue. Hence, you can try some other potential fix to resolve it.
See: Steam games won’t launch; Stuck on Preparing to Launch on Windows.
4] Modify your internet settings
Your internet settings can be the main culprit of the issue at hand. If the problem is occurred because of your PC flagging Steam connection as unsafe, you can try modifying your internet settings accordingly to fix the issue. Here are the steps to do that:
- Firstly, click on the taskbar search button and type Internet Options in the search box. Then, select Internet Options from the results to open up the Internet properties window.
- After that, go to the Advanced tab and scroll down to the Security listings.
- Now, uncheck the option called Enable Enhanced Protected Mode.
- Next, restart your system and then launch Steam to check if the problem is fixed or not.
In case this method doesn’t work for you, try the next solution to fix it.
5] Add –tcp to your Steam shortcut

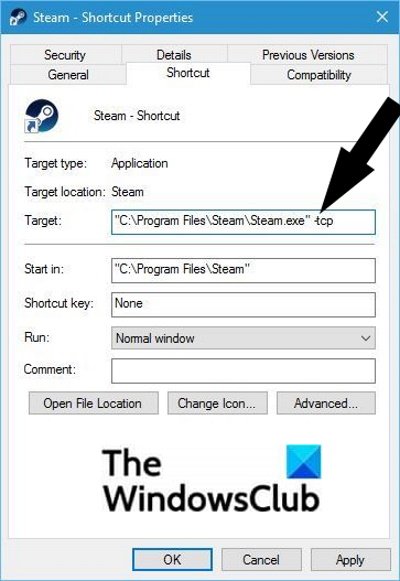
UDP (User Datagram Protocol) is used by Steam in order to transmit data. You can try switching it to TCP (Transmission Control Protocol) as TCP is more reliable. To do that, you can add –tcp parameter to Steam. This can fix the problem of Steam being stuck in offline mode.
Here is how you can add –tcp parameter to the Steam shortcut:
- Firstly, move to the Steam shortcut on your computer and press the right-click on it.
- Now, from the appeared context menu, choose the Properties option.
- Next, navigate to the Shortcut tab.
- After that, write -tcp after the quotation mark in the Target field.
- Then, click on the Apply > OK button to apply changes.
- Lastly, relaunch Steam as an administrator and check if the problem is now resolved.
If you still face the same problem, you can try the next potential fix to resolve it.
Read: Fix Steam App Configuration Missing or Not available error.
6] Reset Winsock
You can also try resetting Winsock via Command prompt to fix the problem. Here is how you can do that:
- Firstly, open the Command Prompt on your system.
- Now, enter the following commands one be one:
netsh winsock reset catalog
netsh int ip reset reset.log
- After that, reboot your PC and check if the problem is resolved or not.
Still facing the same issue? Go ahead and try the next potential fix.
7] Rename ClientRegistry.blob
The next thing you can try is renaming the ClientRegistry.blob file in the Steam folder to fix the issue. To do that, follow the below steps:
- First of all, exit Steam and close all the related processes from Task Manager.
- Next, open File Explorer and move to the Steam installation directory. You are likely to find it at the following location: C:\Program Files\Steam
- Now, find the ‘ClientRegistry.blob’ file and rename it.
- After that, relaunch Steam, and the ClientRegistry.blob file will be regenerated. Hopefully, the issue will be fixed not. If not, follow the below steps.
- Go back to the Steam directory, run the Steamerrorreporter.exe file, and then restart Steam.
If you still face the same problem, move on to the next potential fix.
Read: Fix Steam needs to be online to update error on Windows PC.
8] Open Steam in Safe mode with networking
You can also try rebooting your PC in safe mode with networking and then launching the Steam app. This might fix the problem for you.
9] Reinstall Steam
If you tried all the above solutions and nothing worked for you, the problem might be with your Steam app itself. Your Steam installation might have gone corrupted and that is what causing the issue at hand. Hence, you can start fresh by reinstalling Steam on your PC.
To reinstall the app, you first need to uninstall Steam from your PC. After that, delete the Steam installation directory from your system and reboot your PC. Next, download the latest version of Steam and install it on your PC. Hopefully, the problem at hand will be fixed now.
That’s it!
Why is Steam having trouble connecting to Steam servers?
Steam might be having trouble connecting to Steam servers if there is a server issue. Hence, make sure the current server status of Steam is up and running. Other than that, corrupted and outdated network drivers can also cause the issue at hand.
How do you repair Steam?
To repair the Steam client, here are the steps you can use:
First, open the Command Prompt window and execute the below command:
"C:\Program Files (x86)\Steam\bin\SteamService.exe” /repair
Steam will get repaired!
Now read: Fix Steam error Initializing or Updating Transaction.
