Are you getting the error code 1114 on SteamVR on Windows PC? A lot of SteamVR users have reported encountering the Runtime Installation error while trying to open the SteamVR Tools. SteamVR Tools works on several VR headsets including Valve Index, HTC Vive, Oculus Rift, Windows Mixed Reality headsets, etc. However, this particular error seems to occur with the Oculus Rift VR headset mostly.
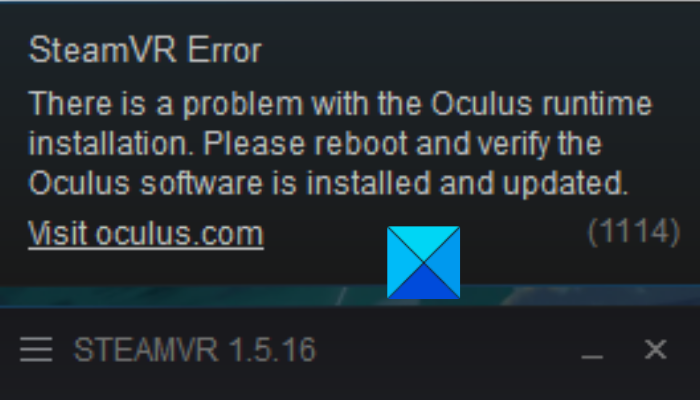
When you receive the error code 1114 on SteamVR, the following error message is shown:
There is a problem with the Oculus runtime installation. Please reboot and verify the Oculus software is installed and updated.
(1114)

Now, as the error prompt indicates, you might receive the error if the Oculus software is not installed. Hence, the first thing you should make sure of is that the Oculus software is installed on your PC. If it is already installed and still you are getting this error, you can try the fixes we have mentioned in this post. So, without much ado, let us check out.
What causes error code 1114 on SteamVR?
Based on various user reports, here are some of the potential causes of the error code 1114 on SteamVR:
- It could be caused due to a temporary system glitch. Hence, before you try advanced solutions, try rebooting your PC to fix the error.
- Corruption with the installation of the Oculus software can be another reason for the error code 1114 on SteamVR. If the scenario is applicable, you can repair the Oculus software using the dedicated feature provided by Oculus.
- In case you are running an outdated version of Windows, it can cause stability and other performance issues with new applications and technologies. Hence, make sure to update your Windows regularly to avoid such errors.
- If your Oculus software is not updated, it can trigger the error at hand. So, update your Oculus software and then check if the issue is fixed or not.
- The error might be caused due to underlying corruption with the Oculus software which is beyond repair. Hence, if the scenario is applicable, you can try reinstalling the Oculus software to get rid of the error.
Now that we know the scenarios that are most likely to cause the error at hand, let us discuss the fixes.

SteamVR Error 1114, There is a problem with the Oculus runtime installation
Here are the methods you can try to fix SteamVR error 1114, There is a problem with the Oculus runtime installation:
- Reboot your PC and headset.
- Repair the Occulus installation.
- Update your Windows.
- Update the Oculus software.
- Reinstall Oculus.
1] Reboot your PC
The first thing you should do to fix the error is to restart your system. In most cases, the error at hand is caused due to temporary glitch with your system. Also, the system might require a restart if you have just finished updating your SteamVR tools.
Hence, in that case, a simple restart of your PC would fix the issue for you. So, go ahead and reboot your system and then try using Oculus Rift with SteamVR tools.
Additionally, you can also try rebooting your Oculus Quest 2 headset and see if the error is fixed or not. Here is how to do that:
- Firstly, ensure that your headset is switched on.
- Now, press the Power button and keep it held until you see the shutdown screen menu.
- Next, choose the Restart option on the shutdown screen to restart your headset.
- Once done, check if the problem is resolved or not.
If the error still persists, you can move on to the next potential fix to resolve it.
Read: Oculus Software not installing on Windows 11.
2] Repair the Occulus installation

If there are any software errors, you can try repairing the Oculus installation. In case the error is triggered due to corruption in the software itself, you can repair it to fix the error. Oculus provides a dedicated option to repair its installation. Here is how you can use it:
- Firstly, you need to download the installer of Oculus from its official website. In case you already have the installer, it is still recommended to download the installer again as the new one is up-to-date.
- Now, double-click on the installer to run it and then click Yes on the UAC prompt.
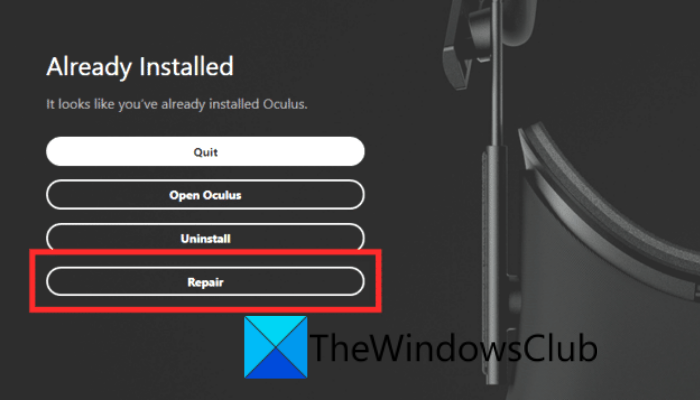
- Next, the installer will detect that the required VR tools for Oculus are already installed on your PC. And, it will show you some available options that include Quit, Open Oculus, Uninstall, and Repair. From these options, tap on the Repair button.
- After that, simply follow the prompted instructions to complete the process.
- Once done, relaunch SteamVR and check if the error code 1114 is now resolved or not.
If you still get the same error, try the next potential fix to get rid of the error.
RELATED: Fix Oculus Rift errors and problems.
3] Update your Windows
You are likely to run into multiple errors and issues if you are using an older version of Windows. New software and technology require up-to-date systems. Hence, if the scenario is applicable and you are getting the error due to your outdated Windows, try installing all the pending Windows updates. To do that, open the Settings app and navigate to the Windows Update tab. Next, tap on the Check for updates and wait for Windows to check for available updates and download them. After that, restart your PC to install all the pending updates. On the next startup, check if the error 1114 on SteamVr is fixed or not.
In case you still keep getting the error code 1114 on SteamVR, follow the next potential fix in order to resolve the error.
Read: Oculus has detected a problem with your graphics drivers.
4] Update the Oculus software
Besides updating your Windows, you also need to make sure that you have up-to-date Oculus software. The error might also be facilitated due to out-of-date Oculus. Hence, you can try updating Oculus and see if the error is fixed. Here is how you can do that:
- First of all, put your Oculus Quest 2 on and tap the Oculus button on your controller.
- Now, to open up the Quick Settings menu, press the clock present in the bottom-left of the universal menu.
- After that, choose the Settings (cog icon) present at the top-right.
- Next, choose System and click on the Software Update option from the left side pane.
- Then, if there is an update available, you will get a Download Update option; simply click on it.
- Finally, once the updates are installed, relaunch SteamVR and try performing the same action that previously gave your error code 1114.
Hopefully, this method will help you fix the error. But, if it doesn’t, we have one more fix that you can try.
Read: Fix Shared IPC Compositor Connect Failed 306 on SteamVR.
5] Reinstall Oculus
In case none of the above solutions worked for you, the last resort to fix the error is reinstalling Oculus. Reinstallation will basically remove software errors, bugs, corrupted installation files, and other problems with the software installation. Some affected users were able to fix the error using this method. So, you can also try doing the same and see if it works for you.
To reinstall Oculus, you first need to uninstall it. You can use the below steps to do so:
- Firstly, launch the Settings app using Win+I hotkey.
- Now, go to the Apps tab and click on the Apps & features option.
- Next, locate the Oculus software and click on the three-dot menu button associated with the app.
- After that, click on the Uninstall option and follow the prompted instructions to complete the process.
- Then, open File Explorer using Win+E and go to Oculus’s installation directory: C:\ProgramFiles\Oculus
- Now, manually delete all the remnant files and reboot your PC.
Once the uninstallation is done, download the latest installer of Oculus from its website. After that, run the installer and complete the installation by following the prompted onscreen guide. Now, check whether the error 1114 on SteamVR is now resolved.
Why is SteamVR not detecting headset?
If SteamVR is not detecting your headset, make sure your headset is properly connected. The problem could also be caused due to some settings. For example, if your Oculus headset is not detected, you can try changing the settings in the Oculus app. Simply access the main settings in the Oculus app and go to the General Settings section. Now, make sure to enable the unknown sources option. If this doesn’t work, you can try reinstalling the SteamVR app to fix the issue.
How do I fix Error 208 on SteamVR?
To fix error code 208 on SteamVR, make sure your graphics drivers are updated. Other than that, try enabling Direct Mode on SteamVR, choose the beta version of SteamVR, reinstall your SteamVR USB devices, or reinstall SteamVR to fix the error.
Related: Fix SteamVR Error Codes 113, 200, 206, 207, 208, 301, 306, 308, 302
Why does Steam VR keep failing?
It could be caused due to corrupted or missing files in the SteamVR app. So, to fix it up, go to Library in Steam and right-click on SteamVR. Then, press the Properties option, go to the Local Files tab, and press the Verify integrity of tool files button.
Now read:
Leave a Reply