Is your Print Screen Hotkey not working? Maybe OneDrive or some other program has taken it over. If you cannot set a Hotkey & you see a message, The hotkey is in use by another program, Do you want to override the existing hotkey assignment, then this post may be able to help you. This article shows how to stop OneDrive from taking over the Print Screen key on Windows 11/10.
Maybe you have left the PrtSc or Print Screen to take screenshots, or maybe you have assigned it to another screen capturing software like SnagIt – and you now find that another program, like say OneDrive, has hijacked this hotkey, then this is what you need to do.
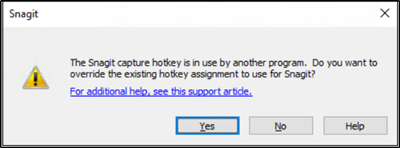
If you have configured the ‘Print Screen’ hotkey for some screenshot-capturing tool like SnagIt, OneDrive can hijack it. As such, you may see an error message indicating the capture hotkey is in use by another program.
Stop OneDrive from taking over the Print Screen key
You can follow any of the two methods described below to stop OneDrive from taking over the Print Screen on your Windows 11/10 computer.
- Manually enable the Hotkey Override assignments option
- Change the OneDrive Settings
Let’s start.
1] Manually enable the Hotkey Override assignments option
If you are using SnagIt as your default screenshot-capturing tool, open its Capture Window, navigate to ‘File’, and select the ‘Capture Preferences’ option.
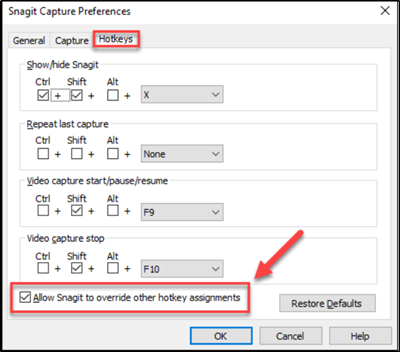
In the ‘SnagIt Capture Preferences’ window that opens up, switch to the ‘Hotkeys’ tab, just adjacent to the ‘Capture’ tab.
There, scroll down to the ‘Video capture stop’ section, and look for the ‘Allow Snagit to override other hotkey assignments’ option.
When seen, simply check the box marked against it and hit the ‘OK’ button.
Now, all you have to do is assign the desired hotkey to a preset or as the global capture hotkey and exit the program.
2] Change the OneDrive Settings
See, if the OneDrive (cloud) icon is visible on the Taskbar.
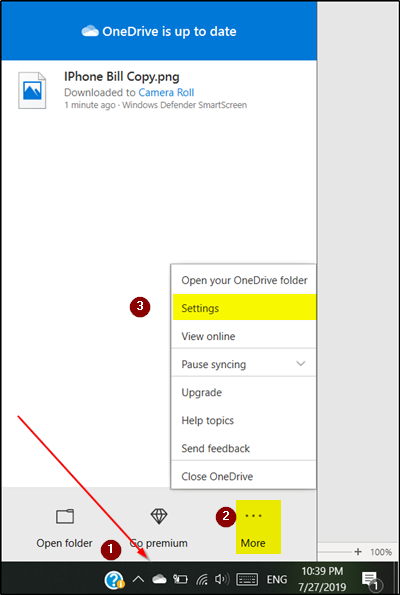
If yes, click the icon and choose the ‘More’ option (visible as three horizontal dots). If not, via the Start Search, open OneDrive settings.
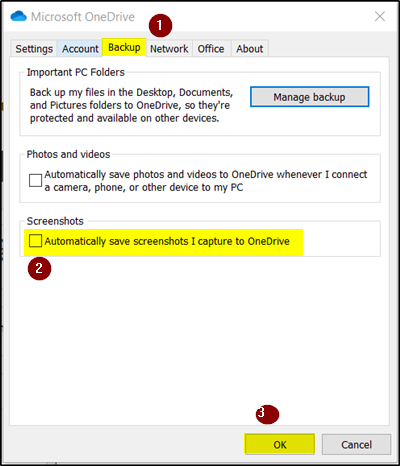
When the new window opens, switch to the ‘Backup’ tab, and under the ‘Screenshots’ section, check the box marked against the ‘Automatically save screenshots I capture to OneDrive’ option. Hit the ‘OK’ button when done.
Now, repeat the same steps – however, in the end, uncheck the ‘Automatically save screenshots I capture to OneDrive’ option. Click the OK button.
If you are using the latest version of OneDrive on Windows 11, the steps to change this setting are a bit different. Go through the following instructions:
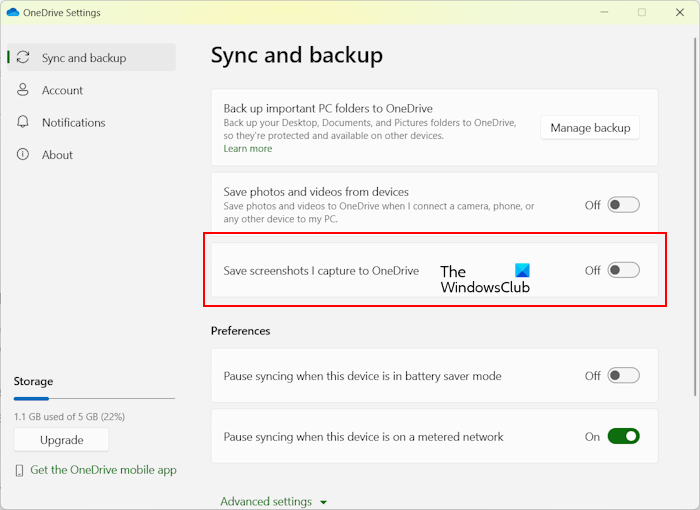
- Click on the OneDrive icon on the Taskbar.
- Click on the gear icon on the top right side and select Settings.
- Select Sync and backup from the left side.
- Turn off the Save screenshots I capture to OneDrive option.
Once you have completed the above steps, complete them, open the settings on your preferred screenshot tool (SnagIt, in this case), and configure the shortcut using the ‘Print Screen’ button.
How do I disable the Print Screen key?
If you want to disable the Snipping Tool or the Print Screen key on your Windows 11/10 computer, you can do so via editing the required policy through the Local Group Policy Editor. Windows 11/10 Home users can use the Registry Editor for the same because the Local Group Policy Editor is not available on Windows 11/10 Home Editions. If the Print Screen key is opening the Snipping Tool on your system and you want to turn off this action, you can do so via Windows 11/10 Settings.
Why are my Screenshots going to OneDrive?
By default, all your screenshots are saved to OneDrive automatically. This is frustrating because it will fill up space on your OneDrive. This happens because a setting, named Save screenshots I capture to OneDrive is enabled in OneDrive by default. If you want your screenshots to go to OneDrive automatically, you have to turn off this setting in OneDrive.
Read next: How to prevent users from syncing personal OneDrive accounts.