If you are a regular Windows user and quite often use it to store hundreds of thousands of photos then, chances are you access them mainly via Thumbnail view. Other views like Details, List, and Icon seem to appear quite inappropriate and irrelevant for pictures. What if the thumbnail cache seems to destroy itself periodically? It can be infuriating. If your Windows 11/10 Thumbnail cache keeps resetting or deleting itself, you can stop Windows from auto-deleting the Thumbnail cache after every restart. You will need to use the Registry Editor and the Task Scheduler.
Where is thumbnail cache stored?
The Thumbnail cache is stored on the drive on which WIndows OS is installed. By default, it is the C drive. To view the Thumbnail cache on your PC, you have to go to the following location:
C:\Users\UserName\AppData\Local\Microsoft\Windows\Explorer
Replace the UserName with your user name in the above path. After reaching the above path, you will see the thumbnail cache files with the name thumbcache.
Stop Windows 11/10 from deleting Thumbnail cache
The cause could be a task in Automatic Maintenance called SilentCleanup – this could be causing the thumbnails to disappear each time you boot. So, all you need to do to eliminate this problem is to stop the task from running.
Please note that the method requires you to make modifications in the Registry settings. As such, exercise extreme caution before proceeding any further.
Open the ‘Run’ dialog box, type ‘regedit’ and hit the ‘Enter’ key.
Then, navigate to the following key-
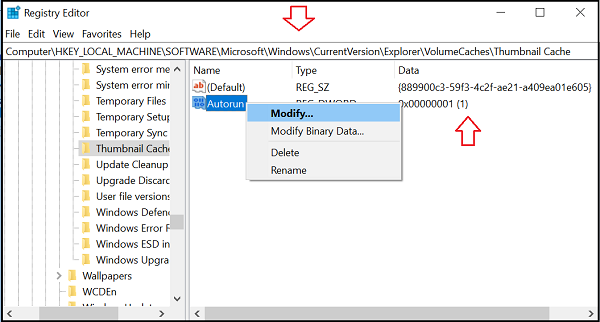
HKEY_LOCAL_MACHINE\SOFTWARE\Microsoft\Windows\CurrentVersion\Explorer\VolumeCaches\Thumbnail Cache
Here, if you notice that the entries are for Disk Cleanup with an Autorun DWORD value set to “1“, it means SilentCleanup’ feature is “ON” and allows autorun to delete the thumbnail cache.
To undo this change, simply right-click on Autorun and choose “Modify” option as shown in the screenshot below.

Under the box, change the value from “1” to “0” which indicates “OFF”.
Similarly, locate the following entry in the Registry editor
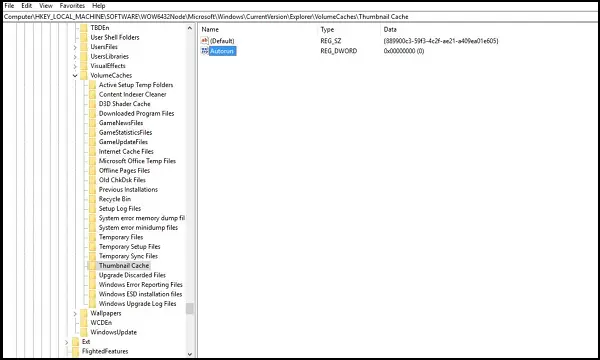
HKEY_LOCAL_MACHINE\SOFTWARE\WOW6432Node\Microsoft\Windows\CurrentVersion\Explorer\VolumeCaches\Thumbnail Cache
There, if you notice again that most of the entries are for Disk Cleanup with Autorun having a value set to “1” which is “ON”, change it to “0” which is “OFF”.

That’s it!
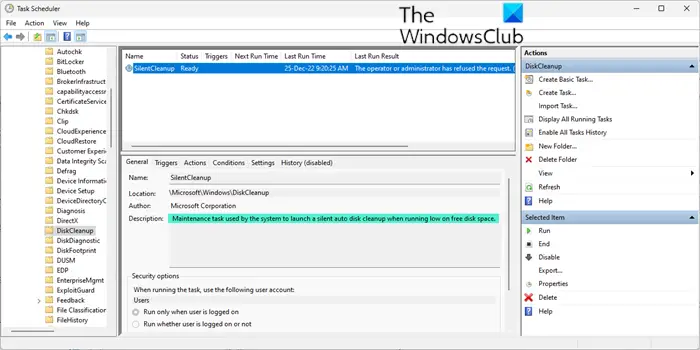
Now having done this, you might need to additionally disable the Maintenance task in the Task Scheduler. This Maintenance task is used by the system to launch a silent auto disk cleanup when running low on free disk space and at this time your cache could get deleted.
So open Task Scheduler and navigate to Task Scheduler Library > Microsoft > Windows > DiskCleanup.

Now right-click on the entry and select Disable or Delete.
You have stopped Windows from automatically deleting the Thumbnail cache on reboot.
Just close the Registry Editor & Task Scheduler and restart your PC to allow the changes to take effect.
Thumbnails are intended to make the process of navigation in File Explorer a lot easier by virtually offering a miniature view of every type of file, be it photos, videos, or any document files. Annoyances, such as this can undermine your Windows experience.
What happens if I delete thumbnails in Disk Cleanup?
Deleting the thumbnails neither impacts your system’s performance nor deletes your personal files. This action fixes the problems occurring due to the corrupted thumbnail cache and also frees up some space on your disc. While deleting the thumbnails using the Disc Cleanup utility, make sure that only the Thumbnails checkbox is selected and all other checkboxes are deselected.
Read next: Taskbar Thumbnail Preview not working in Windows 11/10.
Thx!
Thanks a lot, that was easier than expected.
This was only a temporary fix. At some point between now and the time I used your registry edit solution two days ago, the DWORD field was defaulted back to 1. So without knowing what else in the system is triggering the default, this is basically useless information.
You need to find out what is triggering this default on your system. Perhaps troubleshooting in Clean Boot State will help.
I set the values a few days (weeks?) ago, they remained off, but the thumbnails are still rebuilding today….