After using a computer for a few months, users face low storage problems. For instance, you may not be able to store more files, install another app, or download another file to your computer due to low disk space issues. Windows 11/10 automates the process of freeing up disk space using a new feature called Storage Sense. Let us learn how to configure and use the Storage Sense feature on a Windows PC.
When we delete a file from our computer, it gets moved to the Recycle Bin. The problem is we often forget to clear up the Recycle Bin, and then when the default Bin size is exceeded, Windows starts deleting items on a First-In-First-Out (FIFO) basis. Some people do not have this problem as they use Shift+Delete, which removes a file permanently from a computer.
We install an app, and the app creates various data files in your system. Once their use is over, they become Junk files. At times, even when you uninstall programs, the data files are left back, resulting in a loss of disk space.
Storage Sense finds temporary and junk files created by various apps and permanently removes them. It can also clean your Recycle Bin after a predefined time interval. The best part is that Storage Sense automatically does this in the background without your intervention. Once you set it up correctly, you can forget about it.
Automatically delete Junk files using Storage Sense
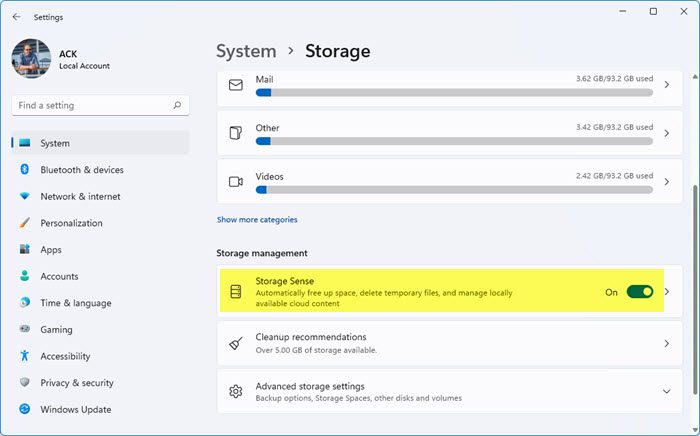
To automatically delete Junk files using Storage Sense in Windows 11, go to Settings > System > Storage. Turn on the Storage Sense slider button.

Windows 11 user? This post will show you how to use Storage Sense in Windows 11 to free up disk space.
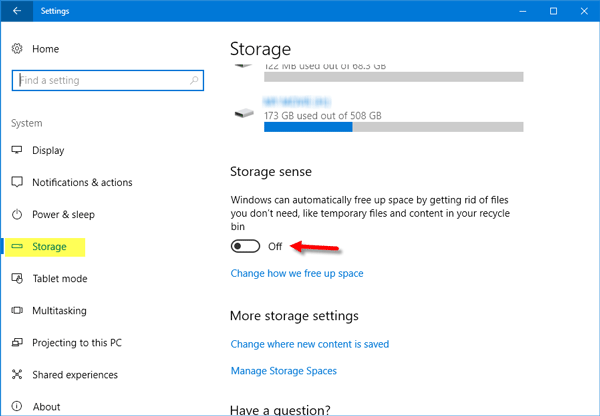
To configure Storage Sense in Windows 10, go to Settings > System > Storage. To open Settings, you can press Win+I together.
On the right-hand side in the top, you will see Storage. This helps you clear up Disk Space & manage Local Storage on Windows 10.
Below that you will see an option called Storage Sense.

By default, this feature is turned off. You can toggle the button to turn it on.
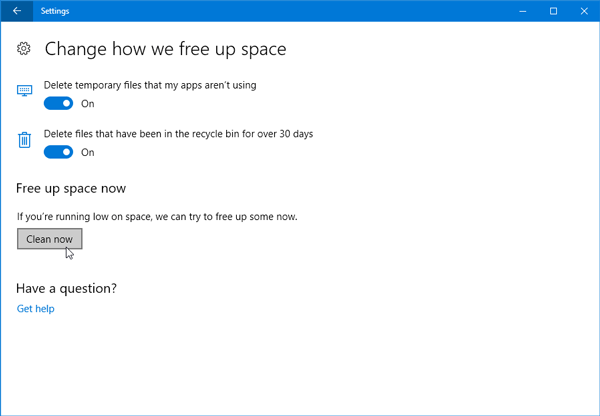
Before toggling the button, you should configure it properly. To do this, click on Change how we free up space.
On the next screen, you will find two options:
- Delete temporary files that apps aren’t using
- Delete files that have been in the recycle bin for over 30 days.

The first option will let you remove all the temporary files created by apps but not in use now. The second option will remove all the files which are present in Recycle Bin for more than 30 days.
After setting your preferences, you may exit; and Storage Sense will start working as and when required.
Related: Stop or Make Storage Sense delete files from Downloads folder in Windows.
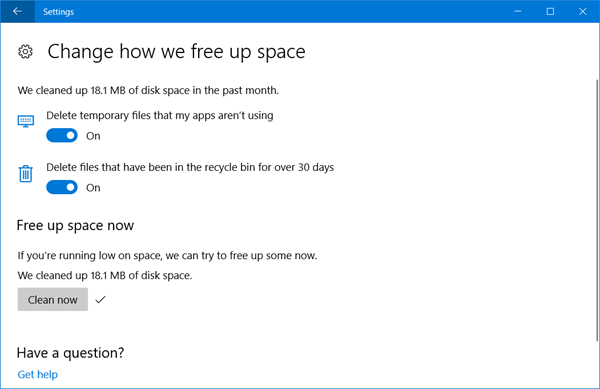
If you wish to clean up your disk space right away you can click on the Clean now button.

Windows 10 will clear disk space and tell you how much space was recovered. It will even tell you how much disk space it recovered in the past one month.
Before you exit, just ensure you have toggled the Storage Sense button to the On position if you want it to run automatically every 30 days.
TIP: Windows now lets you automatically delete files in Downloads folder & Recycle Bin after 30 days.
So it’s the normal disk cleanup utility that’s been in all versions of Windows since 95 except now it’s easier to find and can be automated.
Still good article. Most people don’t look for changes beyond the obvious after a big update
Try Krojam Cleaner. It’s a powerful tool to clean junk files in just one click.