Active Directory helps you manage and secure network resources by storing information about users, computers, and permissions. We can store BitLocker recovery keys centrally. In this post, we are going to learn how you can store Bitlocker recovery keys in Active Directory.
Store BitLocker Recovery Keys in Active Directory
By configuring Group Policy (GPO), we can automatically save recovery keys for BitLocker-enabled computers. If you are an admin or someone with permission to access the AD, you can retrieve them to unlock encrypted drives if a user forgets their password.
If you want to store Bitlocker recovery keys in Active Directory, follow the steps below.
- Configure GPO to store BitLocker Recovery information in Active Directory Domain Services
- Enable BitLocker
- Give Permission to view the BitLocker
- View the BitLocker Recovery Key
Let us discuss them in detail.
1] Configure GPO to store BitLocker Recovery information in Active Directory Domain Services
As mentioned earlier, we need to configure the Group Policy to store the BitLocker Recovery Information in the Active Directory Service. To do so, you need to follow the steps mentioned below.
- First of all, launch the Group Policy Management Console on the system.
- Then, you can either create a new GPO by navigating to your domain, right-clicking Group Policy Objects, selecting New, naming the GPO, and clicking OK, or you can edit an existing GPO; just ensure that it is linked to the OU.
- Under the GPO, go to Computer Configuration/Policies/Administrative Templates/Windows Components/BitLocker Drive Encryption.
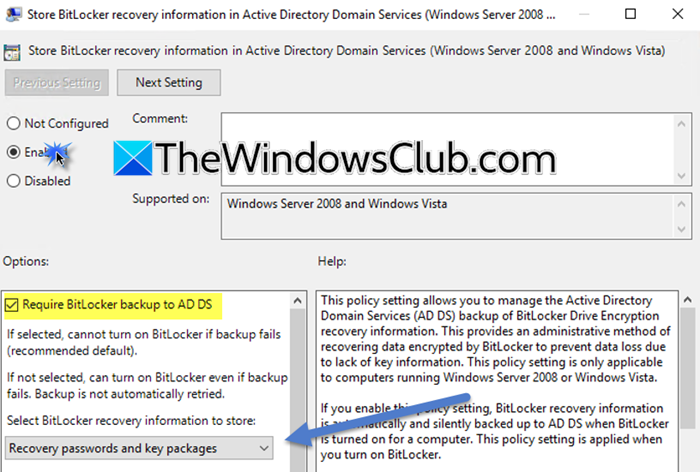
- Look for Store BitLocker Recovery information in Active Directory Domain Services, double-click on it, and select Enabled.
- Tick the Require BitLocker backup to AD DS and from the drop-down that says Select BitLocker recovery information to store, select Recovery passwords and key packages; click Apply > Ok.
- Now, you need to go to one of the following folders from the BitLocker Drive Encryption.
- Operating System Drives: Manages policies for drives where the operating system is installed, such as restricting access or encrypting data.
- Fixed Data Drives: Controls settings for internal non-OS drives, like enabling BitLocker encryption or access limitations.
- Removable Data Drives: Applies rules for external devices, such as USB drives, to enforce encryption or block access.
- Then, go to Choose how BitLocker-protected system drives can be recovered, set it to Enabled, and tick Do not enable BitLocker until recovery information is stored in AD DS for operating system drives (it depends on what GPO drive you have selected).
- Finally, click on Apply > Ok.
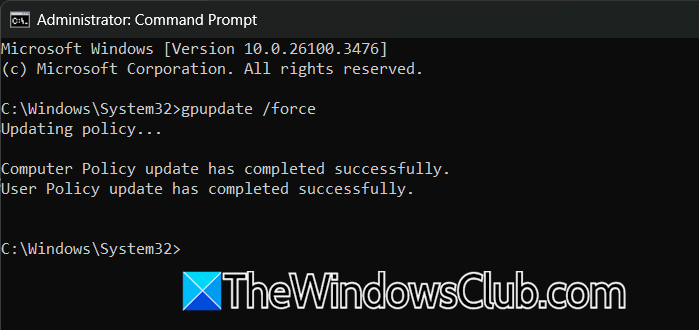
After making the changes to the GPO, you need to run the following command to update it.
gpupdate /force
To check if the policy is updated, you can run gpresult /r.
2] Enable BitLocker
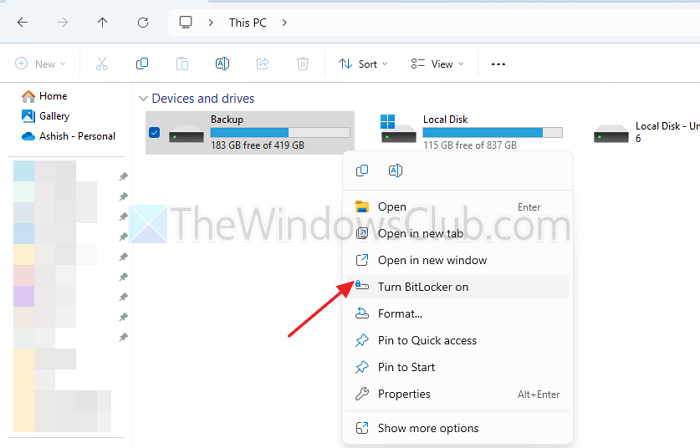
Now we need to enable the BitLocker Protection on our client’s operating system. In File Explorer, right-click on the drive that you want to protect using BitLocker and select Turn BitLocker on.
You can also run the command Enable-Bitlocker -MountPoint c: -UsedSpaceOnly -SkipHardwareTest -RecoveryPasswordProtector (replace c with the required drive)
In case the drive in question had BitLocker enabled before making changes to the GPO, we have to send the recovery key to AD manually. Run the following commands to do the same.
manage-bde -protectors -get c:
manage-bde -protectors -adbackup c: -id "{your_numerical_password_ID}"
3] Give Permission to view the BitLocker
As an administrator you have the privilege to view the BitLocker recovery key, but if you are not, you can’t. If you want others to view the key, follow the steps mentioned below to give them the permissions.
- Right-click on the AD organization unit in question and click on Delegate Control.
- Click on Add and add the group to which you want to give the permission.
- Click on Create a custom task to delegate > Next.
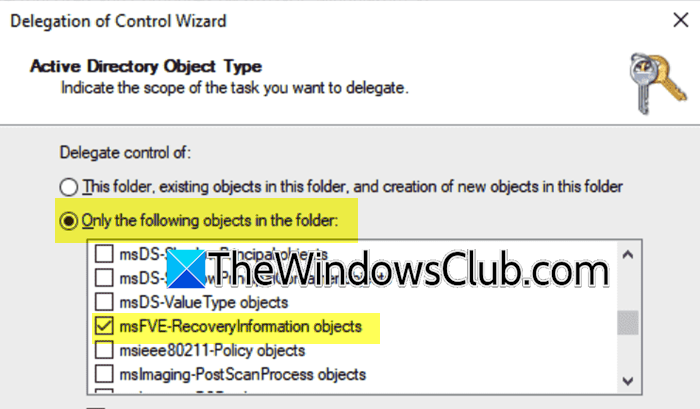
- You need to now check Only the following objects in the folder option, tick msFVE-RecoveryInformation objects, and click on Next.
- Tick General, Read, and Read All Properties and click Next.
Now, all users of this group can view the BitLocker password.
4] View the BitLocker Recovery key

Now that we have enabled the BitLocker Recovery Key and sent it to the AD, we can go ahead and view it. Before that, you need to run the following command to install the BitLocker Management Tools.
Install-WindowsFeature RSAT-Feature-Tools-BitLocker-BdeAducExt
Now, open Active Directory Users and Computers, go to the Properties of the computer on which you want to check the BitLocker key, go to the BitLocker Recovery tab, and check the Recovery password.
That’s it!
Read: Change BitLocker Encryption method & Cipher Strength
Where should I store my BitLocker recovery key?
You should store your BitLocker recovery key securely to ensure access if needed. You can save it to your Microsoft account, print it, keep it in a safe place, or store it on an external drive or USB. However, the best place to store it is in the Active Directory, you can follow the steps mentioned earlier to do the same.
Read: Turn On or Off use of BitLocker on Removable Data Drives
Where is the BitLocker recovery key ID in Azure AD?
The BitLocker recovery key ID in Azure AD can be found in the Azure Active Directory admin center. Navigate to Devices > BitLocker keys and search using the recovery key ID shown on the recovery screen. If saved in Azure AD, you’ll see the device name, key ID, and recovery key.
Also Read: Configure BitLocker hardware-based encryption for fixed data drives.
