If you use a multi-monitor setup with the Windows 11/10 operating system, it is quite easy to handle everything. However, Superpaper is a multi-monitor wallpaper manager for Windows 10 that lets you apply, view, and manage wallpapers regardless of the number of monitors you have.
Superpaper multi-monitor Wallpaper Manager
Here is a list of all the essential features of Superpaper-
- Position management: Users can manage the position of their screen as per their needs. No matter whether you want to use one monitor as usual or vertically, you can set things up using this tool.
- Profile management: You can create multiple profiles and save a set of settings. Then, you can apply the profile so that everything changes in seconds.
- Span mode: It has three different modes: Simple span, Advanced span, and Separate image for every display. If you switch from one mode to another, the user interface and list of functionalities change. For obvious reasons, the Advanced span mode has the greatest number of options.
- Wallpaper slideshow: If you do not like having one single wallpaper, you can enable the wallpaper slideshow. You can also set it for one particular monitor.
- Hotkey: If you want to change the profile quickly, use the keyboard shortcut. You can also set a custom hotkey so that everything works as you require.
- Choose the wallpaper folder separately: You do not need to worry about a mix-up when using a separate image for every display since it lets you choose the source individually.
- Set display size manually: You can also test something by setting up a different display resolution or size with Superpaper.
- Adjust bezel size: If Superpaper is not displaying wallpapers correctly due to a wrong bezel size, you can change and set it manually.
To start using Superpaper on Windows 11/10, follow these steps-
- Download Superpaper from GitHub.
- Install or run the portable file.
- Create a new profile for wallpaper management.
- Select the Span mode.
- Click the Browse button to add wallpaper.
- Click the Apply
Let’s take a look at the steps in detail.
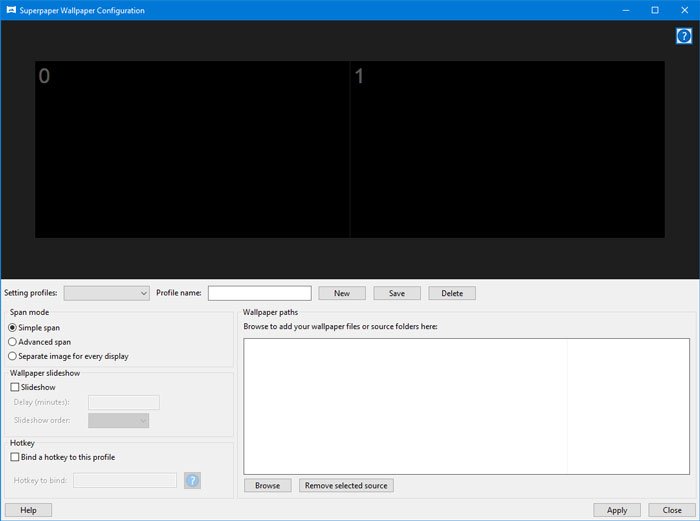
First, you need to download the Superpaper app on your computer. For your information, you can download the portable version if you do not want to go through the installation process. Either way, you can find the following screen after opening this app on your computer-

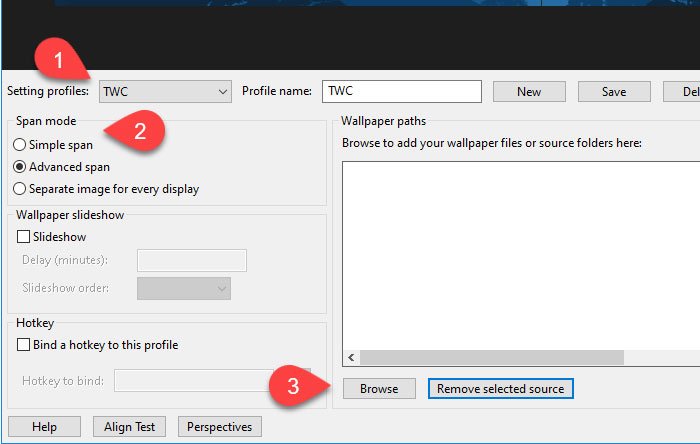
Now, you need to create a new profile. For that, expand the Setting profiles drop-down list, and select the Create a new profile option.
Then, you need to enter a profile name so that you can recognize it in the future. After entering a name, click the Save button.
After that, you should select the Span mode. As mentioned earlier, you can choose anything among Simple span, Advanced span, and Separate image for every display.
The user interface of the first and third option is easy to use.
Therefore, let’s check out the Advanced span in this example.
After choosing the Advanced span mode, you need to select the wallpaper source folder. For that, click the Browse button.

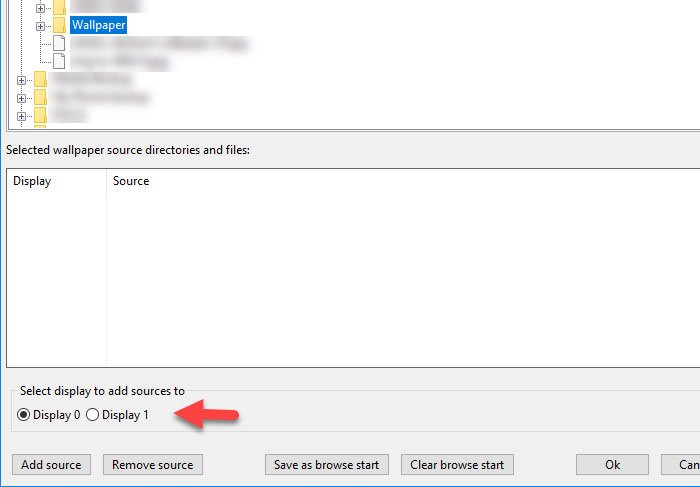
Then, you need to navigate to the folder from where it can fetch all the wallpapers. You must use the Add source button to enlist the folder.
Note: If you choose a separate image for every display option, you will get an option to select the display where you want to show the wallpaper. It generally appears as Display 0, Display 1, and so on.

After adding the source of wallpaper, click the OK button. If the wallpapers are appearing fine in the preview section in Superpaper app, there is no need to do anything else. Otherwise, you can tweak the diagonal size of the display, bezel size, manual offsets, etc.
You will also find a button called Positions, which is visible under the preview section. You can adjust the placement from here if the monitors are not placed correctly.
Two more options for Superpaper are equally important for everyday users.
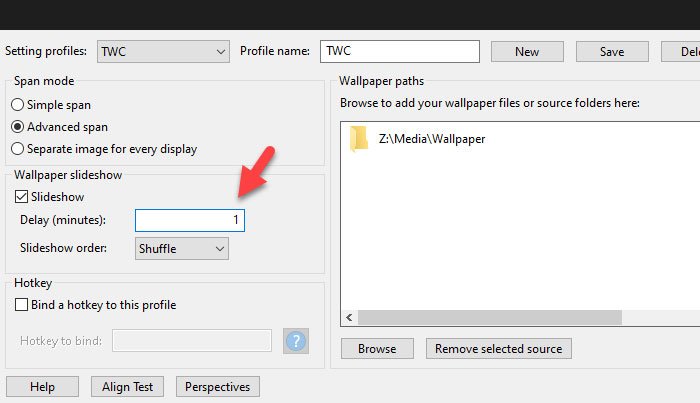
Wallpaper slideshow: If you want to set up a slideshow of wallpaper on your monitor, you can do that as well. To get started, select any Span mode, and tick the Slideshow checkbox. After that, you must set the time in minutes.

Hotkey: You can change the profile using a keyboard shortcut from here. By default, it sets a hotkey, but that can be altered and set anything as per your will. For that, make a tick in the Bind a hotkey to this profile checkbox, and write down the shortcut like this-
Control+super+x
Please note that you need to include super in the keyboard shortcut where the super means the Windows key.
If you like, you can download Superpaper from the official download page.
Read next: How to set different Display Scaling level for Multiple Monitors .
Leave a Reply