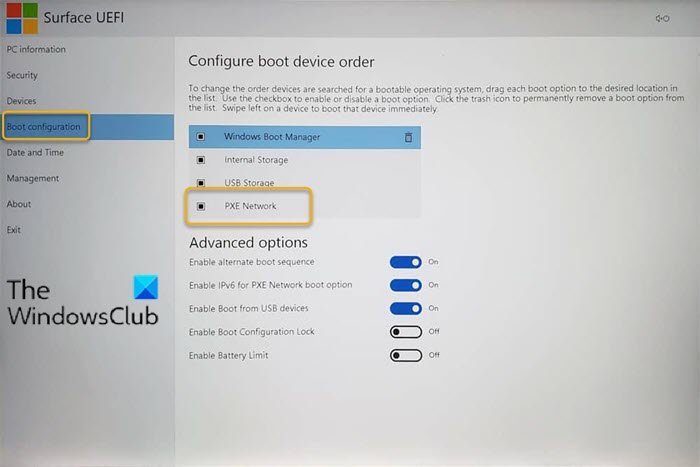
If when you perform the PXE (Preboot Execution Environment) boot on a Surface Laptop by pressing the power and volume-down buttons, the Windows logo may flash, but the PXE boot attempt fails, then this post is intended to help you. This post will outline the steps you can take to resolve this issue.
Surface Laptop PXE boot attempt fails
If you’re faced with this Surface Laptop PXE boot issue, you can follow the instructions below to work around this issue.
- Shut down your Surface Laptop.
- Once the device has turned off, press and hold the volume-up button.
- With the volume-up button held down, press and release the power button.
- Continue holding the volume-up button until the Surface or Windows logo no longer appears on the screen.
You should now see the Surface Unified Extensible Firmware Interface (UEFI) environment.
- Select Boot configuration.
- On the right pane under Configure boot device order, select the PXE Network, and then swipe to the left. This will not affect the boot order.

You should receive the Boot this device immediately message.
- Click OK to exit and perform the PXE Network boot.
Alternatively, you can change the boot order for the Surface Laptop so that PXE Network is at the top of the list. Here’s how:
- Shut down your Surface Laptop.
- Once the device has turned off, press and hold the volume-up button.
- With the volume-up button held down, press and release the power button.
- Continue holding the volume-up button until the Surface or Windows logo no longer appears on the screen.
You should now see the Surface UEFI.
- Select Boot configuration.
- On the right pane under Configure boot device order, select the PXE Network and drag it to the top of the list.
- Select Exit and then select Restart Now.
You can now try the PXE boot again. Your Surface Laptop now should be able to perform the PXE boot successfully!
Read: PXE-E61, Media test failure, check cable boot error.
The Preboot Execution Environment (PXE) is an industry-standard client/server interface that allows networked computers that are not yet loaded with an operating system to be configured and booted remotely by an administrator. The PXE code is typically delivered with a new computer on a read-only memory chip or boot disk that allows the computer (a client) to communicate with the network server so that the client machine can be remotely configured and its operating system can be remotely booted.
The advantages of using PXE include:
- The client machine does not necessarily need an operating system or even a hard disk.
- The client machine can be rebooted in the event of hardware or software failure. This allows the administrator to diagnose and perhaps fix the problem.
- Maintenance is simplified because most tasks are performed remotely.
- Since PXE is vendor-independent, new types of computers can easily be added to the network.
- Centralized data storage provides information security.
PXE provides three things:
- The Dynamic Host Configuration Protocol (DHCP), which allows the client to receive an IP address to gain access to the network servers.
- A set of application program interfaces (API) that are used by the client’s BIOS/UEFI or a downloaded Network Bootstrap Program (NBP) that automates the booting of the operating system and other configuration steps.
- A standard method of initializing the PXE code in the PXE ROM chip or boot disk.
The PXE process consists of the client notifying the server that it uses PXE. If the server uses PXE, it sends the client a list of available boot servers that contain the operating systems. The client finds the boot server it needs and receives the name of the file to download.
The client then downloads the file using Trivial File Transfer Protocol and executes it, which loads the operating system. If a client is equipped with PXE and the server is not, the server ignores the PXE code preventing disruption in the DHCP and Bootstrap Protocol (BP) operations.
Leave a Reply