On BitLocker-supported editions of Windows 11/10, you can temporarily suspend or pause BitLocker protection for an unlocked drive encrypted using BitLocker. For example, if you need to install new software that BitLocker might otherwise block, you can suspend BitLocker—and then resume BitLocker protection on the drive again when you have completed the action. You can suspend or resume BitLocker Protection for Drives via File Explorer, Command Prompt and PowerShell.
If you suspend BitLocker protection for a fixed data drive or removable data drive, the drive remains unlocked and unprotected until you manually resume BitLocker protection for the drive. This is even after you restart the PC or disconnect and reconnect the drive, in the case of a removable data drive. Whereas, if you suspend BitLocker protection for an OS drive, it will remain unlocked and unprotected until you either manually resume BitLocker protection for the drive, or have it resume BitLocker protection automatically the next time you restart the PC.
How to Suspend or Resume BitLocker Protection for Drives in Windows?
You must be signed in as an Administrator to be able to suspend or resume protection for drives encrypted by BitLocker in Windows 11/10. BitLocker Drive Encryption is available on all editions of Windows 11/10, except the Home edition.
1) Stop or Resume BitLocker Protection for Drives via File Explorer
Launch File Explorer, then do the following;
To Suspend BitLocker Protection:

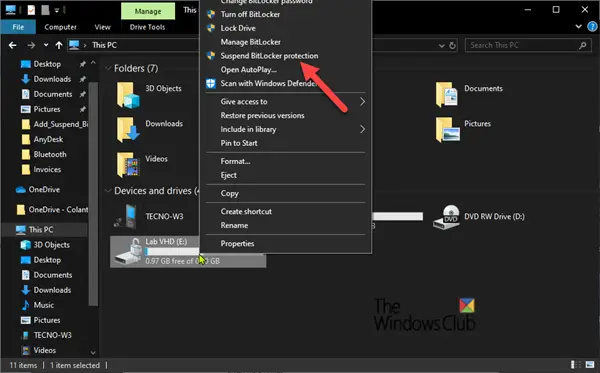
- Right-click on the BitLocker-encrypted drive you want to suspend BitLocker protection for and click Suspend BitLocker protection.
- Click Yes at the UAC prompt
- You can now exit File Explorer.
To Resume BitLocker Protection:

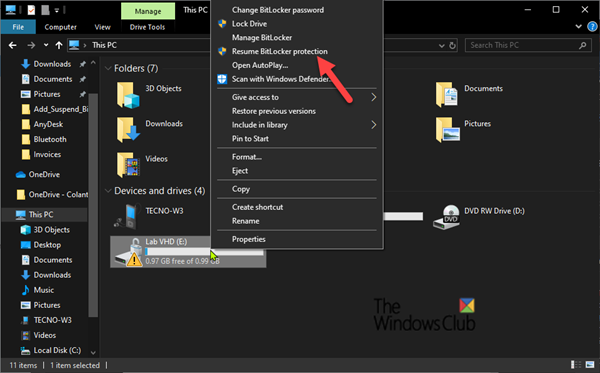
- Right-click on the BitLocker-encrypted drive you want to resume BitLocker protection for and click Resume BitLocker protection.
- You can now exit File Explorer.
Read: How to resume or suspend BitLocker encryption via Control Panel.
2) Disable or Enable back BitLocker Protection for Drives via Command Prompt
Open an elevated command prompt. Then, do the following;
To Suspend BitLocker Protection:

Type the command below in the elevated command prompt, hit Enter.
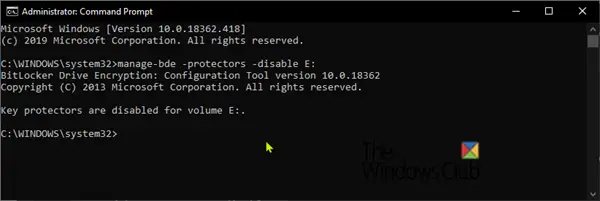
manage-bde -protectors -disable <drive letter>:
Substitute <drive letter> in the command above with the actual drive letter of the encrypted drive you want to suspend BitLocker protection for. Example:
manage-bde -protectors -disable E:
You can now exit the command prompt environment.
Tip: You can check the status of BitLocker for the drive at any time.
To Resume BitLocker Protection:

Type the command below in the elevated command prompt, hit Enter.
manage-bde -protectors -enable <drive letter>:
Substitute <drive letter> in the command above with the actual drive letter of the encrypted drive you want to resume BitLocker protection for. For example:
manage-bde -protectors -enable E:
You can now exit the command prompt environment. You can also check the status of BitLocker for the drive at any time.
3) Suspend or Resume BitLocker Protection for Drives via PowerShell
Open an elevated PowerShell. Then, do the following;
To Suspend BitLocker Protection:
For OS, fixed, or data drives, use the command:
Suspend-BitLocker -MountPoint "<drive letter>:"
For only OS drive, use the command:
Suspend-BitLocker -MountPoint "<drive letter>:" -RebootCount <restarts>
Substitute <drive letter> in the commands above with the actual drive letter of the unlocked encrypted drive you want to suspend protection for. Example:
Suspend-BitLocker -MountPoint "E:"
Substitute <restarts> in the OS command above with a number between 0 to 15 to specify the number of computer restarts before BitLocker automatically restores protection of the OS drive. Specify 0 (zero) to suspend protection indefinitely until you manually resume it. If you do not include the -RebootCount parameter with an OS drive, the cmdlet uses a value of 1 by default. For example:
Suspend-BitLocker -MountPoint "C:" -RebootCount 0
You can now exit the PowerShell environment.
To Resume BitLocker Protection:

For specific drive, use the command:
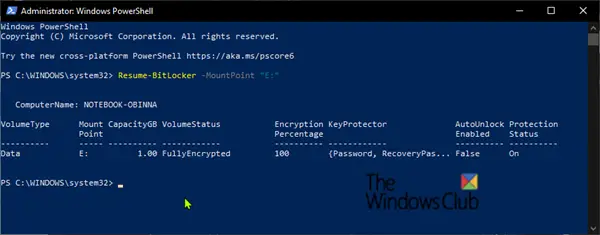
Resume-BitLocker -MountPoint "<drive letter>:"
For all drives, use the command:
Get-BitLockerVolume | Resume-BitLocker
Substitute <drive letter> in the commands above with the actual drive letter of the unlocked encrypted drive you want to resume BitLocker protection for. Example:
Resume-BitLocker -MountPoint "E:"
You can now exit the PowerShell environment. And you can check the status of BitLocker for the drive at any time.
How do I suspend BitLocker encryption in Windows 11?
In order to suspend BitLocker encryption in Windows 11, you can follow the steps mentioned above. That said, you can open This PC first. Next, right-click on the encrypted drive and select the Suspend BitLocker protection option in the context menu. Finally, click on the Yes button on the UAC prompt.
This is how you can Suspend or Resume BitLocker Protection for Drives in Windows 11/10.
Leave a Reply