The System Reserved Partition or EFI System Partition on your hard drive is a tiny sector Windows uses to house system files such as the Boot Configuration Database, Boot Manager Code, and Windows Recovery Environment, and reserve space for the startup files. It is usually created during Windows installation to boot the operating system.
In short, the System Reserved Partition is important and must be operational, so it comes in handy. This post will share how to fix the System Reserved Partition or EFI System Partition on wrong drive error.

Note: System Reserved is for Legacy BIOS. If you are using UEFI, you get EFI System Partition. It is visible when you open any Disk partition software.
Some users in the forums have reported the error, which usually happens when they install Windows with more than one hard drive or multiple physical storages attached to the computer. Since the OS installer needs an unallocated space to create this, it will create it on the second storage device if it doesn’t find it in the primary drive.
Another possible source of this issue is the installation environment. If you try to install Windows and it fails to recognize the correct drive, or if the boot order in the BIOS or UEFI settings is incorrect.
However, since there is no problem and Windows works as usual, nobody notices it. The situation gets tricky when the user needs to remove one of the storage devices which contains the System Reserved Partition or EFI System Partition. If the user removes it, he will not be able to boot because all details related to booting the PC are on that particular partition.
Fix System Reserved Partition or EFI System Partition on wrong drive error
We must ensure that all boot information is on the primary drive to fix the issue before the suggestion in the post is followed. This is important, especially if the System revered Partition is on the wrong drive.
Before starting the process, create a backup of all your data, or at the very least, a copy of whatever is on the C drive. This will help prevent any data loss if the system fails. Additionally, the process requires you to modify files and folders hidden within the operating system; therefore, you should only continue if you are familiar with what you are doing.
1] Open Elevated Command Prompt or Windows Terminal

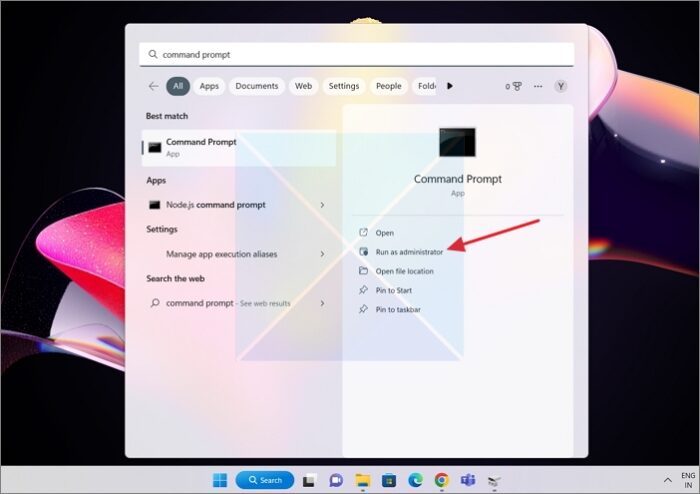
- To get started, press the Windows key on your keyboard to open the Start Search Box, then enter Command Prompt or Windows Terminal into the box that appears.
- Now, right-click on Command Prompt or Windows Terminal and choose the Run as Administrator option.
2] Use BCDBoot to Create Boot Configuration Data
BCDBoot is a command-line tool that allows users to configure the boot files on a PC. You can add boot files to a PC, set up the PC to boot from VHD, Repair the system partition, and even repair the boot menu on a dual-boot PC. In our case, we need to create a new BCD store and initialize the BCD boot-environment files on the system partition, the C Drive available on the primary storage.
In the Command Prompt shell with the privilege level elevated, type bcdboot C:\Windows /s C: and then press Enter.
BCDBOOT <source> [/s <volume-letter>]
- UEFI: BCDBoot copies the boot files to either the EFI system partition or the partition specified by the /s option.
- BIOS: BCDBoot copies the boot files to either the active partition on the primary hard drive or the partition specified by the /s option.
3] Set Drive C to Active
If the C Drive is not set as active, we need to do it manually. If you are wondering, a drive with the startup or boot-related files should be active. The UEFI or BIOS will look for an active partition and then for the boot files.

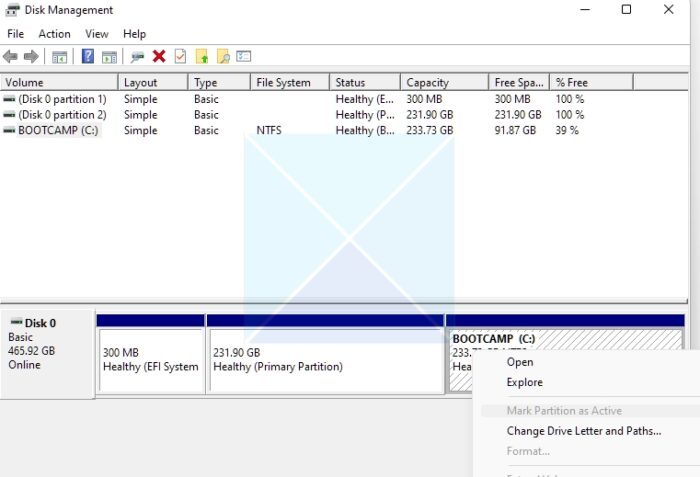
- Launch the Start Search Box once more, and this time, search for Disk Management.
- When the results appear, select the one that says “Create or Format Hard Disk Partitions” from the primary listing.
- Select the Drive which has the C partition.

- Right-click on your C drive within the Disk Management Utility, then select the Mark Partition as Active option from the context menu that appears.
With this done, if you remove your other disk, Windows will boot off your drive C, and there will be no issues.
We hope you found this tutorial on fixing the System Reserved Partition on the wrong drive valuable and informative. The System Reserved Partition or EFI System Partition is vital to your computer’s startup process and must be appropriately configured and active.
Can I delete the system-reserved partition?
It is generally not recommended to delete the system-reserved partition. The system reserved partition is a small partition on a hard drive or solid-state drive used by the Windows operating system to store boot files and other system files. So if you need to remove it, you should only be doing it when you switch to a new Windows drive and an existing system-reserved partition. That said, if you forcibly delete the partition, it will become impossible to start the PC. You will eventually need to use Recovery and the BCD tool to fix the boot records.
Can I move the system reserved partition to a different drive?
The short answer is No, though it was earlier possible in Windows. Also, you don’t need to move the system revered partition anymore. Since the goal is to make another partition active, and it can include the files that are needed to boot the PC, you can use the BCDBoot command to achieve it.
That said, even if somehow, you can do it, it can lead to problems. The system-reserved partition may contain essential files necessary for the operating system’s proper functioning, so moving it to a different drive could cause problems with the system’s stability and performance.