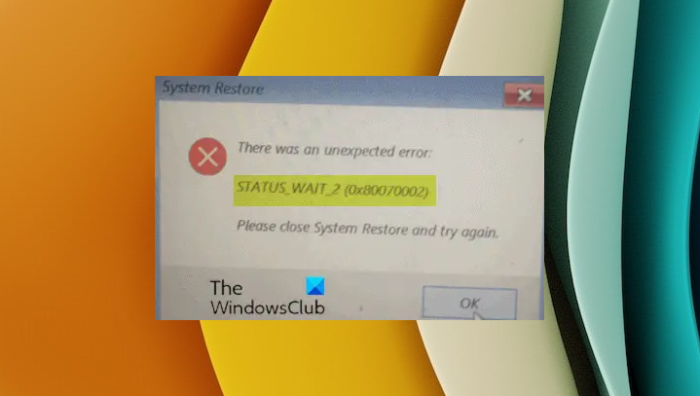
If when you attempt to create a System Image Backup using System Restore on Windows 11/10 and you receive the error message; STATUS_WAIT_2 with code 0x80070002, then this post is intended to help you. In this post, we will identify the possible causes, as well as provide the corresponding solutions you can try to help you mitigate this issue.

When you encounter this issue, you’ll receive the following error message-
System Restore
There was an unexpected error:
STATUS_WAIT_2 (0x80070002)
Please close System Restore and try again.
You might encounter the error due to one or more (but not limited to) of the following known causes-
- System Restore inconsistency.
- Operating System files corruption.
- Windows 10 glitch that ends up creating a persistent rogue guest account DefaultUser0 that the backup utility ends up using instead of the active one (the one with admin access).
Fix System Restore error 0x80070002
If you’re faced with this System Restore error 0x80070002, STATUS_WAIT_2 issue, you can try our recommended solutions outlined below in no particular order and see if that helps to resolve the issue.
- Perform SFC and DISM scan
- Use a 3rd party Backup software
- Delete the DefaultUser0 rogue account (if applicable)
- Perform a Fresh Start, In-place upgrade repair or Cloud Reset
Let’s take a look at the description of the process involved concerning each of the listed solutions.
1] Perform SFC and DISM scan
If you have system file errors, you may encounter the System Restore error 0x80070002, STATUS_WAIT_2.
The SFC/DISM is a utility in Windows that allows users to scan for corruptions in Windows system files and restore corrupted files.
For ease and convenience, you can run the scan using the procedure below.
Press Windows key + R to invoke the Run dialog.
In the Run dialog box, type notepad and hit Enter to open Notepad.
Copy and paste the syntax below into the text editor.
@echo off
date /t & time /t
echo Dism /Online /Cleanup-Image /StartComponentCleanup
Dism /Online /Cleanup-Image /StartComponentCleanup
echo ...
date /t & time /t
echo Dism /Online /Cleanup-Image /RestoreHealth
Dism /Online /Cleanup-Image /RestoreHealth
echo ...
date /t & time /t
echo SFC /scannow
SFC /scannow
date /t & time /t
pause
Save the file with a name and append the .bat file extension – eg; SFC_DISM_scan.bat.
Repeatedly run the batch file with admin privilege (right-click the saved file and select Run as Administrator from the context menu) until it reports no errors.
Restart your PC.
On boot, try creating the system image backup again. If the error persists, continue with the next solution.
2] Use a 3rd party Backup software
This solution entails you use any of the 3rd party Imaging, Backup and Recovery Software capable of doing the same thing as the System Restore utility.
3] Delete the DefaultUser0 rogue account (if applicable)
In some cases, it’s likely that the backup process fails because of a bug that ends up creating a rogue account DefaultUser0 that Windows keeps trying to reconcile even though it no longer exists. This is even more likely if the logs of the error reveal a reference as stated below:
Backup encountered a problem while backing up file C:\Users\defaultuser0\Contacts. Error: ( STATUS_WAIT_2)
If this scenario is applicable, you should be able to fix the issue by removing/deleting the DefaultUser0 rogue account.
Here’s how:
- Boot Windows into Safe Mode.
- In Safe Mode, press Windows key + R, type control, and hit Enter to open Control Panel.
- In Control Panel interface, locate and click User Accounts.
- In the window that appears, click the Manage another account link.
- Once you’re inside the Manage another account window, click on the DefaultUser0 account to select it.
- Click on Delete the account from the next menu.
If prompted whether you want to keep or delete the files belonging to DefaultUser0, click on Delete files. At the final confirmation prompt, click on Delete Account to confirm the operation.
- Next, press Windows key + E to open File Explorer.
- Navigate to C:\Users to see if the DefaultUser0 folder is still there. If it is, right-click it and choose Delete.
If you’re prompted to grant admin access, click Yes at the UAC Prompt.
Once that folder is deleted, you can exit File Explorer.
- Next, invoke the Run dialog again, type regedit and hit Enter to open Registry Editor.
- Navigate or jump to the registry key path below:
Computer\HKEY_LOCAL_MACHINE\SOFTWARE\Microsoft\Windows NT\CurrentVersion\ProfileList
- At the location, select the sub-key that begins with S-1-5-21 at the left pane.
- On the right pane, double-click on ProfileImagepath to edit its properties.
- In the Value data field, if that path points towards C:\Users\DefaultUser0, change it to point towards the primary profile that you’re using.
- Click OK to save changes.
- Exit Registry Editor and reboot your computer.
On boot, attempt to create a backup once again with System Restore and see if the error 0x80070002, STATUS_WAIT_2 is fixed. If not try the next solution.
4] Perform In-place upgrade repair or Cloud Reset
At this point, if the System Restore error 0x80070002, STATUS_WAIT_2 is still unresolved, it’s most likely due to some kind of system corruption that cannot be resolved conventionally. In this case, you can try Fresh Start, In-place upgrade repair to reset every Windows component. Also, you can try Cloud Reset and see if that helps.
Any of these solutions should help you fix your System Restore problems.
NOTE: Error 0x80070002 can also be seen when using Windows Update, Windows Upgrade, Windows Features, Installer, Microsoft Store, Windows Backup, Outlook, Sandbox, Microsoft Account, Printer, and Hyper-V.
Leave a Reply