Many times, we opt for a System Restore to fix a problem. In most cases, it solves the problem within minutes. However, at times, System Restore fails and we may see error messages.

System Restore failed while restoring the directory from the restore point – 0x80070091, 0x800703f9, 80070002
- System Restore did not complete successfully. Your computer’s system files and settings were not changed.
- Details: System Restore failed while restoring the directory from the restore point.
- Source: AppxStaging
- Destination: %ProgramFiles%\WindowsApps
- An unspecified error occurred during System Restore. (0x80070091)
The error code displayed could also be 0x800703f9 or 80070002.
This article will show you how to solve this issue.
System Restore failed in Windows
If you receive System Restore failed while restoring, copying or mounting the directory from the restore point error on Windows 11/10, then this post will guide you.
There are two different methods to solve this issue and both of them are mainly for Windows 11/10. Although, you can use the same technique on Windows 8.1/8 as well, with minor variations.
As the error message indicates, the problem is likely due to the WindowsApps folder, which contains all the apps’ data and installation files. A post on Answers states that it is possible to solve the issue if you can rename the WindowsApps folder. But the problem is that you cannot change it like other regular folder or files since it contains all the data of installed apps. Therefore, the following two solutions will let you rename the WindowsApps folder so that you can fix the failed System Restore operation on Windows 11/10.
Related: System restore failed while copying, restoring or mounting the Registry.
1] Rename the folder in Safe Mode
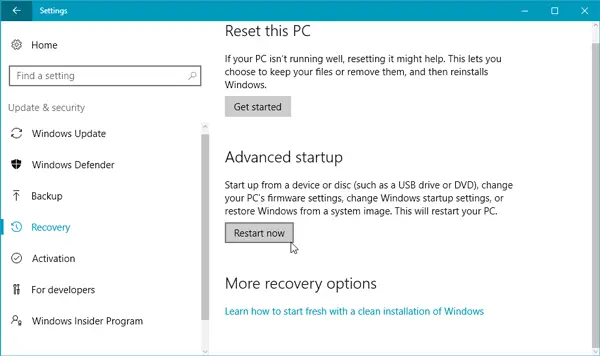
Safe Mode works as a very good problem solver for many people when something goes wrong. So boot your Windows computer in Safe Mode. To do so, open Settings panel (Win + I) on Windows 11/10. Therefore, go to
To do so, open Settings panel (Win+I) on Windows 11/10, go to Update & security > Recovery. Under the Advanced startup option, you will see a Restart now button.

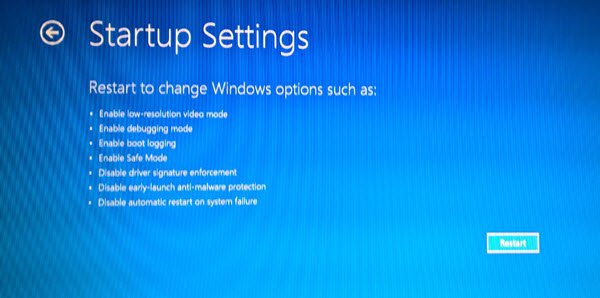
Press that button and you will boot into Advanced Startup Options.

To reach the above screen, on restart you will have to press Troubleshoot > Advanced Options > Startup Settings > Restart, and then press 4 to restart your Windows machine in Safe Mode.
Once you enter Safe Mode, open Command Prompt with Administrator privilege and enter the following commands, one after the other:
cd C:\Program Files

takeown /f WindowsApps /r /d Y

icacls WindowsApps /grant “%USERDOMAIN%\%USERNAME%”:(F) /t

attrib WindowsApps -h

rename WindowsApps WindowsApps.old
Now reboot your PC and check whether System Restore is working or not.
Related errors:
- System Restore failed to replace the file, Error Code 0x80070780
- System Restore failed to extract the file, Error Code 0x80071160.
2] From WinRE (Windows Recovery Environment)
You can run Command Prompt on Windows Recovery Environment and see if that helps. To do so, go to Settings > Update & security > Recovery. Click on the Restart now button under Advanced startup.
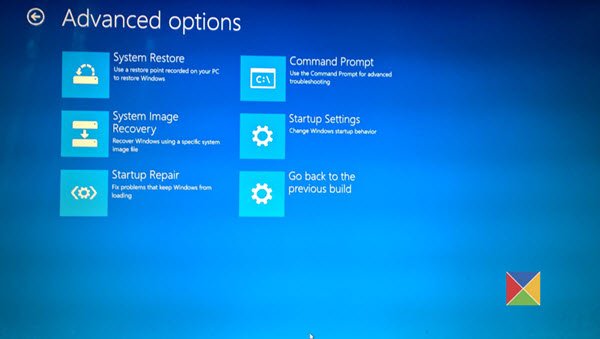
On a restart, you will reach the Advances Startup Options screen. Now you have to go to Troubleshoot > Advanced Options to reach the following screen.

Click on Command Prompt. It may ask you to enter your admin password. Now execute the following commands:
cd C:\Program Files

attrib WindowsApps -h

rename WindowsApps WindowsAppsOld
Having done this, reboot your computer and check if the System Restore is working or not.
PS: There are other suggestions that can help you resolve System Restore not working issues on Windows 11/10/8/7.
Very nice article !!