If you have been waiting for a system-wide DNS over HTTPS service for your Windows 11/10 computer, here is good news for you. Now you can enable and test DNS over HTTPS in Windows 11/10 with a little tweak. If you are a part of the Windows Insider Program, you can check it today, whereas stable version users might have to wait a bit.
DNS over HTTPS or DoH helps you to get rid of the ISP monitoring. Currently, it is possible to enable DNS over HTTPS in Firefox, Chrome, Edge, Opera, etc. browsers. However, now you can do the same as a system-wide setting in Windows 11/10.
DoH prevents ISPs from tracking users’ activity by bypassing the default DNS service. Whenever you connect to the Internet, it goes through a DNS service provided by the ISP by default, and this is how the ISP keeps an eye on you. If you want to get rid of that, you should use DNS over HTTPS.
How to Enable DNS over HTTPS in Windows 11/10
To enable and test DNS over HTTPS in Windows 11/10, follow these steps-
- Open Registry Editor on your PC.
- Navigate to the Dnscache\Parameters key.
- Create a new DWORD value.
- Name it as EnableAutoDoh.
- Set the value to
- Add the DNS server in the Control Panel.
- Restart your computer.
- Open elevated Command Prompt.
- Reset network traffic filters.
- Add a new traffic filter for Port 53.
- Start real-time traffic logging.
To know more about these steps in detail, read on.
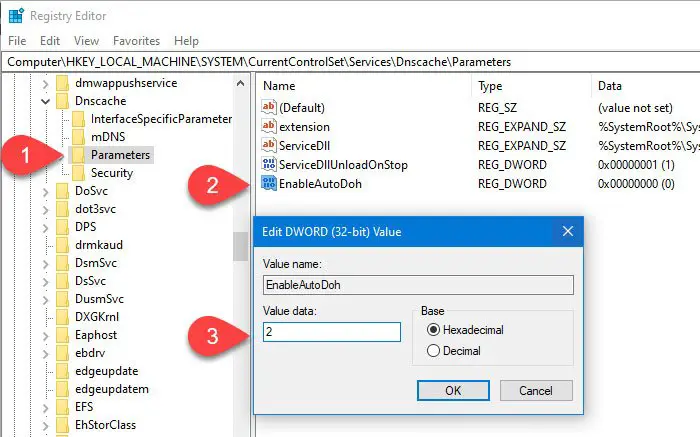
As this feature is under development, users need to create a new Registry value to turn on the DoH service. For that, you need to open the Registry Editor on your PC and navigate to this path-
HKEY_LOCAL_MACHINE\SYSTEM\CurrentControlSet\Services\Dnscache\Parameters
Here you need to create a new DWORD (32-bit) value.
Right-click on the space, select New, and choose the DWORD (32-bit) Value. After that, name it as EnableAutoDoh.
Now, you need to set the value to 2. For that, double-click on EnableAutoDoh, type 2, and click the OK button.

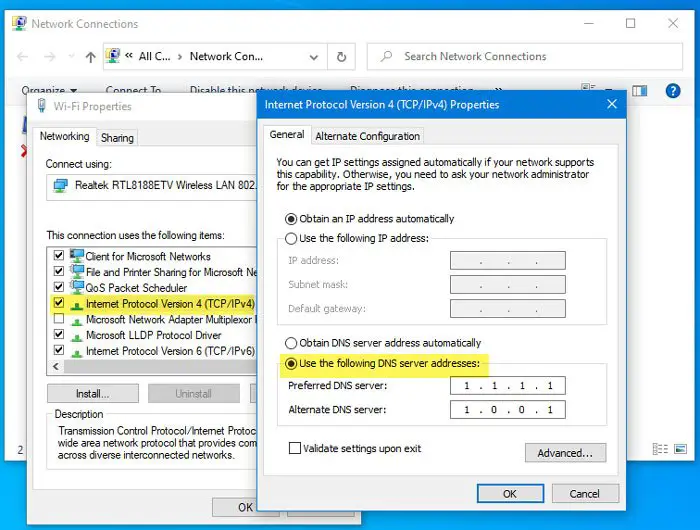
Then, you need to change the default DNS settings on your computer.
For that, press Win+R, type ncpa.cpl, and hit the Enter button. Next, right-click on the currently connected network and select Properties.
Double-click on the Internet Protocol Version 4 (TCP/IPv4) or Internet Protocol Version 6 (TCP/IPv6). It depends on which version of IP your ISP is using.
Next, select Use the following DNS server addresses radio button, and enter the IP addresses as follows:
Google:
8.8.8.8
8.8.4.4
2001:4860:4860::8888
2001:4860:4860::8844
Cloudflare
1.1.1.1
1.0.0.1
2606:4700:4700::1111
2606:4700:4700::1001
Quad9
9.9.9.9
149.112.112.112
2620:fe::fe
2620:fe::fe:9
Read : How to set up and use CloudFlare’s new DNS service 1.1.1.1.

After that, click the OK button, close all the windows, and restart your computer as it is the best way to restart the DNS service.
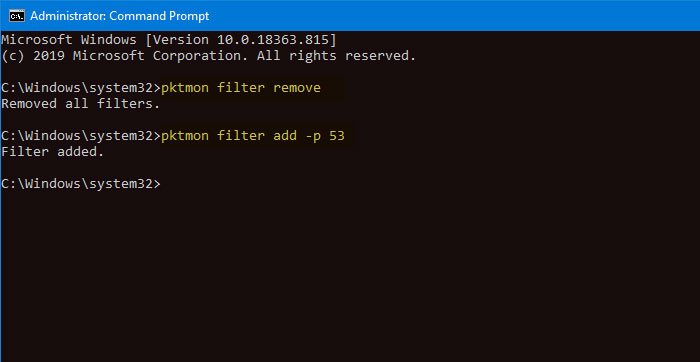
Now, you need to open an elevated Windows PowerShell or Command Prompt window and execute this command-
pktmon filter remove
The pktmon command will reset the current network traffic filters.
Next, use the following command to add a traffic filter for port 53.
pktmon filter add -p 53

At this point, you are almost set. Now, you need to start logging the real-time traffic so that you can understand the monitoring process-
pktmon start --etw -m real-time
All the port 53 packets should be redirected and printed to the command line.
However, if you want to test a DoH server that isn’t in the official auto-promotion list, you need to register it first from your computer. For that, you can enter the following command-
netsh dns add encryption server=<your-server’s-IP-address> dohtemplate=<your-server’s-DoH-URI-template>
Don’t forget to make the necessary changes in this command. Now, you can verify the addition by using this command-
netsh dns show encryption server=<your-server’s-IP-address>
It should show the new template that you just added. After that, you can go through the real-time traffic logging step.
I hope this tutorial will help you.
Read:
Leave a Reply