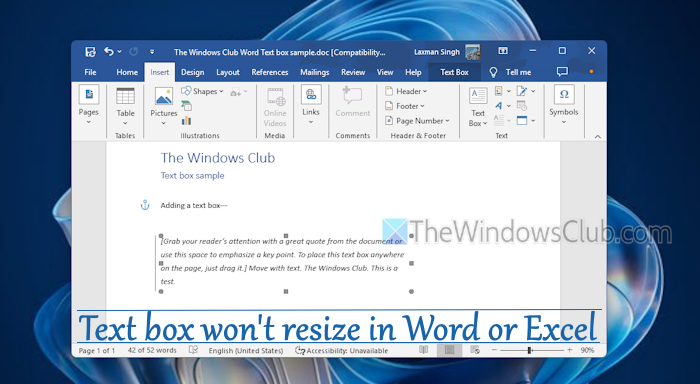
In Microsoft Word or Excel, we can insert a pre-formatted text box or draw a text box as well as resize it to put and type text anywhere in a document or sheet. However, some users have complained that the text box won’t resize in their Word or Excel documents on Windows PC. They can add text boxes and move them but can’t resize them. Users find that the text box handles (white circles and squares) are greyed out, as visible in the image below, and because of this, they can’t resize the text box. For some other users, the text box can’t be moved either. If you also face this problem, the working solutions added in this post will help.
Why can’t I change the size of a text box in Word?
This problem can most likely occur when we open a *.doc format document in a newer version of Microsoft Word (say Office 2016, Office 2019, etc.). In that case, the DOC file is opened in Compatibility Mode preserving the document layout and new or enhanced features are disabled in Word. On the other hand, if you cannot change the height and width of a text box independently, it happens when the aspect ratio is locked for the text box.
Text box won’t resize in Word or Excel [Fix]
If the text box won’t resize in Word or Excel on a Windows 11/10 PC, use the options covered below. Before that, update Microsoft Word or Excel, insert a text box, and check if the problem is gone. If not, use these solutions:
- Check if the document is opened in Compatibility Mode
- Convert your Word document or Excel workbook
- Edit text box points
- Change text box height and width manually
- Use Layout options
- Repair Office.
Let’s check these solutions.
1] Check if the document is opened in Compatibility Mode

Whether it is a DOC or DOCX format document, if it is opened in the Compatibility Mode, you may face issues while resizing a text box or using enhanced features of Word. The same goes for an Excel workbook. So, first, you need to check if your document is opened in Compatibility Mode which is causing this problem. You can do this using any of these options:
- Look at the title bar of your Word document. If you see [Compatibility Mode] just next to the file name, that clears the doubt
- Go to File > Info. If there’s a Convert button, the document is opened in the Compatibility Mode
- Open the Word Options (File > More… > Options) box. Select the Advanced category and scroll down to the Compatibility options for section. If you see a long list of options there, it indicates the document is opened in the Compatibility Mode.
Related: How to change Text Direction in Word
2] Convert your Word document or Excel workbook
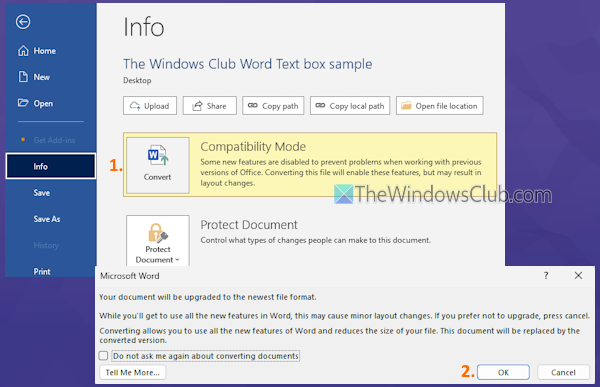
Now that you know your document is opened in the Compatibility Mode, you need to convert your Word document or Excel workbook to a newer format to fix this issue. There are multiple ways to do this:
- Navigate to File > Info and press the Convert button. In the box that appears, press the OK button. This action will convert your document to the current file format and Compatibility Mode will gone. However, do note that this option doesn’t save your document in the newer format. You have to convert it manually
- Open the File menu, click the Save As option, and select a save location. In the Save As window, select the Save as type to *.docx format if not set already. This will disable or turn off Compatibility Mode in Word and save a new copy of your document in the newer format. Similarly, you can turn off Compatibility Mode in Excel and save it in XLSX format
- You can also use a free third-party conversion tool such as CloudConvert, FreeConvert, AVS Document Converter, etc., that provides DOC to DOCX and XLS to XLSX conversion.
3] Edit text box points
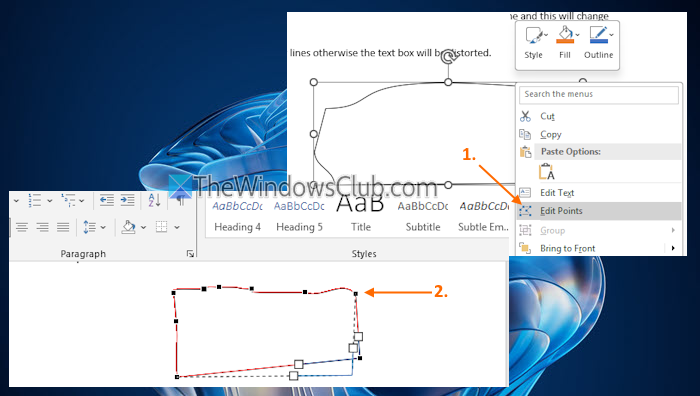
If you can’t use text box handles to resize it, use the text box points instead. For this:
- Select the text box
- Right-click on the border of the text box
- Click on the Edit Points option
- Now the black dots or tiny squares will appear. Use those squares or drag any line to adjust the shape of the text box.
You need to be very careful to drag lines or points otherwise the text box shape will be distorted.
4] Change text box height and width manually
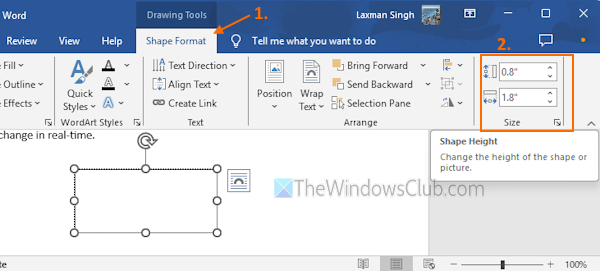
Use the following steps to manually change the height and width of a text box in a Word document or Excel workbook:
- Select the text box
- Go to the Shape Format menu in the Ribbon. If you have opened a DOC format file in the Compatibility Mode, then you will see a Text Box menu instead of the Shape Format menu
- Look for the Size group on the right part
- There, you will see the Shape Height and Shape Width options. Change the numbers there and the text box size will change in real time.
Also read: Microsoft Word cannot select or highlight text with mouse
5] Use Layout Options
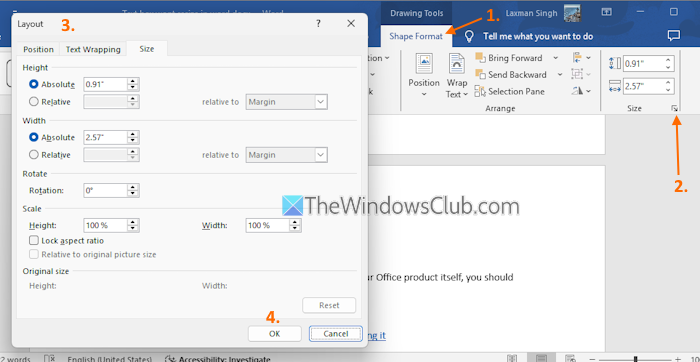
Layout Options help to set the position, adjust height & width, rotation, scaling, set text wrapping style, lock or unlock aspect ratio of a shape or picture, etc. And, these options can also be used for a text box. If you can’t move or resize a text box using text box handles and other ways or you face difficulty in properly resizing a text box, Layout Options will come in handy. Here are the steps:
- Select a text box in your document
- Switch to the Shape Format menu. Again, if you are using an older format document, then access the Text Box menu
- Click the dialog launcher icon (small arrow) in the Size group
- This will open a Layout Options box where you will see Position, Text Wrapping, and Size tabs. Access these tabs to lock/unlock the aspect ratio of the text box to change height and width independently, set the scaling (height and width), change the text box position, and use other customization options.
You can’t see the changes or output preview in real time. So, you have to press OK each time you use the customization options to apply and save the changes.
6] Repair Office
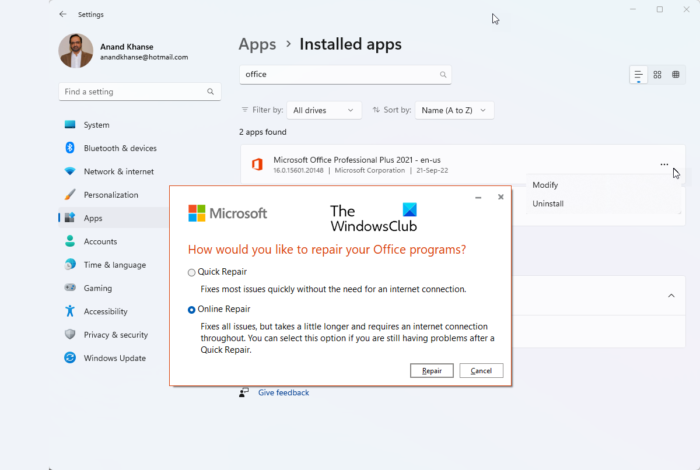
If none of these options work and there’s a problem with the Office product itself, you should repair Office.
I hope this helps.
Now read: How to type Text over a Line in Word without moving it
How do you resize a text box to fit text?
To automatically resize a text box to fit text in Word, select a text box. Go to the Shape Format menu and click the dialog launcher icon in the Shape Styles group. A Format Shape sidebar will open on the right part. Select the Shape Options and click the Layout & Properties icon. Expand the Text Box section and tick mark the Resize shape to fit text option. After that, when you type text in it, the text box size will adjust accordingly.
Read next: Unable to hide Text in Word.
Leave a Reply