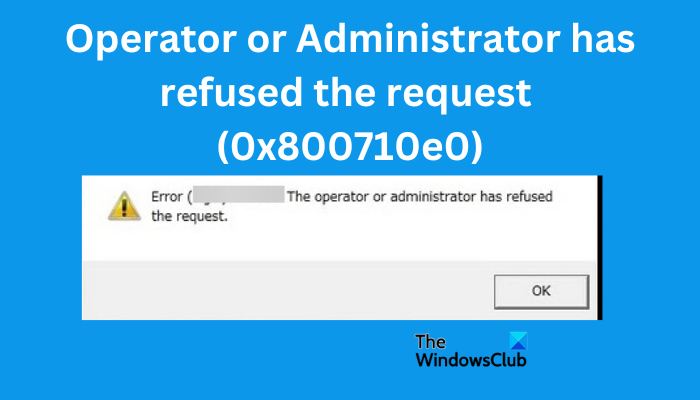
In this article, we will look at how we can fix The operator or administrator has refused the request, Error 0x800710e0 in the Windows Task Scheduler. The error happens even to those with administrative privileges, making it hard to know why it occurs in the first place.

If the criteria are met, the Task Scheduler will execute the tasks automatically by monitoring what made you choose or create them. Some users have reported that the code 0x800710e0 occurs when they update the tasks after their domain password is modified or changed. Even when they select the Run whether user is logged on or not option, they still get the error on the Task Scheduler.
Why do I get Operator or Administrator has refused the request (0x800710e0)
The Operator or Administrator has refused the request (0x800710e0) error happens when there are issues with user privileges. For example, it can occur if you use an administrator’s account that doesn’t have a password. If you get a warning that you cannot proceed without a password, ignored it, and you let the Task Scheduler open; you will get the error code 0x800710e0. The error will also happen if you use the wrong permissions when setting up your tasks. The other cause is incorrect power settings in the Task Scheduler.
Fix The operator or administrator has refused the request, Error 0x800710e0
The error Operator or Administrator has refused the request is triggered by permissions and privileges. So, the solutions to this error will revolve around tweaking your settings when scheduling or after an update. To fix this issue, try the following solutions:
- Tweak the Power settings
- Ensure you have the correct permissions and privileges
Lets us delve into these solutions one by one
1] Tweak the Power settings

Some users reported that they get the Task Scheduler error when they are not plugged into AC power. This happens when you are not using a server or a PC or laptop that is always connected to AC power. You need to change the power settings while settings up a task, and this is how;
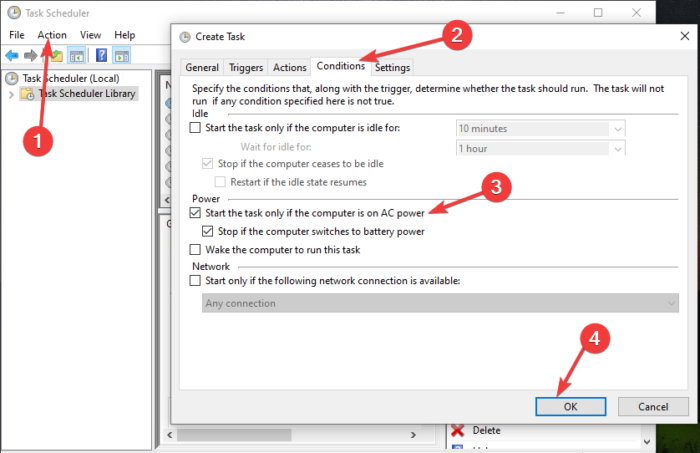
- Open the Task Scheduler and go to the Conditions section. You can search it in the search box and select Open or click the first search results.
- Click on Actions and then select Create Task at the left side of the Task Scheduler panel.
- Locate the Power option and untick the box next to Start the task only if the computer is on AC power.
- If you want to run the jobs when the PC is asleep, then check the box next to Wake the computer to run this task.
Test if the solution worked by running the schedule. This should work for most users.
2] Ensure you have the correct permissions and privileges

For the Task Scheduler to open programs, run scripts, or perform tasks automatically, your should create tasks using the correct privileges and permissions. If you do not have administrator privileges, then you should have admin permissions to run tasks successfully without errors. Ensure the following steps are checked;
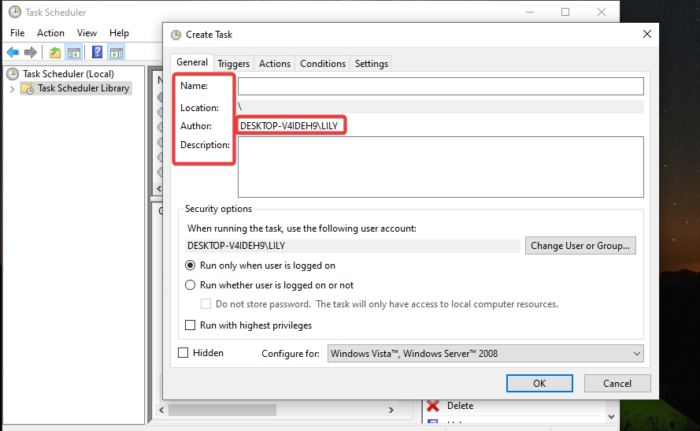
- Ensure that you are using the correct username and that the spellings are right. You can check this under the General tab when creating a task. Also, ensure that the Location and Author are correctly indicated.
- If you want to assign an already created task to a certain user or group, Click Change User or Group and select the users or group. A normal user account may not work for tasks with system or administrator privileges or permissions.
- If you tick the box next to Run with highest privileges, ensure that the user under the task has the privileges or permissions to run the jobs.
- Enabling the Run whether the user is logged on or not option makes the task run always; non-stop.
We hope the solutions and tips in this post work for you.
Important: How to enable or disable Scheduled Task in Windows
How do I enable History in Task Scheduler?
To enable history in Task Scheduler on Windows 11 or Windows 10, Open the app and right-click on Task Scheduler Library. You will see a list of options; locate the Enable All Tasks History option. This will enable the event history in Task Scheduler. If you wish to disable event history, follow the same procedure and select Disable All Tasks History as the last option.
You can also use the Windows Command Prompt to enable the event history for Task Scheduler. Open the Command Prompt and select Run as administrator. Type or copy and paste the following command line and hit Enter on your computer keyboard:
wevtutil set-log Microsoft-Windows-TaskScheduler/Operational /enabled:true
If you want to confirm if the Task scheduler history is enabled, copy and paste the following command line and press Enter on your keyboard;
wevtutil get-log Microsoft-Windows-TaskScheduler/Operational
To disable the Task Scheduler history using the Command Prompt, copy and paste the command line below and press Enter on your keyboard:
wevtutil set-log Microsoft-Windows-TaskScheduler/Operational /enabled:false
Read: Prevent others from creating Tasks in Task Scheduler
How do I start a PowerShell script from Task Scheduler?
To start a PowerShell script from the Task Scheduler, open the app and go to the Task Scheduler Library. Locate the created task and right-click on it and then select Run. Now, go to the script file location. Here verify is the new report has been created which is the output from the script. That’s how to start the PowerShell script from the Task Scheduler if you have already created the tasks.