If you see The sign-in method you’re trying to use isn’t allowed error while trying to log in to a Windows PC, then this post is sure to resolve the issue. The error message occurs when you try to login in with a guest account on a Windows 11/10 PC or with any other account except for the Domain administrator on a Domain Controller (network server that allows host access to domain resources). The complete error message says:
The sign-in method you are trying to use isn’t allowed. Try a different sign-in method or contact your system or network administrator.

The Sign-in method you’re trying to use isn’t allowed
System or network administrators can restrict specific users or groups from accessing a computer or a domain controller by configuring Group Policy Objects. In such a case, the restricted user will not be able to log in to the computer or the network domain and see this message on the screen. Essentially, this is a privacy and security feature and cannot be considered an error, but sometimes, the restriction may be unintentionally imposed by the administrator, and in rare cases, the communication between a client and a domain controller may be blocked by a security software leading to the error message.
If you see the sign-in method you’re trying to use isn’t allowed error on your computer screen, then use these suggestions to resolve the error:
- Add User to ‘Allow Log on Locally’ Group Policy
- Remove User from ‘Deny Log on Locally’ Group Policy
Note: You can remove this restriction if you have access to the administrator account or the domain controller. Otherwise, you will have to request your administrator to do the needful.
Let us see these in detail.
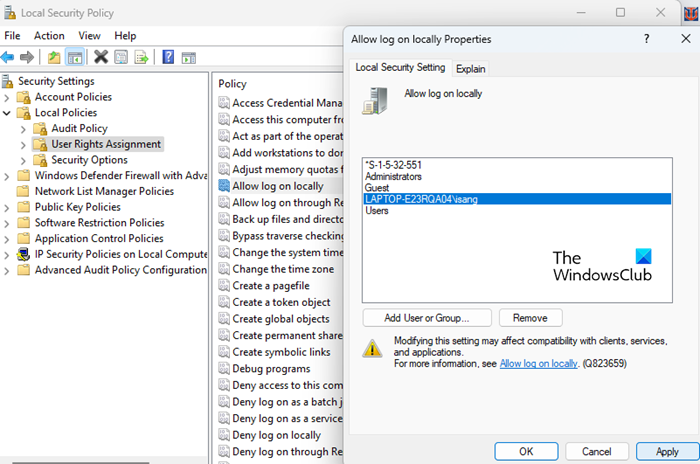
1] Add User to ‘Allow Log on Locally’ Group Policy

This policy contains a list of users that are allowed to log on to a computer locally. Follow these steps to modify the policy settings:
A] On a Standalone Computer
- Press Win+R to open the Run dialogue box.
- Type ‘secpol.msc‘ and press the Enter key.
- This will open the Local Security Policy.
- Navigate to Local Policies\User Rights Assignment.
- On the right panel, double-click on Allow log on locally.
- In the policy properties window, click on the Add User or Group button.
- In the next window that pops up, click on the Advanced button.
- In the next window, click on the Object Types button, select all options and click on OK.
- Then click on the Find Now button.
- Select the user/group from the list of search results and click on the OK button.
- Again click on the OK button.
- Then click on the Apply button.
- Reboot your PC to apply the changes. If you do not want to reboot, you can type
gpupdate /forcein an elevated Command Prompt and press the Enter key to force apply the Group Policy update.
B] On a Domain Server
- Open the Group Policy Management Console.
- Navigate to <domain_name>\Domains\<domain_name>\Group Policy Objects.
- In the right panel, double-click on Default Domain Controller Policy.
- This will open the Group Policy Management Editor.
- Navigate to Computer Configuration\Policies\Windows Settings\Security Settings\Local Policies\User Rights Assignments.
- In the right panel, double-click on Allow log on locally.
- Then click on Add User or Group > Advanced.
- Click on Object Types, select all objects and click on OK.
- Then click on the Find Now button and select the specific user/group from the list that appears.
- Click OK three times in a row while closing the windows.
- Reboot the PC to apply the changes.
Also Read: How to reset all Local Group Policy settings to default in Windows .
2] Remove User from ‘Deny Log on Locally’ Group Policy

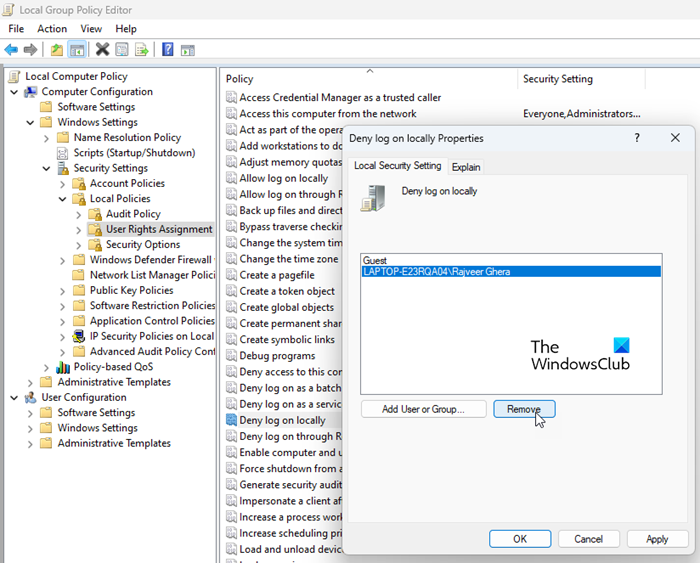
This policy disables local login for specific users or groups. It has higher priority than the ‘Allow Log on Locally’ group policy. So if a user is assigned both of these policies (multiple policies can be assigned to users in a domain environment), he will not be able to log in to the system. To remove this restriction, you need to follow these steps:
A] On a Standalone Computer
- Open the Local Security Policy as explained above.
- Navigate to Local Policies\User Rights Assignment.
- In the right panel, double-click on Deny log on locally.
- If the specific user/group is listed there, select it.
- Click on the Remove button.
- Reboot your PC to apply changes.
B] On a Domain Server
- Open the Group Policy Management Console.
- Navigate to <domain_name>\Domains\<domain_name>\Group Policy Objects.
- Double-click on Default Domain Controller Policy in the right panel.
- In the Group Policy Management Editor window that appears, navigate to Computer Configuration\Policies\Windows Settings\Security Settings\Local Policies\User Rights Assignments.
- In the right panel, double-click on Deny log on locally.
- Check if the specific user/group is listed there. If yes, select the user/group.
- Click on the Remove button.
- Reboot your PC to apply the changes.
Apart from the above-mentioned GPO settings, the Advance Security settings in Windows Defender Firewall or similar settings in third-party security software can also restrict users of the domain groups, known as the Network Access Groups (NAGs) from accessing a device. So you should check your firewall or security software and reconfigure it to allow the user access to the domain.
Hope this helps.
Read Next: Fix IPv6 Connectivity, No network access error on Windows.