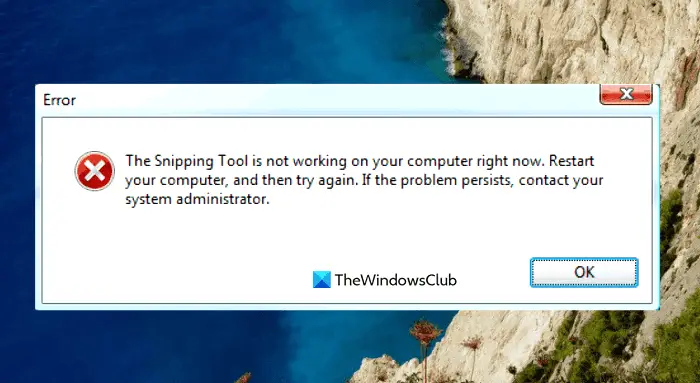
The Snipping Tool is a screenshot tool that is built into Windows. It captures the contents of your screen and allows you to draw on it, and you can then save or share your work. There have been reports of users being unable to use the Snipping Tool because it does not open when they try to open it. In this article, we will explain why the Snipping Tool is not working, including its solution. This problem occurs with the following message when triggered:
The Snipping Tool is not working on your computer right now. Restart your computer, and then try again. If the problem persists, contact your system administrator.

What is the use of the Snipping Tool in Windows?
Snipping Tool is a very handy program that every Windows user should know how to use. It’s free and simple to use and can be accessed instantly by pressing the Print Screen key on your keyboard. This tool is great for teachers, students, web designers, developers, engineers, or anyone who wants to capture screenshots of anything on their screen.
You can use the snipping tool in Windows to capture a screenshot of a particular part of your screen. Your options with the snipping tool depend on what version of Windows you are using. In general, you will be able to get a rectangular or free-form shape from what is on your screen and then get it saved as a file type that you desire.
The Snipping Tool is not working on your computer right now
If you find that Snipping Tool is not working on your Windows 11/10 computer, you can try the below suggestions to solve this issue:
- Relaunch the Snipping Tool
- Run System File Checker tool
- Identify the conflicting software
- Disable/Enable the Snipping Tool
- Reset or Reinstall Snipping Tool.
Let’s now see them in detail:
1] Relaunch the Snipping Tool
Alternatively, you can close Snipping Tool and then relaunch it. By doing so, you won’t need to reboot your computer. The following steps can guide you through the process.
- Open the Task Manager first.
- Click on the More details down arrow key to expand the window.
- Under the Processes tab, select SnippingTool and then click on the End task button.
- Open the Snipping Tool once again.
The program should now work properly.
Related: Recording Stopped error in Snipping Tool
2] Run System File Checker tool
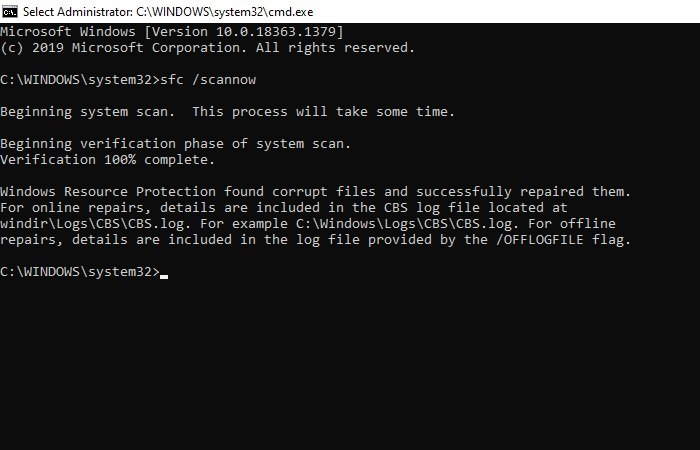
This problem can also occur due to the presence of corrupted system files and running the System File Checker tool will fix the issue. So, follow the below suggestions and see if it works:

- Right-click on Start and open the Run command.
- Type cmd in the text box and press Ctrl+Shift+Enter to launch the command prompt as an administrator.
- If UAC prompts on the screen, click on the Yes button to proceed.
- Inside the Command Prompt window, type the below command line and press Enter to execute it
sfc /scannow
- The procedure may take some time, so be patient.
So, if you want to do anything else while your system scans the text code, then you can do it. Once it successfully scans your Windows device, restart your computer and see if you can now open the Snipping Tool on your computer.
Read: Fix Snipping Tool This app can’t open error
3] Identify the conflicting software
A conflict between Snipping Tool and other software may lead to this issue. Therefore, you should check your computer for any problematic software, especially freshly installed programs, and disable them once you find them.

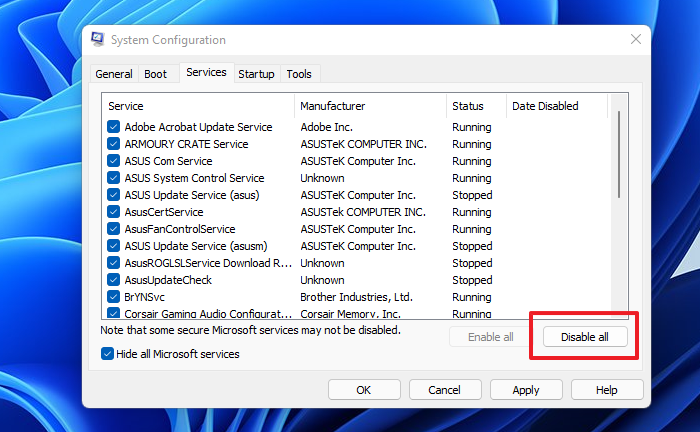
- Click on the Start button and type MSConfig into the search box.
- Select the search result to access System Configuration.
- Switch to the Services once System Configuration has opened.
- After that, mark the Hide all Microsoft services checkbox.
- The next step is to select the suspected services, especially those associated with the newly installed software.
- Then click on the Disable all button.
- Click Apply > OK to save the changes.
Once you restart your PC, see if Snipping Tool is working now in Clean Boot State, else you may need to manually identify and eliminate the offending software.
Related: A problem with Windows is preventing Screen Snipping from opening
4] Disable/Enable the Snipping Tool

In the case where none of the above methods work, we recommend disabling the Snipping Tool and enable it again. The following steps will show you how to do this:
- Open the Start menu.
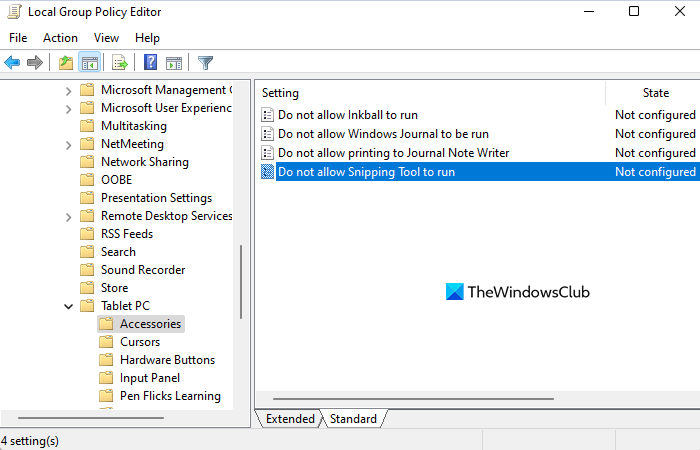
- Type gpedit.msc and press Enter to open Local Group Policy.
- On the next screen, navigate to the following locations: User Configuration > Administrative Templates > Windows Components > Tablet PC > Accessories.
- Go to the right side of the page and double-click on Do not allow Snipping Tool to run
- Mark the Enabled checkbox and then click the OK button.
- Next, select Not Configured or Disabled and then click Apply > OK.
Read: Snipping tool missing in Windows 11
5] Reset or Reinstall Snipping Tool

If nothing helps, open Windows Settings > Installed apps > Snipping Tool > Advanced options.
Click on the Reset button, restart your PC and see if it helps.
If it does not, Uninstall it, go to the Microsoft Store to download and install it, and see if that helps.
Why is Snipping Tool not working?
These are the main reasons why the snipping tool may not work on your Windows PC.
- A change in the default save path has prevented the Snipping Tool from correctly saving screenshots.
- If some system files related to the Snipping tool are damaged, they may not function properly.
- Snipping Tool may conflict with some third-party applications.
Related: Snipping Tool locked, freezes, or crashes in Windows.
Leave a Reply