One of the best ways to personalize your computer is by applying a theme of your choice. But none of us would want the themes we set to change automatically to something else. In this post, we are going to discuss this issue and see what you should do if your Theme keeps changing on your Windows computer.
Why does my Windows theme keep changing?
Usually, if you have other devices in the light mode with the sync feature enabled, then there’s a high chance that your theme will change abruptly. You can turn off the sync feature and restart the PC to eliminate this issue. If that’s not the case, then it’s possible that you have enabled the Slideshow background feature or there are some conflicts in your recently updated Windows.
Fix Theme keeps changing in Windows 11/10
In case the Theme keeps changing on your PC, try the solutions mentioned below to fix the issue:
- Change Power Plan settings
- Do Not Sync your Settings
- Scan your PC for viruses
- Delete your icon cache files
- Uninstall the new Windows update
- Try System Restore
Let’s start with the first solution.
1] Change Power Plan settings
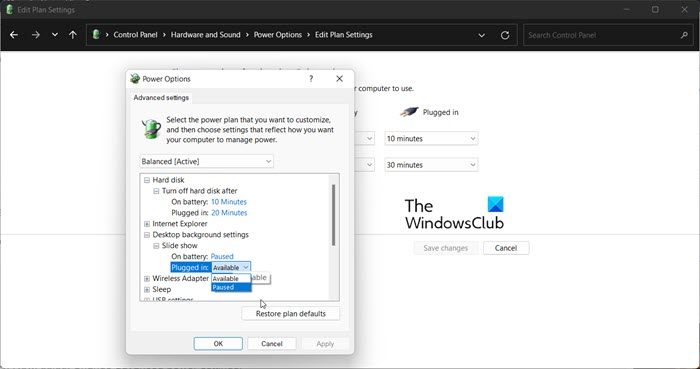
If themes keep changing, the first thing you should be doing is changing the background settings. Many users have resolved the issue by disabling some of the Power Plan settings, so, we will try to do the same.
Follow the prescribed steps to do the same.
- Click Win+R to open the Run Dialogue box.
- Type the following and then click Enter button.
powercfg.cpl
- In the Power plans, click on the Change plan settings of the selected option.
- Now, select Change advanced power settings.
- Expand Desktop background settings > Slideshow and change the settings of On battery and Plugged in to either Disable or Pause.
- Click on the OK and Apply buttons to save the changes.
After making the changes, restart your PC and see if the theme is still changing. In case you are still facing the issue, move on to the next solution.
2] Do Not Sync your Settings
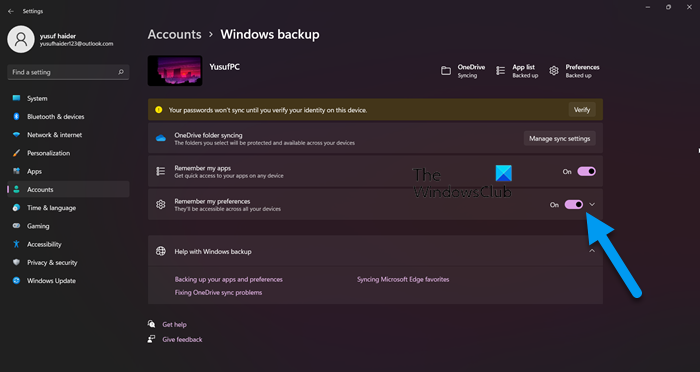
You should disable the Sync feature as the settings may be getting synced with your other devices. In this case, you can turn off this feature and see if it resolves the issue. Follow the steps mentioned below to do the same:
- Click Win + I to open Settings.
- Select the Accounts tab and then click on Windows backup.
- Turn off the toggle key of Remember my preferences.
Hopefully, this will do the trick for you.
3] Scan your PC for viruses
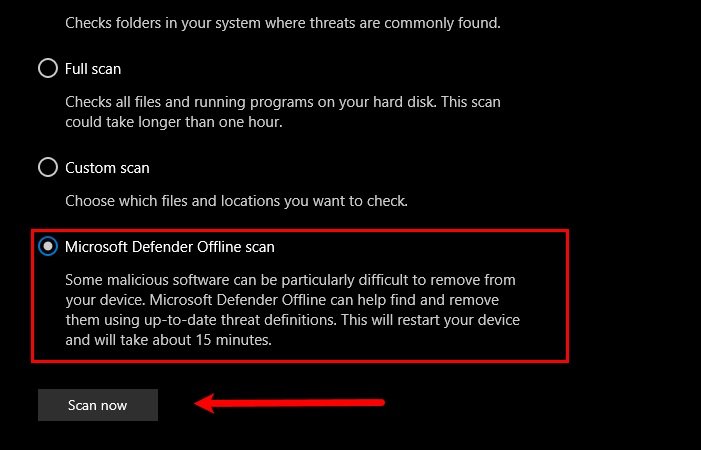
Your themes may keep changing because of a virus or malware that’s installed on your computer unintentionally. So to fix the issue in this case, you can scan your PC for viruses. If you have a third-party antivirus, you can use it to scan your computer. In case, you don’t have a third-party antivirus, use the Windows Security program to scan your system. Follow the prescribed steps to do the same.
- Search and launch the Windows Security app from the Start Menu.
- Go to the Virus & threat protection tab.
- Click on the Scan option.
- Select Microsoft Defender Offline scan or Microsoft Defender Antivirus.
- Click on Scan now.
After the scan is done, you have to get rid of the viruses, and hopefully, this will do the job for you.
4] Delete your icon cache
One of the reasons why your themes keep changing is the corrupted icon cache. However, the good news is, that you can actually rebuild the corrupted icon cache using our guide. After building the cache, check if the issue is resolved.
5] Uninstall the new Windows update
If your themes started changing abruptly only after updating Windows, then deleting the update is recommended. The issue can result from a buggy update that can break your computer’s themes.
You can follow the prescribed steps to uninstall the new Windows Update.
- Click Win + I to open Settings.
- Click on Windows Update, and go to Update History.
- In Related Settings, select Uninstall Updates.
- Right-Click on the recently installed update that is causing the issue, and select Uninstall option.
- Follow the onscreen instruction to complete the procedure.
Once the procedure is finished, restart your PC.
6] Try System Restore
If you have created a System Restore point, then it is the right time to deploy it. Search for “System Restore” from the Start Menu. Click on the System Restore button and follow the on-screen instructions to complete the restoration process.
We hope you can resolve the issue using the solutions mentioned in this article.
Read: Prevent themes from changing Desktop icons in Windows
Where are Themes stored in Windows 11?
You can find themes on your PC by clicking Win + R to open Run and typing the following environmental variable:
%localappdata%\Microsoft\Windows\Themes
You can also find themes by visiting C:\Windows\Web\. Just launch File Explorer on your computer, copy and paste the location and hit Enter, and you’ll be redirected to the theme installed on your computer. However, if you can download a third-party theme, it can be found in the Downloads folders. So, just launch File Explorer and click on the Downloads folder; you will find the downloaded themes there.
Read: Windows 11 Theme not syncing
How do I sync themes in Windows 11?
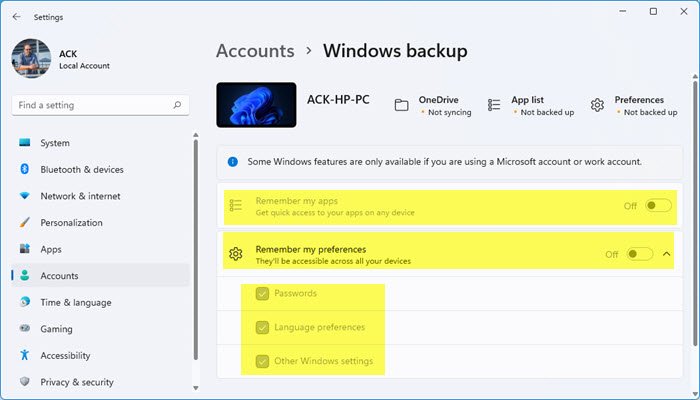
To sync your themes across multiple devices, the first thing you should do is make sure that all the devices are logged into the same account or have the same admin. Also, make sure that your Microsoft account is verified, otherwise, this feature won’t work. Once you are done with these prerequisite steps, follow the prescribed steps to enable Remember my preferences from Windows Settings. Follow the prescribed steps to do the same.
- Launch Settings by Win + I.
- Go to Accounts > Windows Backup.
- Enable to toggle for Remember my preferences.
If you want, you can also configure this option by clicking on the expand button and then disabling options of your choice. If you want to sync themes, make sure that the box associated with Other Windows Settings is ticked.
Also Read: How to change Theme, Lock Screen & Wallpaper in Windows.
Leave a Reply