Windows installation is an easy process that anyone can do. However, sometimes we may face some errors. One such error is Windows cannot be installed to this disk. This computer’s hardware may not support booting into this disk. Ensure that the disk’s controller is enabled in the computer’s BIOS menu. In this guide, we show you how to fix this error on Windows.
![This computer's hardware may not support booting to this disk [Fix] This computer's hardware may not support booting to this disk [Fix]](https://www.thewindowsclub.com/wp-content/uploads/2023/05/This-computers-hardware-may-not-support-booting-to-this-disk-Fix.png)
This computer’s hardware may not support booting to this disk [Fix]
If you see This computer’s hardware may not support booting to this disk error while trying to install Windows on your PC, you can follow the below methods to enable Disk Controller in BIOS and resolve the issue:
- Make sure the disk is connected properly
- Make sure the disk controller is enabled in BIOS
- Change boot order
- Convert the Disk to GPT
Let’s get into the details of each method and fix the error to install Windows easily.
1] Make sure the disk is connected properly
Check if the disk you are trying to install Windows is properly connected to your PC and working well. Check if there are any loose cables that may be in a connection loop of disconnecting and connecting again. Make sure the cables are securely attached without any chance of disconnection.
2] Make sure the disk controller is enabled in BIOS

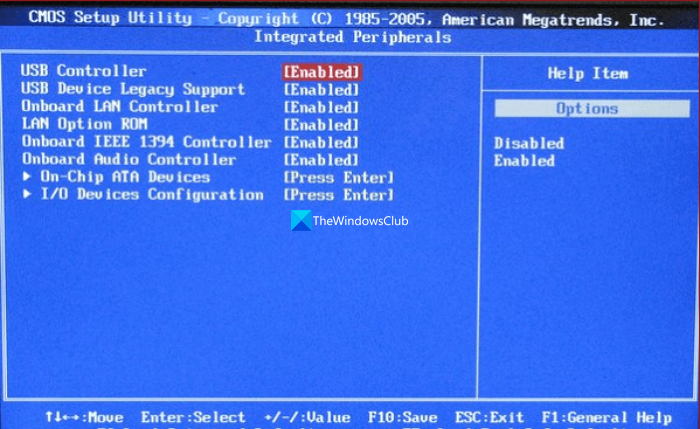
The disk controller in BIOS settings controls the disk drives connected to your computer’s motherboard. It is responsible for communicating with the disk drives and managing data transfer between the drives and the computer’s CPU. When you are seeing This computer’s hardware may not support booting into this disk error, you need to make sure the disk controller is enabled in the BIOS settings.
To check if the disk controller is enabled in BIOS settings:
- Restart your PC and access BIOS settings using F2 or F10, or DEL button based on your manufacturer while your PC is starting.
- Navigate to Integrated Peripherals or Storage Configuration or something like that based on your manufacturer to access the disk controller section.
- Check if the disk controller for the disk you want to install Windows is enabled. If not, enable it. This will allow Windows to communicate with the disk and perform the installation process.
- Save the changes and exit the BIOS/UEFI settings.
3] Change boot order

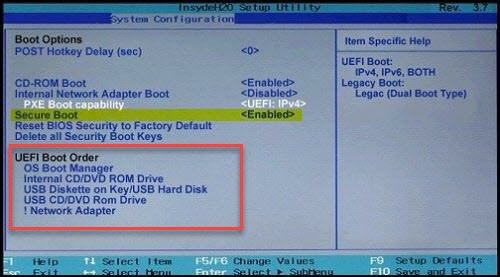
If the above methods do not fix the error, you need to change the boot order in the BIOS settings to prioritize the disk you want to install Windows on. Make sure you set the disk you are installing Windows on as the first boot device.
To change the boot order in BIOS settings:
- Restart your PC and access BIOS settings using F2 or F10, or DEL button based on your manufacturer while your PC is starting.
- In the BIOS settings, look for Boot, Boot Order, or Boot Configuration which may differ according to your manufacturer. In these settings, you will see the list of devices that can be selected as boot options.
- Select the device to prioritize from the list and use the arrow keys on your keyboard to move it up or down to prioritize it.
- Arrange the disk as per your boot preference. Then, save and exit the BIOS settings.
4] Convert the Disk to GPT

If you are trying to install Windows on a disk larger than 2TB, you need to convert it to GPT partition style. It will ensure easy installation of Windows without any errors. Remember that this process may result in data loss as the hard disk is wiped. You must back up the data on your device before getting into this process. Though there are a few options to convert MBR to GPT without data loss, you might have some errors. So, it is advised to back up all of your data. After that, follow these steps:
- Connect the Windows Installation media to your system
- Begin the Windows installation process
- When the Windows Setup screen appears, press the Shift+F10 hotkey
- This will open a Command Prompt window as the administrator
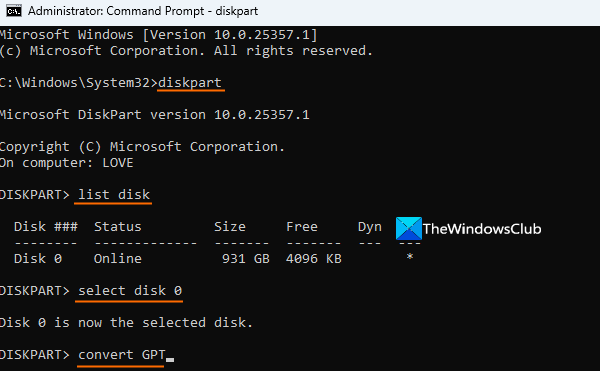
- Now execute the
diskpartcommand - Enter
list diskcommand and execute it. This will show the list of hard disks connected to your PC - Select the hard disk for which you face this problem. For example, if the disk number is 0, then execute
select disk 0command - Now the disk is selected, execute the
cleancommand to wipe it - Finally, execute
convert GPTcommand. This will convert your hard disk from MBR to GPT - Exit the CMD window
This should fix the error and make a way for the installation of Windows on the selected disk.
Related reads:
- Windows must be installed to a partition formatted as NTFS
- The selected disk has an MBR partition table
- Setup does not support configuration of or installation to disks connected through a USB or IEEE 1394 port
- Windows cannot be installed to this disk, The selected disk is of the GPT partition style
- The disk may fail soon.
How do I enable disk in BIOS?
To enable a disk in the BIOS/UEFI settings, enter the BIOS settings while restarting your PC using keys like Del, F2, F12, or Esc based on your manufacturer. In the BIOS settings, look for Storage, Drives, or SATA Configuration. You will find the list of connected disks in the settings. Look for the disk you want to enable. Select the disk and press the appropriate key as instructed on the screen to enable it. When you enable the disk, there should be an Enabled option beside it. Save the changes and exit the BIOS settings.
How do I enable UEFI boot drive?
To enable the UEFI boot drive, restart your PC and enter the BIOS settings using the keys like Del, F2, F12, or Esc based on your manufacturer. In the BIOS settings, look for Boot, Boot Options, or Boot Configuration. In the settings, you will see the list of drives available. Select the drive and use the keys lie F5 or F6 or keys as instructed on the screen to toggle the button from Disabled to Enabled beside the drive. Then, arrange the drive to prioritize the disk to boot. Save settings, and exit the BIOS settings.
Leave a Reply