If the Timeline feature is not working in Windows 10, then this post will show you how to enable Timeline and get it working. Via Settings, you can also disable or turn off the Timeline feature & the Activity History feature if you do not use them.
Timeline feature not working in Windows 10

From the WinX Menu, open Settings and move to the Privacy section.
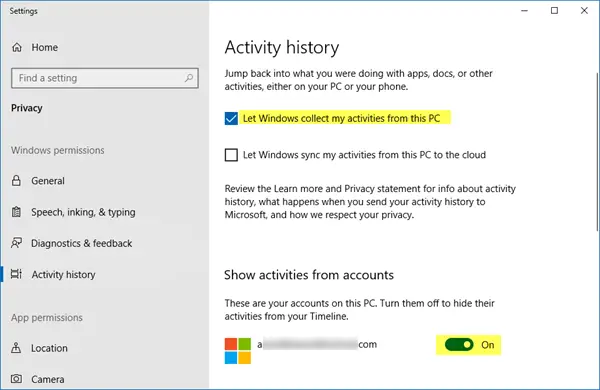
There under Windows permissions > Activity history, you will see on the right side a setting – Let Windows collect my activities from the PC. Select this setting.
Under Show activities from accounts, ensure that your Microsoft Account is selected and the toggle is set to the On position.
If you wish to sync your activities across devices, select the Let Windows sync my activities from this PC to the cloud option.
Restart your computer and see.

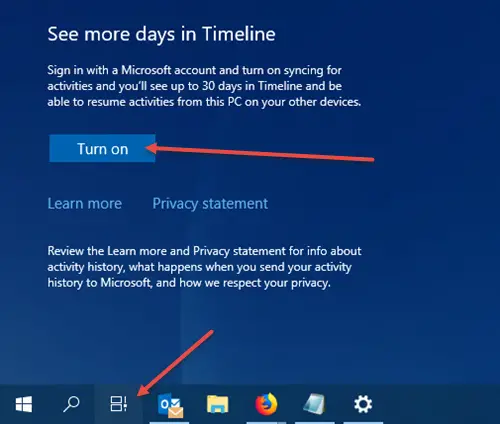
You will see the Timeline icon on your Taskbar, and it should be working fine. If you still don’t see the icon, right-click on the taskbar and select Show Task View button.
To see More days in your Timeline, sign in with your Microsoft Account,press on the Timeline button, scroll down a bit and and click on Turn on.
If this does not help, create a system restore point first and then open Registry Editor, navigate to the following path-
HKEY_LOCAL_MACHINE\SOFTWARE\Policies\Microsoft\Windows\System
and ensure that the value of the following DWORD (32 bit) values are set to 1:
- EnableActivityFeed
- PublishUserActivities
- UploadUserActivities.
If you do not see these DWORD values, create them and give them values of 1 each.
To create them, you must right-click in the right side panel, New > DWORD (32-bit) Value. Give it the mentioned name, double-click on it and change it value to 1 as mentioned.
You may need to be logged in with your Microsoft account.
I hope this helps!
I can confirm that creating the three registry keys (which weren’t present dispite my privacy settings beeing OK) and setting them to 1 has solved the issue on my computer. Thanks guys.
I tried it, but no such luck. I am only seeing current tasks, which disappear after the windows are closed. Nothing is saved in the timeline for future reference (all permissions are enabled).
Same here, it behaves just like the old task view, except with slightly larger thumbnails.
yep, same here, even if i created the Dwords.
Please advice that i’m not logged in with a microsoft account. this seems to be the problem.
on my other pc where i’m logged in with a microsoft account the timeline works fine with apps stored by date and it shows all the apps even when i close them
Yes, as I understand it, you have to be logged in with a Microsoft account for it to work. However, I was, and I still couldn’t get it to work.
What eventually solved the problem for me was shutting the computer down completely and then switching it back on manually, rather than restarting Windows. For whatever reason, when Windows next booted up, the timeline was working as intended. Go figure!
you are right. shutting down the computer makes the timeline work.
I have tested it with a local account. I don’t know if the created dwords had anything to do but now it works
It looks like I have a greater issue because I am still having the problem after applying all the suggestions.
OK, scratch that. It worked yesterday, now it doesn’t. I checked and the registry keys are still there, but taskbar button or keyboard shortcut do not work anymore.
There’s definitely a bug there.
My timeline feature is not working either. Checked the applicable registry and even group policy settings and nothing shows except large thumbnails of whatever windows I currently have open, but nothing earlier. The “new” taskbar icon is there, but it functions like the old task viewer. If I have no windows open, it just shows something like “keep using your PC and your history will appear below”, but nothing is there after 4 days.
My online Microsoft account shows my activity so I know it’s being collected, but nothing displays on my PC. So, I decided to download the latest Windows 10 from Microsoft and do a repair install from the ISO file it created. Unfortunately, still no timeline. SFC and DISM utilities show no file or component store corruption.
Same symptoms, but on only one PC !! On my other machine (a Surface linked to the same accounts) it works fine and ironically will display the activities from the other (non-working) machine fine too! So activities definitely being collected. Have added the 3 registry entries, rebooted etc but still no history showing, only current tasks. Bizarre
OK, as a last resort, tried the above suggested Shutdown and manual restart (instead of automatic restart) and it’s now working :) Even more bizarre!
Glad it helped :)
It should be pointed out that Timeline only works for Microsoft apps.
Locally Enabled doesn’t collect any applications, but perhaps it’s because I don’t use the Microsoft apps. I use Firefox, LibreOffice and Notepad+, none of which Timeline ‘sees’. I DON’T want to upload to the cloud. I’d rather get rid of Timeline completely since it takes up space in Task View needlessly. Has anyone figured out how to remove Timeline?
Right-click on the taskbar and search for the checkmark for Timeline. Remove that! (right under SEARCH if I’m right.)
Well, the good news – I suddenly noticed that Timeline doesn’t take up most of the screen in Task View anymore and only shows “Use your PC more to see your activities here.”, but it’s still installed – I don’t know if it’s running in background collecting info for Microsoft since most Microsoft background apps have such obtuse names…
As far as right-clicking on Taskbar, I don’t have Timeline or SEARCH. From the top – Toolbars, Cortana, Show Taskview, Show People, Show Windows Ink, Show touch keyboard, Cascade windows, Show winodws stacked, Show windows side by side, Show the desktop, Task Manager, Lock all Taskbars, and Taskbar settings.
Thanks for the suggestion, but at least Timeline is not as obtrusive anymore.
And then it’s back. Can’t figure out what turned it back on, but it’s working again. No new updates… There were two Timelines “Tips”, so Tips has been removed… but they’re still showing and I’ll have to see if they ‘timeout’ and Timelines quits using all the landscape.
Remove the checkmark away from ‘Show Taskview’, that’s what I meant…
Well, yes, that would work to get rid of Timelines using up most of the landscape in Task View except then I couldn’t use the 4 virtual desktops I have set up… Libre Office on #1, Firefox on #2, Thunderbird on #3 and games on #4… none of which Timelines tracks or shows.
From everything I’ve seen, Timelines only “works” when 1) logged into Microsoft account and 2) only works with Microsoft applications… making it worthless to anyone who doesn’t use a Microsoft account to log in (majority of people without constant network access or corporate logins) and/or people that don’t buy (literally) into Microsoft applications. Bottom line: Timelines runs in background collecting information and passing it on to Microsoft even if not logged into Microsoft AND takes up the landscape in TaskView just like pop-up advertisments for itself.
Hello. After trying all options that I found here and many other places in internet and nothing was bringing back the timeline (always the message”use more your pc..bla bla) I found what was blocking it. In account settings enable in synchronize your settings other windows settings. Then tada… no needed restart. :)
My Win 10 v1803 does have the TIMELINE feature, however there is no SEE ALL option displayed for me like its supposed to have; i.e., I can scroll and see past days but shouldn’t here be a SEE ALL option so I can see the times during each day?