BCD stands for Boot Configuration Data. It contains Boot Configuration Parameters on how to start the Windows operating system. When BCD gets corrupted or goes missing, you will experience boot issues on your system. Such types of boot issues can be fixed by rebuilding the BCD file in normal circumstances. However, if the rebuild BCD command fails, you will not be able to boot into Windows. In this article, we will talk about the error message Total identified Windows installations 0 which you may see after a failed Windows boot.
Total identified Windows installations 0 in Windows 11/10
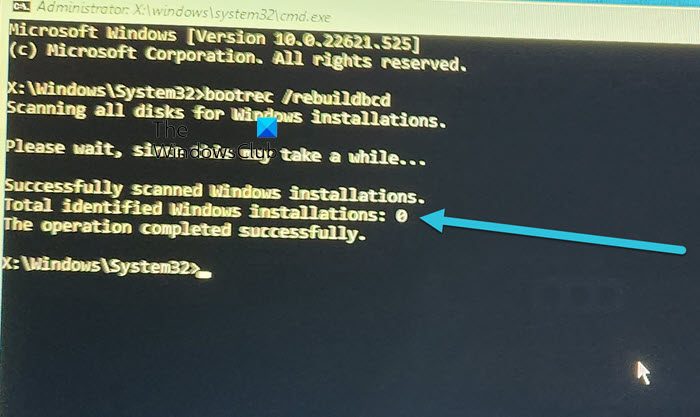
Some users experienced boot issues on their systems after frequent crashes or after upgrading their systems. To fix boot issues, when they attempted to repair BCD in WinRE, the command failed to do so and displayed the following result:
Scanning all disks for Windows installations.
Please wait, since this may take a while…
Successfully scanned Windows installations.
Total identified Windows installations: 0
The operation completed successfully.
After starting the computer, they may again receive the same error message, when rebuilding the BCD. If you are also stuck with the same error, use the following solutions and see which one works for you.
- Mark the Windows partition as active
- Remove the hidden, system, and read-only attributes from the BCD file, and rebuild BCD again
- Copy the Registry files from the RegBack folder
- Seek professional help
Let’s start.
1] Mark the Windows partition as active
One solution to fix this issue is to mark the Windows installation partition as active. This fix has worked for many users. You can also try this.
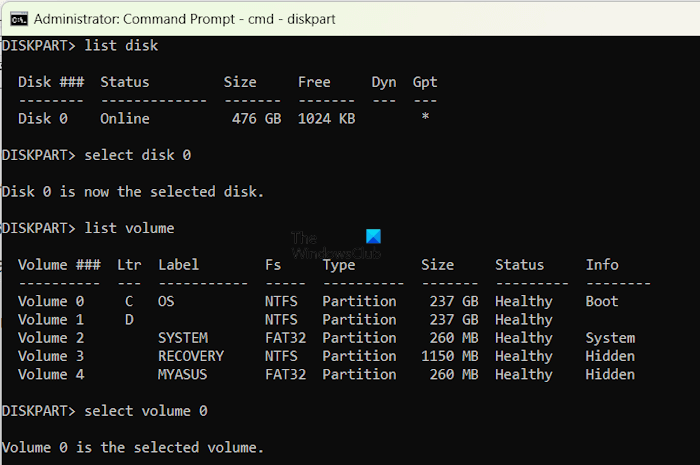
Launch the Command prompt in Windows Recovery Environment.
- Type Diskpart and hit Enter.
- Type list volume and hit Enter.
- Type select volume #. In this command, replace # with the volume on which Windows OS is installed.
- Type active and hit Enter.
- Type exit to leave Diskpart.
- Now, see if you can rebuild BCD and restart your computer.
Read: Computer boots to black or blank screen with blinking cursor
2] Remove the hidden, system, and read-only attributes from the BCD file, and rebuild BCD again
If the above fix did not help you, you have to remove the hidden, system, and read-only attributes from the BCD file and then rebuild the BCD file again. Go through the following instructions.
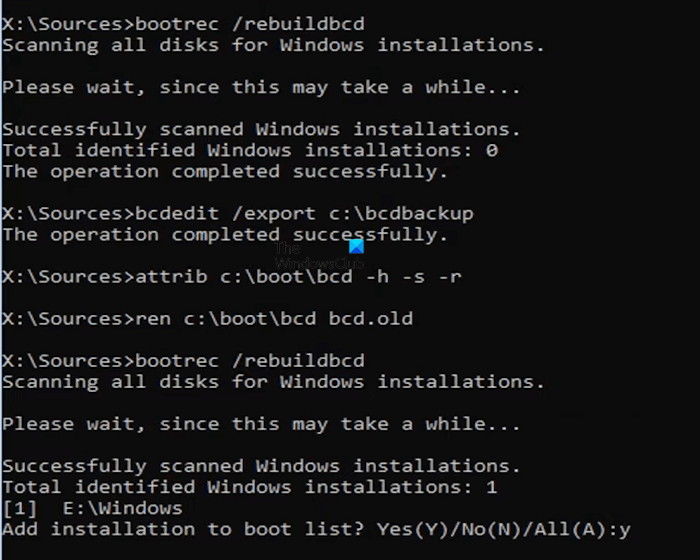
Boot from Windows Installation Media and open Command Prompt in Windows Recovery Environment.
Type bootrec /rebuildbcd and hit Enter. You will see the following message:
Successfully scanned Windows installations.
Total identified Windows installations: 0
The operation completed successfully.
Now, type the following command and hit Enter.
bcdedit /export c:\bcdbackup
Now, type the following command to remove the hidden, system, and read-only attributes from the BCD file.
attrib c:\boot\bcd -h -r -s
Now, you have to rename the BCD store. To do so, execute the following command and hit Enter.
ren c:\boot\bcd bcd.old
Now, type the following command to rebuild BCD.
bootrec /rebuildbcd
This time, you should get the following output:
Successfully scanned Windows installations.
Total identified Windows installations: 1
Type Y and hit Enter. Exit the Command Prompt and restart your computer. The issue should get fixed.
Read: Crash dump initialization failed, Event ID 46
If after removing the hidden, system, and read-only attributes from the BCD file, Command Prompt shows you the following error message, your hard disk partition table is GPT and not MBR, or you have selected the wrong drive for the boot partition.
Path not found – C:\boot
In this case, you have to follow a different approach. You can also check your hard disk partition style. For this, open Command Prompt and type the following commands.
diskpart
list disk
Press Enter after typing each of the above commands. The Command Prompt will show you all the hard disks installed on your system. If you see the asterisk under the GPT column, your hard disk has the GPT partition table, otherwise it has the MBR partition table.
Because you have a GPT hard disk, you have to follow the procedure explained below.
Launch the Command Prompt in Windows Recovery Environment and type:
Diskpart
list volume
Press Enter after typing each of the above commands. Usually, the EFI partitions do not have a drive letter. Check this. The EFI partition is in FAT32 format and of size about 200 MB. If the EFI partition does not have a drive letter, you have to assign a drive letter to it.
Type the following command to select the EFI partition.
select volume #
In the above command, replace # with the correct volume number. Now, type:
assign letter=z:
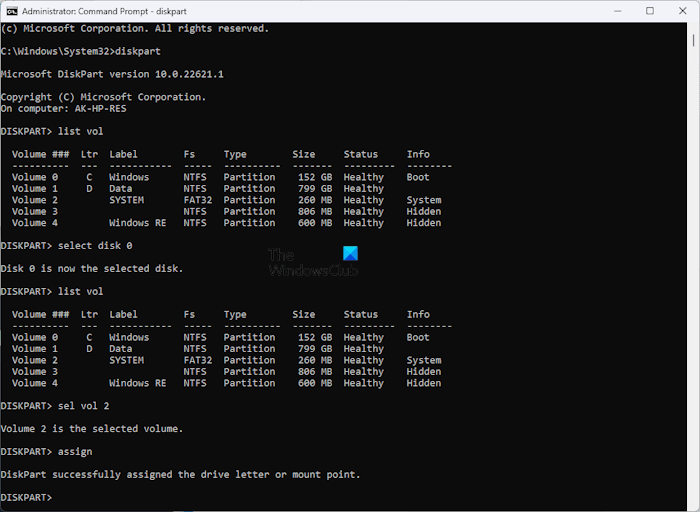
You can assign any available drive letter to the EFI partition. Type list volume again to check if the letter z is assigned to the EFI partition or not. Once done, type exit and press Enter to exit Diskpart.
Now, check if the volume to which you have assigned the letter z is the correct EFI partition or not. List all files by executing the following command:
DIR /A /B /S Z:
In the above command, Z is the drive letter. The result should show Z:\EFI\Microsoft\Boot\BCD in any of the lines. If yes, you have assigned the letter to the correct EFI partition.
Do not close the Command Prompt window. Now, open another Command Prompt window by pressing the Shift + F12 keys. Or, you can continue executing the commands in the same Command Prompt window. But launching another Command Prompt window will make things simpler for you.
Type bootrec /rebuildbcd and hit Enter. The result will show you the same message that we are discussing in this article. Now, type the following command to create a backup of the existing BCD.
bcdedit /export c:\bcdbackup
Now, delete the hidden, system, and read-only attributes from the BCD file by using the following command:
attrib <correct file path> -h -r -s
Previously, in the case of the MBR disk, we used the c:\boot\bcd as the file path in the above command. But in this case, the file path will be different. Go to the previous Command Prompt window and copy the path Z:\EFI\Microsoft\Boot\BCD. In your case, the drive letter may be different. Now, the complete command is:
attrib Z:\EFI\Microsoft\Boot\BCD -h -r -s
Now, rename the BCD files by using the following command:
ren Z:\EFI\Microsoft\Boot\BCD BCD.old
Now, rebuild BCD using the command written below:
bootrec /rebuildbcd
You should get the following output:
Successfully scanned Windows installations.
Total identified Windows installations: 1
Type Y and hit Enter. Close the Command Prompt by typing exit and hitting Enter. Now, click Continue to restart your computer.
Read: Boot selection failed because a required device is inaccessible, 0xc0000225.
3] Copy the Registry files from the RegBack folder
This fix is for users with Windows OS earlier than Windows 10 version 1803 and assuming you can access the folder. On Windows operating systems earlier than Windows 10 version 1803, the Registry backup was stored in the RegBack folder. This folder is located at the following location:
C:\Windows\System32\config
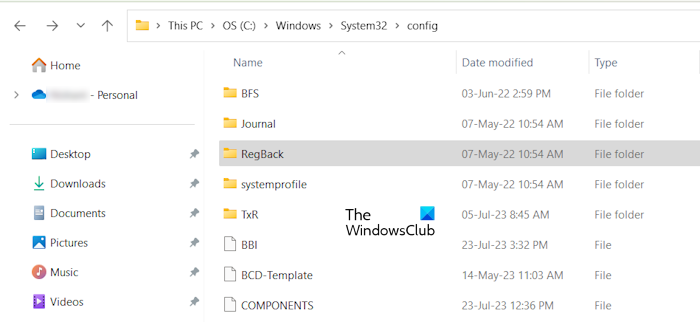
The registry backup is no longer saved in the RegBack in Windows 10, version 1803 and later. If you open the RegBack folder, you will find it empty. Or if any files are located inside this folder, they have a size of 0 KB. This change is by design. Microsoft implemented this change to Windows 10, version 1803 and later to help users reduce the overall disk footprint size of Windows.
Therefore, if you have Windows 10 version 1803 or later, this fix will not work for you. Hence, you have to use System Restore to fix the issues occurring due to corrupted Registry Hive(s). Other users can try this fix. Before applying this fix, you have to rename the registry files in the Config folder. After doing that, you can copy the registry backup files from the RegBack folder to the Config folder. Hence, if the problem was occurring due to Registry corruption, this will fix the issue.
Before executing any command, it is better to check if the RegBack folder contains any backup files or not. To do so, open the Command Prompt in Windows Recovery Environment and type Notepad. Hit Enter after that. When Notepad opens up, go to File > Open or press the Ctrl + O keys. This will open the File Explorer. Now, go to the above-mentioned location and open the RegBack folder. See if it contains any Registry backup files or not. If yes, do not forget to check their sizes. If the files show 0 KB, they do not contain any backup data. Hence, in this case, you cannot apply this fix.
Read: Windows Boot Manager on wrong drive.
Now, first, change the directory by typing the flowing commands. Press Enter after typing each of the following commands. Although the OS resides in the C directory, this directory may change on some computers. Hence, use the correct drive letter.
C:
cd Windows
cd System32
cd Config
Now, the directory in the Command Prompt should show the following path:
C:\Windows\System32\config>
After changing the directory, rename the following files:
- DEFAULT
- SAM
- SECURITY
- SOFTWARE
- SYSTEM
To rename the above files, use the following commands. Press Enter after typing each of the following commands.
ren DEFAULT DEFAULT.old
ren SAM SAM.old
ren SECURITY SECURITY.old
ren SOFTWARE SOFTWARE.old
ren SYSTEM SYSTEM.old
Now, type the following command to enter the RegBack directory.
cd RegBack
Make sure that the complete directory in the Command Prompt is shown the same as written below:
C:\Windows\System32\config\RegBack>
Use the copy command to copy the files one by one. Press Enter after typing each of the following commands:
copy DEFAULT "C:\Windows\System32\config"
copy SAM "C:\Windows\System32\config"
copy SECURITY "C:\Windows\System32\config"
copy SOFTWARE "C:\Windows\System32\config"
copy SYSTEM "C:\Windows\System32\config"
Exit the Command Prompt and click Continue to restart your computer. You should be able to boot into Windows without any problem.
Read: Windows computer will not boot up, start or turn on
4] Seek professional help
If none of the above-written solutions helped you, it is time to seek professional help. Take your system to a professional computer technician to resolve the issue.
I hope this helps.
Read: How to solve Disk Boot Failure, Insert System Disk error.
What is total identified installation 0?
The total identified installation 0 indicates that your system is unable to detect any existing Windows operating system installed on your hard disk. There can be many causes of this error, like corrupted Windows installation, corrupted Windows Registry, etc.
Read: Windows computer unable to boot to BIOS
How to rebuild BCD Windows 11?
You need to rebuild BCD when you face boot issues on your system. To rebuild BCD, you have to enter Windows Recovery Environment and then open the Command Prompt. Now, use the command bootrec /rebuildbcd to rebuild BCD.
Read next: MBR Error 1, 2 or 3 on Windows.