If you want to reduce CPU, memory, or battery usage on your Windows laptop, the Sleeping tab feature is one option you can consider. Although it is possible to enable or disable Sleeping Tabs in Edge using Edge flags, you can do the same using the Registry Editor and the Local Group Policy Editor in Windows 11/10.
Turn on or off Sleeping Tabs in Edge using Registry Editor
To turn on or off Sleeping Tabs in Edge using Registry Editor, follow these steps-
- Press Win+R to open the Run prompt.
- Type regedit and press the Enter button.
- Click the Yes option in the UAC prompt.
- Navigate to Microsoft in HKEY_LOCAL_MACHINE.
- Right-click on Microsoft > New > Key.
- Name it as Edge.
- Right-click on Edge > New > Key.
- Name it as Recommended.
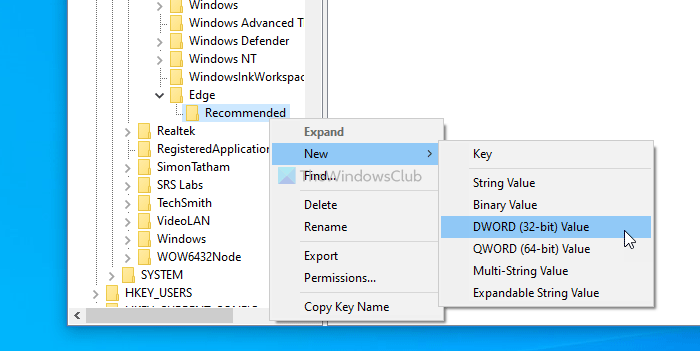
- Right-click on Recommended > New > DWORD (32-bit) Value.
- Name it as SleepingTabsEnabled.
- Double-click on it to set the Value data as 1.
- Click the OK button.
Press Win+R, type regedit and hit the Enter button. If you find the UAC prompt, click the Yes button to open the Registry Editor on your computer. After that, navigate to the following path-
HKEY_LOCAL_MACHINE\SOFTWARE\Policies\Microsoft
Right-click on Microsoft > New > Key and name it as Edge.
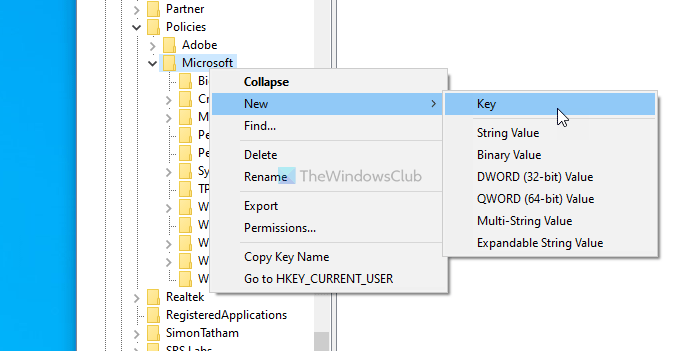
Right-click on Edge > New > Key and name it as Recommended.
Right-click on Recommended > New > DWORD (32-bit) Value and name it as SleepingTabsEnabled.
Next, double-click on SleepingTabsEnabled to set the Value data as 1.
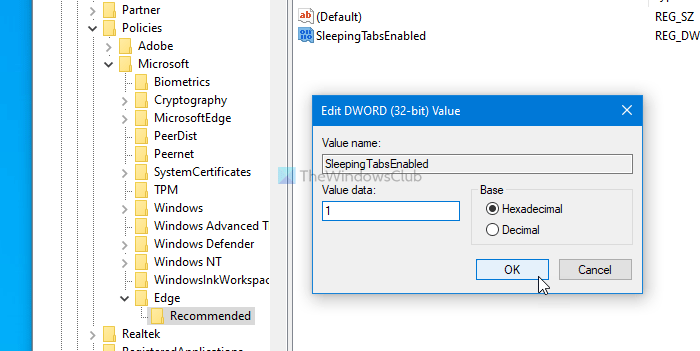
At last, click the OK button to save the change. It enabled the Sleeping tabs feature. However, if you want to set the background tab inactivity timeout, you need to create another DWORD value in the Recommended key and name it as SleepingTabsTimeout. Double-click on it > choose the Decimal radio button, and enter a value in seconds.
For instance, if you want to set it as 1 hour, enter 3600 and click the OK button.
It is also possible to turn off Sleeping tabs for a specific website. For that, right-click on Recommended > New > Key, and name it as SleepingTabsBlockedForUrls.
Right-click on SleepingTabsBlockedForUrls > New > String value and name it as 1.
Then, double-click on it, and enter the website URL as the Value data.
Click the OK button to save changes.
Fix: Microsoft Edge battery drain issues
How to enable or disable Sleeping Tabs in Edge using Group Policy
It is required to download the Group Policy template for Microsoft Edge to use the Group Policy method.
To enable or disable Sleeping Tabs in Edge using Group Policy, follow these steps-
- Press Win+R to open the Run prompt.
- Type gpedit.msc and hit the Enter button.
- Navigate to Sleeping Tabs settings in Computer Configuration.
- Double-click on Configure Sleeping Tabs.
- Choose the Enabled option and click the OK button.
Let’s delve into these steps in detail.
To get started, press Win+R, type gpedit.msc, and press the Enter button. After opening the Local Group Policy Editor, navigate to the following path-
Computer Configuration > Administrative Templates > Classic Administrative Templates > Microsoft Edge – Default Settings > Sleeping Tabs settings
On your right-hand side, you can see a setting called Configure Sleeping Tabs. Double-click on it, select the Enable option and click on the OK button to save the change.
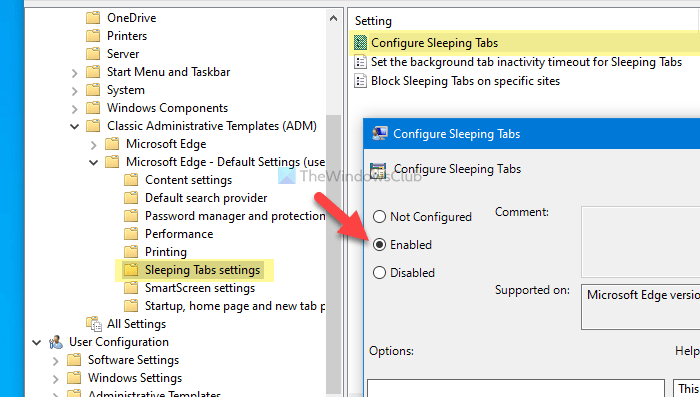
There are two more settings – Set the background tab inactivity timeout for Sleeping Tabs and Block Sleeping Tabs on specific sites.
To choose the inactivity timeout, double-click on the former setting, choose the Enabled option, expand the drop-down list, and choose a time according to your requirements.
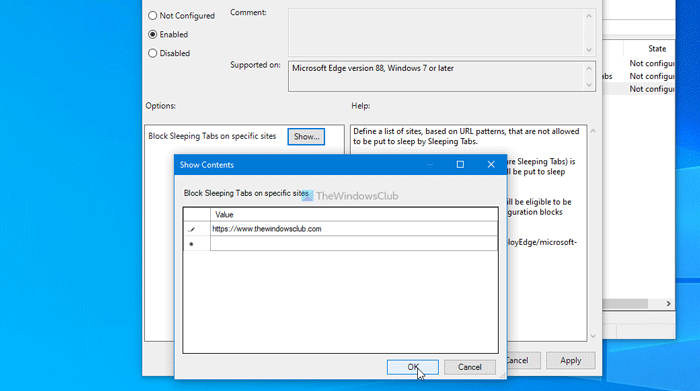
If you want to disable Sleeping Tabs for a specific website, double-click on the latter setting, choose the Enabled option, click the Show button, enter the website URL, and click the OK button.
That’s all! I hope it helps.
Leave a Reply