If you have Microsoft Office or Microsoft 365 installed on your Windows 11 or Windows 10 computer and you use Outlook, you can perform certain actions like edit received email, insert an emoji or image in the email subject line or body and so on. Now for some reason, if you’re unable to edit the subject line in Outlook email, this post shows you how to do it.

Unable to edit Subject line in Outlook email
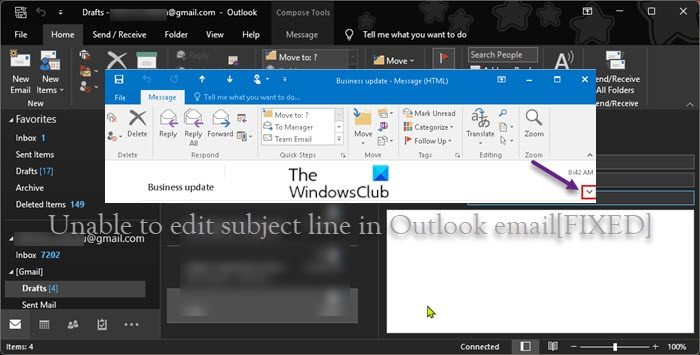
You may notice when you open a message in Outlook and select the subject, the text cursor does not appear, consequently preventing you from editing the subject line of the message. You will encounter this issue when the message header is collapsed to compact the size of the message. This behavior occurs in Outlook 2013 Service Pack 1 and newer versions.
So when the message header is collapsed, you’ll be unable to edit the subject line in Outlook email. In Outlook 2013, the default behavior is the expanded header while Outlook 2016 the default behavior is collapsed header.
To resolve this issue, you simply need to expand the Outlook Infobar by clicking the chevron or caret (downward-pointing arrowhead) as indicated in the lead-in image above, to expand the header for editing. However, we can change the default behavior of Outlook to always expand the email message. You need to change some Registry setting and you have the following methods to do so:
- Registry Editor
- REG (registry) file
- Command Prompt
Let’s see the description of the methods in detail.
1] Via Registry Editor

To change the default behavior of Outlook to always expand the email message header via Registry Editor in Windows 11/10, do the following:
Since this is a registry operation, it is recommended that you back up the registry or create a system restore point as necessary precautionary measures. Once done, you can proceed as follows:
- Press Windows key + R to invoke the Run dialog.
- In the Run dialog box, type regedit and hit Enter to open Registry Editor.
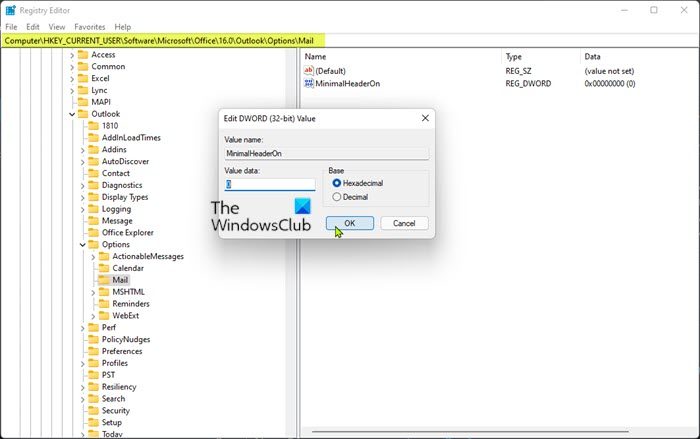
- Navigate or jump to the registry key path below:
HKEY_CURRENT_USER\SOFTWARE\Policies\Microsoft\Office\x.0\Outlook\Options\Mail
Note: The x.0 placeholder denotes the version of Office Outlook (Outlook 2010 = 14.0, Outlook 2013 = 15.0, Outlook for Microsoft 365, 2019, 2016, 2021 = 16.0) that you’re using on your system.
- At the location, on the right pane, double-click the MinimalHeaderOn entry to edit its properties.
- Now, input 1 (collapsed) or 0 (expanded) in the Value data field per your requirement.
- Click OK or hit Enter to save the change.
- Exit Registry Editor.
2] Using .REG (registry) file

Alternatively, you can achieve the same outcome by automatically setting the preferred MinimalHeaderOn registry key value. Here’s how:
- Press Windows key + R to invoke the Run dialog.
- In the Run dialog box, type notepad and hit Enter to open Notepad.
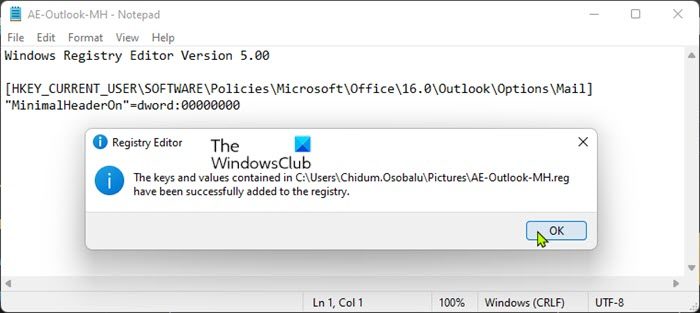
- Copy and paste the code below into the text editor and make sure to replace the x.0 placeholder with the actual Outlook version number:
For always collapsed
Windows Registry Editor Version 5.00

[HKEY_CURRENT_USER\SOFTWARE\Policies\Microsoft\Office\x.0\Outlook\Options\Mail]
"MinimalHeaderOn"=dword:00000001
For always expanded
Windows Registry Editor Version 5.00

[HKEY_CURRENT_USER\SOFTWARE\Policies\Microsoft\Office\x.0\Outlook\Options\Mail]
"MinimalHeaderOn"=dword:00000000
- Now, click the File option from the menu and select Save As button.
- Choose a location (preferably desktop) where you want to save the file.
- Enter a name with .reg extension for the preferred behavior (eg; AE-Outlook-MH.reg).
- Choose All Files from the Save as type drop-down list.
- Exit Notepad.
- Now, double-click the saved .reg file to merge it.
- If prompted, click on Run > Yes (UAC) > Yes > OK to approve the merge.
3] Via Command Prompt

Similarly, you can set the preferred MinimalHeaderOn registry key value by editing the registry via Command Prompt. Here’s how:
- Press Windows key + R to invoke the Run dialog.
- In the Run dialog box, type cmd and then press CTRL + SHIFT + ENTER to open Command Prompt in admin/elevated mode.
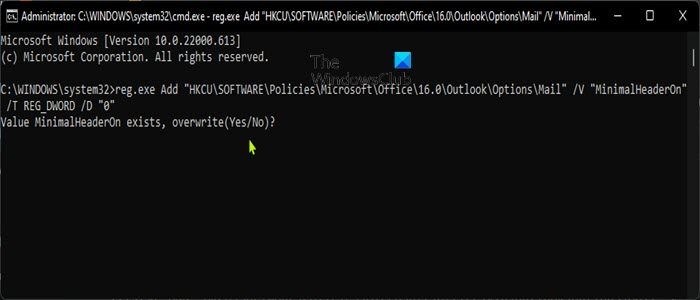
- In the command prompt window, copy and paste the command below and hit Enter. Make sure to replace the x.0 placeholder with the actual Outlook version number:
For always collapsed
reg.exe Add "HKCU\SOFTWARE\Policies\Microsoft\Office\x.0\Outlook\Options\Mail" /V "MinimalHeaderOn" /T REG_DWORD /D "1"
For always expanded
reg.exe Add "HKCU\SOFTWARE\Policies\Microsoft\Office\x.0\Outlook\Options\Mail" /V "MinimalHeaderOn" /T REG_DWORD /D "0"
- Exit CMD prompt once the command executes.
That’s it!
How do I make the subject line in Outlook editable?
To edit an email subject line in Outlook, follow these steps:
- Open the message.
- Click the chevron (▿) at the far right of the message header.
- Click your insertion point on the subject line and edit the text.
- Close the message, selecting Yes, when prompted to save (alternatively, press CTRL+S to save edits prior to close).
Why can’t I change the subject line in Outlook 365?
If you can’t change the subject line in Outlook 365 on your Windows 11/10 PC, it’s because the message header is collapsed. Just go to the extreme lower right of the message header where you’ll see a small “down arrow” – click on it to expand the header – once done, you can change the subject line. Keep in mind that the state of the header persists, so only need to do this once.
Can you edit the subject line in Outlook 365?
To change the subject line of a message you’ve received, simply click anywhere inside the subject field – once you see a blinking cursor, press CTRL+A to select the entire subject line. Now, type your new subject and click the Save icon in the top left corner of the message window, then close the message.