Security questions help you recover the account when you forget your local account password. However, if you are unable to set security questions for local account in Windows 11 or Windows 10, here is how you can get them back. It disappears only when the administrator turns on a setting in the Local Group Policy Editor or Registry Editor. This article will help you open the setting and opt for the factory defaults.

Unable to set Security question for Local Account in Windows 11/10
If you are unable to set security questions for your Local account in Windows 11/10, follow these steps:
- Disable settings in Group Policy Editor
- Verify Registry file
To learn more about these steps, continue reading.
1] Disable settings in Group Policy Editor

As said earlier, you need to check the Local Group Policy Editor settings first. Many organizations’ administrators often set various things across all the networked computers with the help of the Local Group Policy Editor.
Even though your computer is not a part of any organization, you may still encounter the same problem in Windows 11/10. Therefore, follow these steps to enable security question requirements for local accounts in Windows 11/10 using Group Policy:
- Press Win+R to open the Run prompt.
- Type gpedit.msc and press the Enter button.
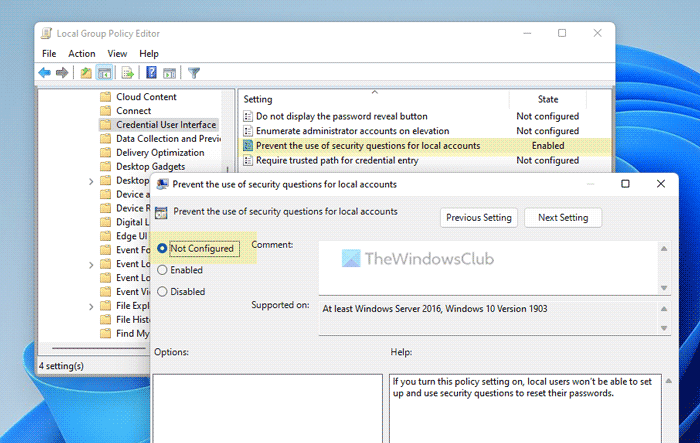
- Go to this path: Computer Configuration > Administrative Templates > Windows Components > Credential User Interface
- Double-click on the Prevent the use of security questions for local accounts setting on the right side.
- Choose the Not Configured option.
- Click the OK button.
After that, you can close all windows and restart the process to create a Local account. However, you do not need to do anything else if the status of this Group Policy setting is set to Not Configured. Alternatively, you can also set the state of this setting to Disabled as well in order to get the security questions while creating a local account.
2] Verify Registry file

At times, you might not find any enabled setting in the Local Group Policy Editor but still, the security question section might not appear. In such situations, you can verify the Registry Editor settings on your computer. There could be times when you might have enabled some options via Windows Registry and forgot about them. If so, you can go through the following steps to verify the Registry files:
- Press Win+R > type regedit > click the OK button.
- Click the Yes button in the UAC prompt.
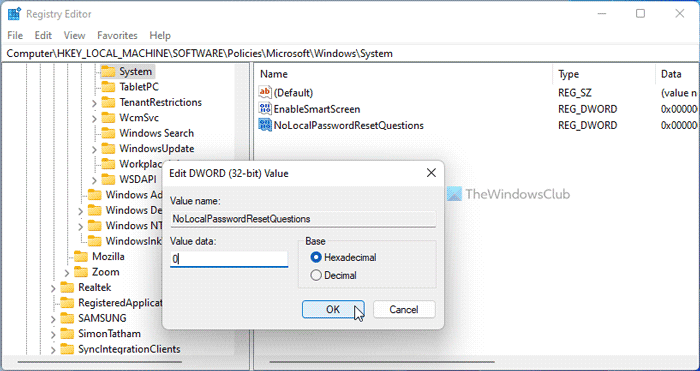
- Go to
HKEY_LOCAL_MACHINE\SOFTWARE\Policies\Microsoft\Windows\System - Double-click on the NoLocalPasswordResetQuestions REG_DWORD value.
- Set the Value data as 0 and click the OK button.
- Close all windows and restart your computer.
After that, you can find all the security questions when trying to create a local account on Windows 11/10 PC.
Alternatively, you can delete this REG_DWORD value as well. For that, right-click on NoLocalPasswordResetQuestions, select the Delete option and click the Yes button to confirm the removal.
I hope this guide has helped you.
Read: Add Security Questions to reset Windows Local Account password
How do I bypass security questions on Windows 11?
To bypass security questions on Windows 11, you can enable the aforementioned setting. Open the Local Group Policy Editor and go to Credential User Interface. Then, double-click on the Prevent the use of security questions for local accounts setting and choose the Enabled option. Click the OK button to save the change.
Read: Skip Security Questions when setting up Local User Account in Windows
How do I create a local account without security questions?
To create a local account without security questions, you can turn on the setting mentioned above. It is possible to bypass that using Local Group Policy Editor and Registry Editor. In the Registry Editor, navigate to the following path: HKEY_LOCAL_MACHINE\SOFTWARE\Policies\Microsoft\Windows\System. Here, create a REG_DWORD value named NoLocalPasswordResetQuestions and set the Value data as 0. At last, restart your computer to get the change.
Read: How to view Security Questions and Answers for Local Account in Windows
Leave a Reply