Sometimes, if things are not working well, you may need to investigate the Network settings in the Windows 11/10 operating system. For example, if you have recently updated your machine and tried to open Properties of ‘Network Connections’, you may receive the following error message – An unexpected error occurred. Here’s how you can investigate and fix this error.
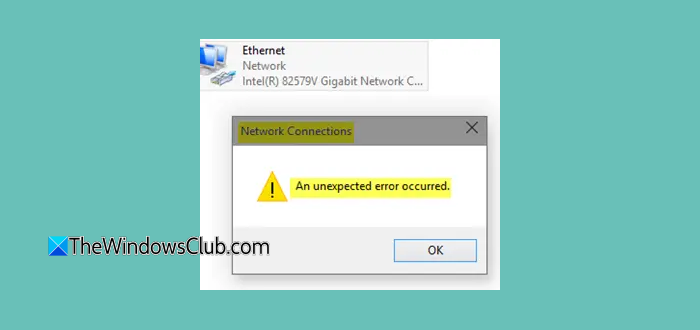
An unexpected error occurred in Network Connections Properties
An unexpected error occurred error message may pop up in the Network Connections folder when opening the Properties of a network connection in Windows 11/10. To fix this:
- Uninstall and re-install your Network Adaptor
- Disable IPv6 protocol
- Update Ethernet adapter driver
- Check DNS server address
- Re-register Netshell.dll file
Let’s proceed to cover the methods in detail.
Unable to open Network Adapter Properties
1] Uninstall and re-install your Network Adaptor
Click on ‘Search’, type ‘Device Manager’, select it to open it.
Next, expand the ‘Network adapters’ menu.
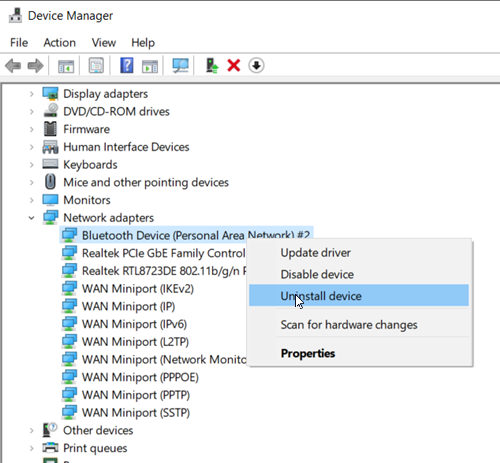
Right-click on Network adapter and select ‘Uninstall Device’.
Switch to ‘Action’ tab. Click it and select ‘Scan for hardware changes’ option.
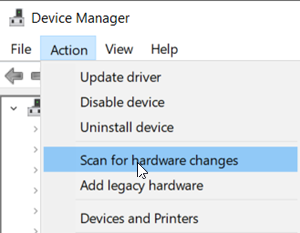
Windows will begin scanning the system immediately and check for hardware changes. It will add the network adapter to the list.
Again, open ‘Internet properties’ and check for any improvements.
2] Disable IPv6 protocol
To disable IPv6 protocol, launch Control Panel, go to ‘Network and Internet’ and then, choose ‘Network and Sharing Center’ from the right.
Next, select ‘Change adapter settings’.
Right-click on the ‘Ethernet adapter’ and select ‘Properties’.
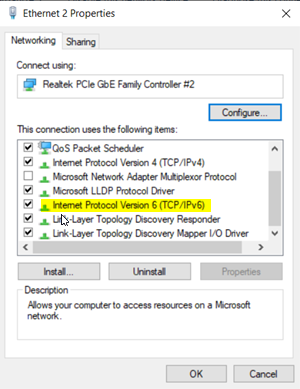
Thereafter, under the ‘Network’ tab, scroll down Internet Protocol Version 6 (TCP/IPv6) and uncheck the box.
Click OK to save the changes.
Following this, right-click on ‘Ethernet adapter’ and select ‘Properties’.
Check if you can make changes now.
3] Update Ethernet adapter driver
Open ‘Device Manager’ > ‘Network adapters’
Here, right-click on your Ethernet adapter and select ‘Update Driver’.
In the new window that opens, click on ‘Search for updated driver software automatically’ option.
Windows will scan the Internet for any pending driver update and download the driver.
Following its installation, restart the computer.
4] Check DNS server address
Launch Control Panel, go to ‘Network and Internet’ and then, choose ‘Network and Sharing Center’ from the right.
Next, select ‘Change adapter settings’.
Right-click on the ‘Ethernet adapter’ and select ‘Properties’.
Here, double-click on ‘Internet Protocol Version 4 (TCP/IPv4)’.
Select ‘Use the following DNS server addresses’ option.
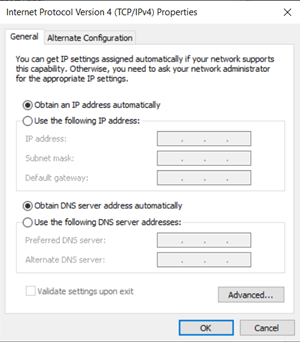
Enter the following DNS server address in the ‘Preferred’ and ‘Alternate DNS server’ field respectively.
- 8.8.8.8
- 8.8.84.4
Click OK to save the changes.
5] Re-register Netshell.dll file
Reregister the Netshell.dll file and see if that helps.
Your problem should have been resolved. Let us know if it did.
Also read: Failed To Read Description. Error Code 2 For Background Services.
Leave a Reply