If you have a TPM-enabled laptop or PC, and you are receiving a message in Windows Defender Security Center telling you that you need to update your security processor or TPM firmware, then you should update it on priority. In this guide, I will share how you can Clear TPM & Update TPM security processor firmware.
What is TPM in Windows 11/10

In case you do not know, TPM or Trusted Platform Module is a specialized chip on an endpoint device. It can store RSA encryption keys for hardware authentication specific to the host system. The TPM chip also holds an RSA key pair called the Endorsement Key. The pair is maintained inside the chip and cannot be accessed by software. In short, it can store crucial data including Fingerprints, Facial data, etc. in the chip, and it’s not easily accessible.
How to Update TPM security processor firmware
The update for TPM usually contains a patch for a security vulnerability that can impact operating system security. The update will address the vulnerability, which you will need to download and install. It is also possible that firmware updates are sent by OEMs, which are usually faster than Windows Update.
Download & install Windows Updates
This is the best way to update your TPM. So in case you have set your update to manual mode, check if you have an update and if it includes a security patch. In case of the automatic update, it will download and install. You will get an idea when you see a notification in Action Center asking you to restart your computer.
Here is a small warning. Do not apply TPM firmware update from OEMs before installing the Windows operating system update. Windows will be unable to determine if your system is affected.
Install Firmware updates by OEMs
Many OEMs including Microsoft offer Firmware Updates separately. If TPM firmware update was not included in Windows Update, you would have to manually download, and apply it. Below is the list of OEMs from where you can download the update. You can always check your manufacturer from here.
- Microsoft Surface Devices.
- Acer
- Fujitsu
- HP Customer Support
- HP Enterprise Support
- Lenovo
- Panasonic
- Toshiba
How to clear TPM
Once you have installed the firmware update, either through Windows Update or from the OEM website, you will also need to clear your TPM. This is important to ensure that the data is secured.
Before you follow the steps, make sure to backup your TPM data so that you can restore them later. Clearing your TPM will reset your security processor to its default settings. Also, it’s important that you do not do it at all unless you own the PC. This may be needed if you see a message here: Reset your security processor to fix functionality issues.

To clear your TPM on your Windows computer, follow the steps below:
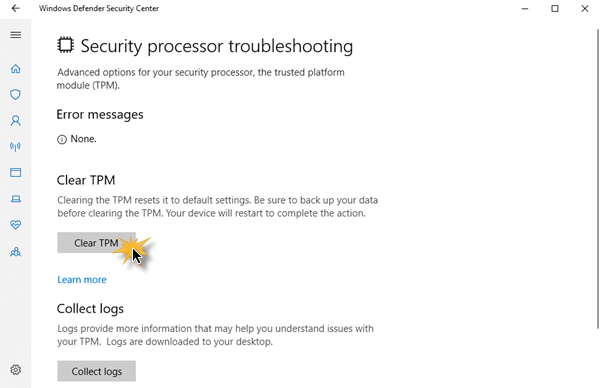
- Go to Start > Settings > Update & Security > Windows Security > Device security. This will launch the Windows Defender Security Center.
- Select Device Security again, and then under Security processor, select Security processor details.
- On the next screen, select Security processor troubleshooting, and then under Clear TPM click on the Clear TPM button.
- This will reset your security processor to its default settings.
Your device will need to restart before the process is complete.
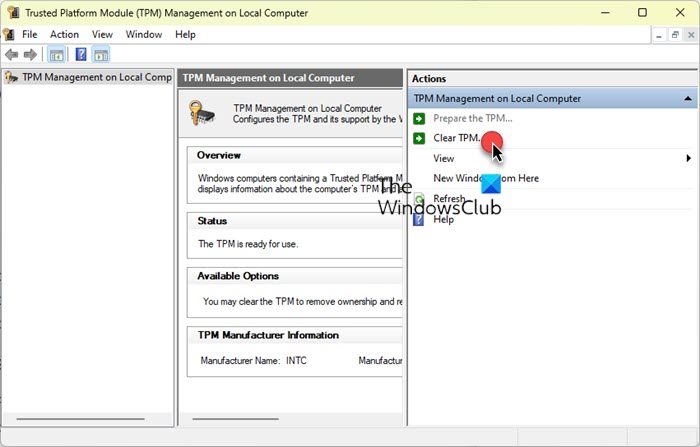
You can also open the Run box, type tpm.msc and hit Enter to open the TPM Management window.

Here, on the right side, click on Clear TPM.
NOTE: Before you clear your TPM, make sure you turn off BitLocker on all of your drives first (or save the encryption password safely). Otherwise, you’ll lose the encryption keys to your drives and be unable to access them.
Also read: Is it safe to Clear TPM when reinstalling or resetting Windows 11?
How to clear TPM using PowerShell?
The Clear-Tpm cmdlet resets the Trusted Platform Module to its default state and removes the owner authorization value and any keys stored in the TPM.
Clear-Tpm
This command uses the owner authorization value stored in the registry instead of specifying a value or using a value in a file. You can read more on this at docs.microsoft.com.
How to clear TPM via BIOS?
- Boot your computer to BIOS settings
- In BIOS, navigate to the Security tab, and here you’ll see an option Clear TPM.
- Select Clear TPM and save the changes.
- Restart your computer.
I hope this helps!