While opening VS Code, if you see a message saying Updates are disabled because you are running the user-scope installation of Visual Studio Code as Administrator, here is how you get rid of it. There are multiple methods to fix this problem, and this article explains all of them so that you can troubleshoot the issue and update VS Code on a Windows 11/10 computer.

What is the difference between User Setup and System Setup of VS Code?
There are two main types of Visual Studio Code installations: user setup and system setup. As they offer two different versions, obviously, there are some differences.

- If you choose to opt for user setup, you do not need to provide any administrator privileges. On the other hand, if you choose to go with the system setup, you must use administrator permission.
- user setup option installs the app in the Local AppData folder, whereas the system setup option uses the Program Files folder to be installed on your computer.
- You can find VS Code only in the current user account if you choose the user setup. However, if you choose the system setup, you can find the app in all the user accounts.
- You cannot find the Check for Updates option in the Help menu of user setup.
Even though the user setup option seems easier to go with, it may display the aforementioned message at times. That being said, even though you choose the automatic update option, updates will be downloaded but may not be installed automatically. That is the reason why you need to opt for system-level setup instead of user-level setup.
Updates are disabled because you are running the user-scope installation
To fix the Updates are disabled because you are running the user-scope installation issue in VS Code, follow these steps:
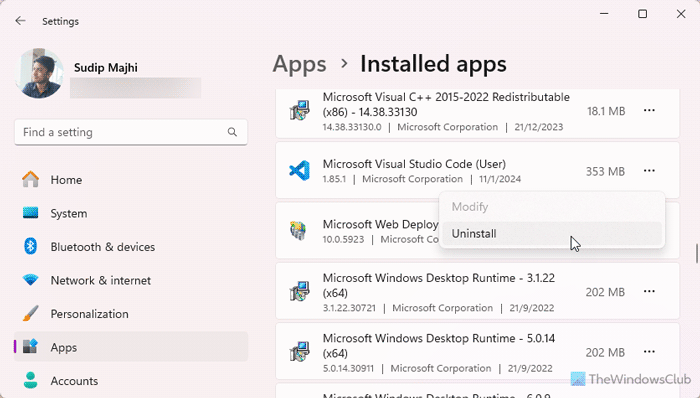
- Press Win+I to open the Windows Settings panel.
- Go to Apps > Installed apps.
- Find the Microsoft Visual Studio Code (User) app.
- Click on the three-dotted icon and select the Uninstall option.
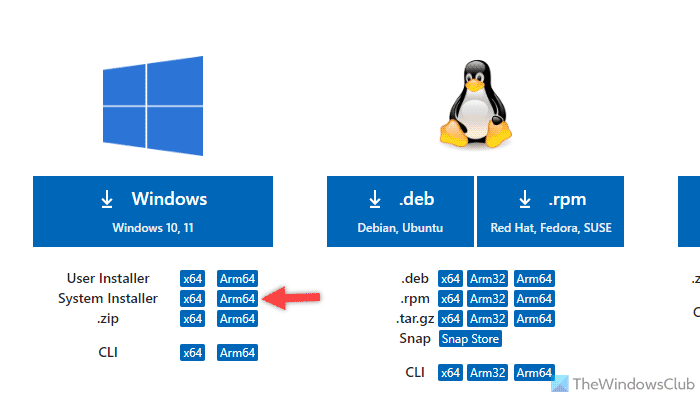
- Download the System Installer file from the official website.
- Double-click on the executable file to complete the installation.
To get started, you need to uninstall the existing VS Code app. For that, press Win+I to open the Windows Settings panel. Then, go to Apps > Installed apps and find the Microsoft Visual Studio Code (User) app.
Click on the respective three-dotted icon and select the Uninstall option.

Following that, click on the Uninstall button again to start the uninstallation process. Next, you need to head to the code.visualstudio.com website and download the System Installer file.

Once the download is complete, you can double-click on the EXE file to start the installation. Although it is pretty basic, you can still follow this guide to know how you can install VS Code properly on Windows PC.
Once done, you cannot find the same message again.
That’s all! I hope this article explains everything.
Read: Unable to install extensions in Visual Studio Code
Why are Visual Studio Code updates disabled?
If you run the Visual Studio Code user setup version as Administrator, the updates will be disabled. In order to fix this problem, you need to opt for the system-level setup. For that, use the Windows Settings panel to uninstall the existing application first. Then, download the System Installer file and install the VS Code as a system-level setup.
How do I force Visual Studio Code update?
To force Visual Studio Code updates, you can use the Check for Updates option. You need to go to the Help menu to find this option. It checks for updates anytime you click on it. If an update is available, you will be able to download and install it automatically. However, this option is not available in the user-level setup.