When updating Windows 11/10, if you receive error 0x800f0988, then this post will help you resolve the problem. Here is the exact error message — Updates Failed, Error 0x800f0988, There were problems installing some updates, but we’ll try again later. You may also see error code 0x80073701 or 0x800f08a instead of 0x800f0988.

Fix 0x800f0988 Windows Update Error
If you receive Updates Failed, Error 0x800f0988 message, here are two things you should do:
- Clear the contents of the SoftwareDistribution folder
- Run Windows Update Troubleshooter
- Run StartComponentCleanup Task using DISM or Task Scheduler
Fix Install error 0x800f0988 in Windows 11
1] Clear the contents of the SoftwareDistribution folder
Clear the contents of the SoftwareDistribution folder and run Windows Update and see if that helps.
2] Run the Windows Update Troubleshooter
Windows Update Troubleshooter can fix a variety of problems that we used to do it manually previously. If you face any problem, including Error 0x800f0988 and 0x80073701, it is an excellent idea to run the troubleshooter.
- Open Windows 10 Settings using Win + I
- Click on Update and Security and then navigate to Troubleshoot
- Locate Windows Update, and click on it, and then click on the button which says Run the troubleshooter.
- It will check for any pending restart, initialize the diagnosis and restart services like BITS.
Check for the update again, and you should not face error 0x800f0988 and 0x80073701 any more.
3] Run StartComponentCleanup Task using DISM or Task Scheduler
Before we manually run, let’s learn a bit about the StartComponentCleanup task. The task was introduced in Windows to regularly clean up Windows components when they are not in use. It is expected to be triggered by the operating system. When it does that, it will wait for at least 30 days after an updated component has been installed before uninstalling the previous versions of the component.
According to Microsoft, we can run this task either using Task Manager or using DISM. There is a difference between the two methods. While running via Task Manager, the timeout is only for an hour. It is possible that some of the cleanups might be left out. When using DISM, updated components will be immediately deleted without the 30-days grace period, and you will not have a 1-hour timeout limitation.

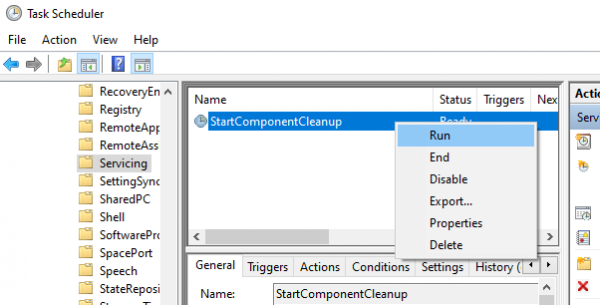
How to run StartComponentCleanup Task using TaskManager-
- Open the Run prompt and type taskschd.msc and hit Enter to open Task Scheduler
- Navigate to Library\Microsoft\Windows\Servicing\
- Select StartComponentCleanup, right-click and run
- Wait for the process to complete, and check for the update again
How to run StartComponentCleanup Task using DISM
Open Command Prompt with admin privileges. Type or copy and paste the following command into the Command Prompt window:
dism /online /cleanup-image /startcomponentcleanup
Hit the Enter key and wait for the command to complete.
Restart the computer and check for the update again.
Along with this, you may well use another switch /ResetBase to remove all superseded versions of every component in the component store. The command will then look like
Dism.exe /online /Cleanup-Image /StartComponentCleanup /ResetBase
Let the task complete, and once it is done, reboot your computer and see if it has helped.
I hope the steps were easy to follow and that you were able to fix Error 0x800f0988 on Windows 11/10. The error is usually caused by an old component, and using Start Component Cleanup will fix the issue.
Leave a Reply