If your USB-C monitor is not being detected on your Windows 11/10 PC, you’re not alone. Many users have reported similar issues, particularly after recent Windows updates, where external displays connected via USB-C ports suddenly stop working. This can be frustrating, especially if your monitor worked perfectly before the update. This post’ll guide you through the troubleshooting steps to resolve the issue.
Why is my USB-C not working for display in Windows 11?
Several factors could cause your USB-C port to stop working for display in Windows 11. One common cause is outdated or incompatible drivers, especially after upgrading to the new operating system. Additionally, hardware issues, such as a damaged USB-C port, cable, or adapter, can disrupt the connection. Power management settings in Windows 11 may turn off USB ports to save energy, impacting device connectivity. Also, incorrect BIOS or UEFI settings could disable USB-C functionality or video output, preventing the port from working properly.
Fix USB-C Monitor not detected in Windows 11
To fix a USB-C monitor that is not being detected in Windows 11, use these solutions:
- Check physical connections
- Rollback or Reinstall graphics/USB-C drivers
- Check USB Power Settings
- Disable USB Selective Suspend
- Rollback recent updates
- Check BIOS/UEFI settings
Let us see this in detail.
1] Check physical connections
Ensure the USB-C cable is securely connected to the monitor and the laptop/PC. Use another USB-C cable or try a different USB-C port on your device to check if the issue is due to a faulty cable or port. This can help identify if the problem lies with the cable or port itself. Also, ensure the USB-C cable and the USB-C port on your device supports video output (some USB-C ports and cables are designed only for specific functions like charging devices or transferring data, and they do not support video output).
2] Rollback or Reinstall graphics/USB-C drivers
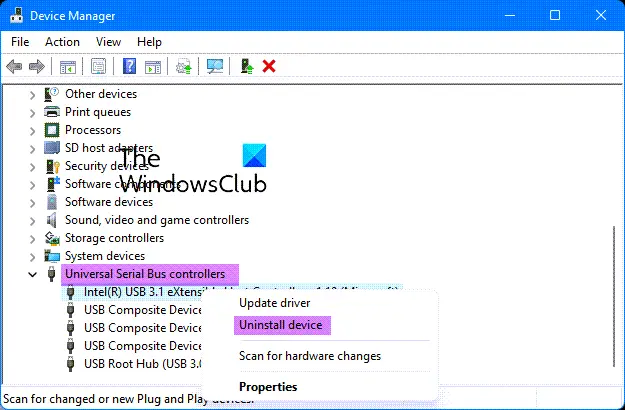
Graphics drivers are responsible for managing video output and display functions in Windows, and USB-C drivers are crucial for managing the functionality of USB-C ports, including their ability to handle video output, data transfer, and power delivery. If these drivers are outdated, corrupted, or incompatible, they might cause issues with detecting or using external monitors, including those connected via USB-C.
Right-click the Start button and select Device Manager. Expand the Universal Serial Bus controllers section in the Device Manager window and look for any errors or warning symbols. A Yellow Triangle with an Exclamation mark next to the device name indicates a problem with the device (driver issues, hardware malfunctions, or compatibility problems). A Red X shows that the device is disabled or not functioning properly.
If you see any issues, right-click the device and select Properties > Driver tab. If available, select Roll Back Driver to revert to the previous version that worked before the update. Otherwise, select Uninstall Device, follow the prompts, and reboot your PC. Windows will reinstall the necessary drivers.
Repeat the above steps for the Display adapters section (for graphics drivers).
3] Check USB Power Settings
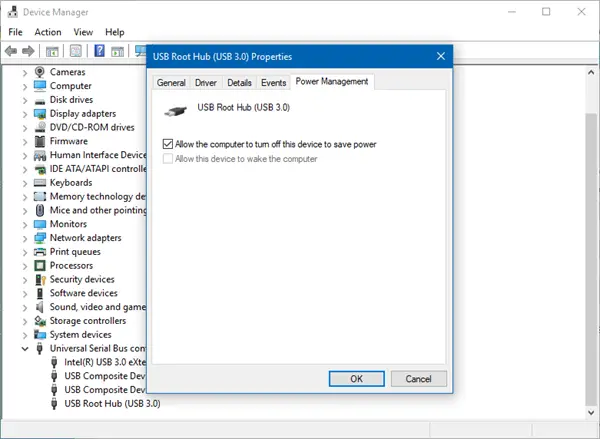
USB Power Settings in Windows manage how your USB ports behave to conserve energy and can affect the functionality of devices connected through these ports. If these settings are enabled, Windows might reduce power to the USB ports, potentially causing video output or device detection issues.
Open Device Manager and expand the section labeled Universal Serial Bus controllers. Right-click on each USB Root Hub or Generic USB Hub and select Properties.
Go to the Power Management tab and uncheck the option ‘Allow the computer to turn off this device to save power‘. Click OK to apply the changes.
By adjusting these settings, you can rule out power management as the cause of your USB-C display issues and ensure that your USB ports are operating at full capacity.
4] Disable USB Selective Suspend
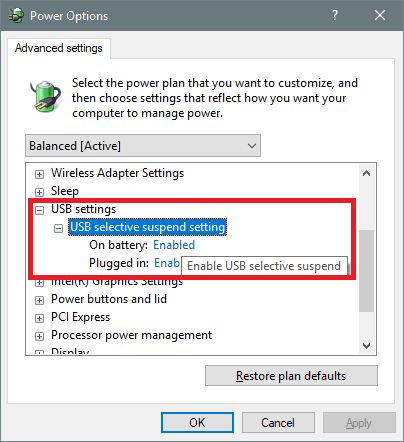
USB Selective Suspend is a power-saving feature in Windows that allows the operating system to put individual USB ports into a low-power state when not actively being used. This can help save energy, especially on laptops.
The low-power state, however, can sometimes disrupt the stable operation of devices connected via these ports, including USB-C monitors. It can make them appear as if they are not working properly or cause them to disconnect and reconnect frequently. Disabling this feature can improve the reliability of the connection between your USB-C port and your monitor, ensuring that the monitor remains detected and functional all the time.
Open the Control Panel and navigate to Hardware and Sound > Power Options. Click on Change plan settings next to your selected power plan. Click on Change advanced power settings.
In the Power Options window, expand the USB settings section. Expand the USB selective suspend setting. Set the option to Disabled for both On battery and Plugged in (if applicable). Click Apply and then OK.
5] Rollback recent updates
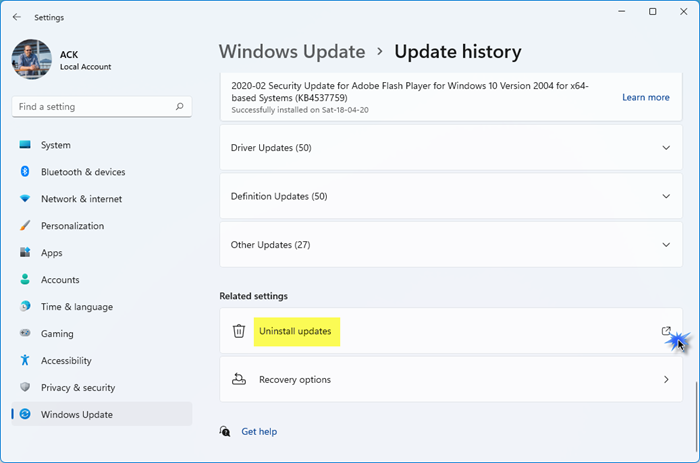
If a recent update is causing issues with your USB-C monitor, rolling back the update can reverse any changes that may have led to these problems, potentially restoring your system’s normal functionality.
To roll back an update, press Win + I and go to Settings > Windows Update. Select Update history, scroll down, and click Uninstall updates user ‘Related settings’.
This will bring up a list of recently installed updates on your system. Find and select the update you wish to roll back. Click Uninstall and follow the on-screen instructions. After the update is uninstalled, restart your computer to apply the changes and check if the issue has been resolved.
Read: How to fix USB-C problems on your Windows computer
6] Check BIOS/UEFI settings

In some cases, USB-C video output might be disabled in the system’s BIOS or UEFI. Enabling it can resolve detection issues with external displays in Windows.
Restart your computer and press the designated key during startup (often F2, F10, DEL, or ESC) to enter the BIOS/UEFI setup. If you’re unsure of the key, check your laptop or motherboard manual.
Look for sections names as Advanced, Peripherals, USB Configuration, or Thunderbolt Configuration. Ensure that USB-C ports are enabled. If you have options for Thunderbolt or other USB-C features, ensure they are configured to be enabled.
If none of these steps resolve the issue, contact manufacturer support for further assistance. They might determine that a motherboard replacement (USB-C port is integrated into the motherboard) is necessary to fix the problem.
Read: USB Device is not recognized.
Does Windows 11 support USB-C display?
Yes. As long as your device and the display you’re connecting are compatible with DisplayPort Alternate Mode (DP Alt Mode) or Thunderbolt 3/4 standards, Windows 11 will support video output through USB-C. These standards are essential for enabling video transmission over the USB-C connection.
Read Next: USB WiFi not working with 100417CF Access Violation error.
Leave a Reply