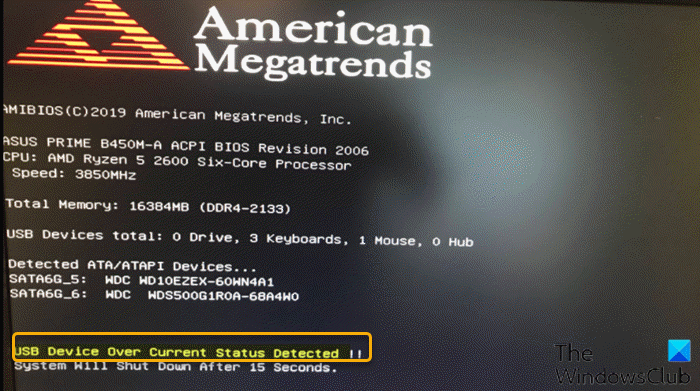
If you receive the USB Device Over Current Status Detected error notification message when you power on your Windows 11 or Windows 10 computer, then this post is intended to help you. In this post, we will provide the most suitable solutions affected users can try to successfully resolve this issue.

What is an overcurrent error?
In a nutshell, if there’s an overcurrent or “E” code, the electrical current on one or more wires connected to your Nest thermostat has spiked multiple times. Nest thermostats have an internal breaker to help prevent damage, and there will appear an overcurrent code if the breaker has been tripped 10 times or more.
USB Device Over Current Status Detected
If you’re faced with this issue, you can try our recommended solutions below in no particular order and see if that helps to resolve the USB Device Over Current Status Detected error on your Windows 11/10 computer.
- Diagnose and connect USB devices one at a time
- Disconnect front USB ports
- Check for missing jumper
- Update BIOS
- Replace MOBO
Let’s take a look at the description of the process involved concerning each of the listed solutions.
1] Diagnose and connect USB devices one at a time
Do the following:
- Turn your computer off.
- Unplug all the USB devices from your computer.
- Wait for at least 1 minute and turn your computer back on again.
- Try to plug your USB devices in, one at a time.
You need to restart your computer after plugging in one USB device. This way, you might be able to find the culprit device. If you manage to find the device or or identify the USB port causing this USB Device Over Current Status Detected error, you can simply try to avoid using the device/USB port.
Proceed with the next solution if this action didn’t help.
2] Disconnect front USB ports
You may require the services of a PC hardware technician.
Do the following:
- Shut down your computer completely.
- Unplug the power cable from the socket.
- Open your computer’s case.
- Once you see the motherboard, search for USB connectors.
- Once you have located the pins and socket, unplug the connector.
- Now turn on your computer and see if the error message persists.
If the error message doesn’t reappear, it means the USB socket was problematic. In this case, you can get it replaced.
3] Check for missing jumper
You may require the services of a PC hardware technician.
Do the following:
- Shut down your computer completely.
- Unplug the power cable from the socket.
- Open your computer’s case.
- Check your USB internal port to see if there’s a missing jumper in the USB internal ports. If you see a spot is missing a jumper, put a jumper to short 1 and 2.
- Restart your computer.
On boot, check if the issue at hand is resolved. If not, try the next solution.
4] Update BIOS
This solution requires you to try updating the BIOS and firmware on your system.
Using tools from OEMs is the easiest way to do so. All OEM manufacturers have utilities that help you easily update, BIOS, firmware, and drivers. Search for yours and download it from the official site only.
This is the safest way to update the BIOS.
- If you own a Dell laptop you can head over to Dell.com, or you could use Dell Update Utility.
- ASUS users can download the MyASUS BIOS update utility from the Microsoft Store.
- ACER users can go here. Enter your Serial Number/SNID or search for your product by Model, select BIOS/Firmware, and click the Download link for the file you want to download.
- Lenovo users can use the Lenovo System Update Tool.
- HP users can use the bundled HP Support Assistant.
Once you complete the manual update of the BIOS/firmware on your system, check if the issue is resolved. If not, proceed with the next solution.
5] Replace MOBO
If nothing has worked so far and you have a new motherboard installed on your computer for the first time, it is possible that the motherboard is defective and there are some modules damaged. In this case, if the MOBO is still under warranty, you can have the MOBO replaced.
How do I check if my USB ports are malfunctioning?
To check if your USB ports are malfunctioning on your Windows 11/10 system you can use the Device Manager method to scan for hardware changes. Follow these instructions: Click Start, type run in the search bar, and then click Run. Type devmgmt. In Device Manager, click your computer so that it is highlighted. Click Action, and then click Scan for hardware changes. Check the USB device to see whether it is working.
How do you fix a USB port malfunction?
If you’re experiencing a USB port malfunction on your Windows 11/10 device, you can fix USB Port Issues by applying any of these suggestions:
- Restart your computer.
- Look for debris in the USB port.
- Check for loose or broken internal connections.
- Try a different USB port.
- Swap to a different USB cable.
- Plug your device into a different computer.
- Try plugging in a different USB device.
- Check the Device Manager (Windows).
Hope the post helps you.