As a PC gamer or regular user, on your Windows 11 or Windows 10 computer, you may encounter microphone-related issues like Discord Mic not working, Microphone not plugged in, Zoom Microphone not working, Skype Audio or Microphone not working and so on. In this post, we provide the most suitable solutions to the issue of USB microphone not working on Windows 11/10.
USB microphone not working on PC
If your USB microphone is not working on your Windows 11/10 system, you can try our recommended solutions below in no particular order to resolve the issue.
- Run Recording Audio Troubleshooter
- Restart Windows Audio service
- Update/Reinstall latest driver for the USB Microphone
- Uninstall and Reinstall the USB microphone
- Run Hardware and Devices Troubleshooter
Let’s take a look at the description of the process involved concerning each of the listed solutions.
Before you try the solutions below, you can do the following, and after each task see if your USB microphone is now working normally on your PC without issues:
- Disconnect and reconnect the USB microphone.
- Check if your USB mic has a physical mute button and set the switch accordingly.
- Restart your computer. In most cases, a quick restart of your PC will resolve minor issues.
- Make sure microphone access is turned on and mic is not disabled in Settings app or Device Manager on your PC, the mic is set as default input device and Exclusive Mode is disabled in Microphone properties.
- Use another USB cable. If the USB cable is detachable from the microphone, try another USB cable. If there’s provision on the mic, you can use an audio jack cable to connect to the PC or you may use the USB audio jack adapter.
- Try another USB port. You can plug the USB microphone into another USB port on your computer.
- Check for updates and install any available bits on your Windows 11/10 device. On the other hand, if the error started after a recent Windows update, you can perform System Restore or uninstall the update as a last resort maybe, after you have tried the solutions described below.
- If you recently installed any Voice Over Internet Protocol (VOIP) app on your PC and the issue in focus started, uninstall the app.
1] Run Recording Audio Troubleshooter
If your USB microphone is not working on your Windows 11/10 system, you can begin troubleshooting to fix the sound/audio issue on your device by running the Recording Audio Troubleshooter.
To run Recording Audio Troubleshooter on your Windows 11 device, do the following:
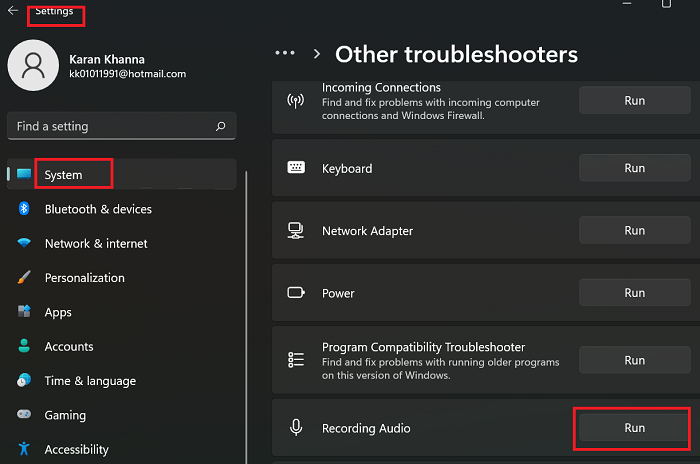
- Press Windows key + I to open the Settings app.
- Navigate to System > Troubleshoot > Other troubleshooters.
- Under the Other section, scroll to find Recording Audio.
- Click Run button.
- Follow on-screen instructions and apply any recommended fixes.
To run the Recording Audio Troubleshooter on your Windows 10 device, do the following:
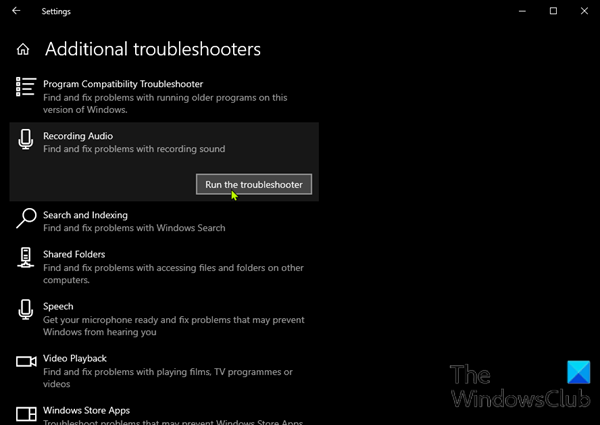
- Press Windows key + I to open the Settings app.
- Go to Update and Security.
- Click the Troubleshooter tab.
- Scroll down and click on Recording Audio.
- Click the Run the troubleshooter button.
- Follow on-screen instructions and apply any recommended fixes.
Continue with the next solution if the issue in view remains unresolved.
2] Restart Windows Audio service
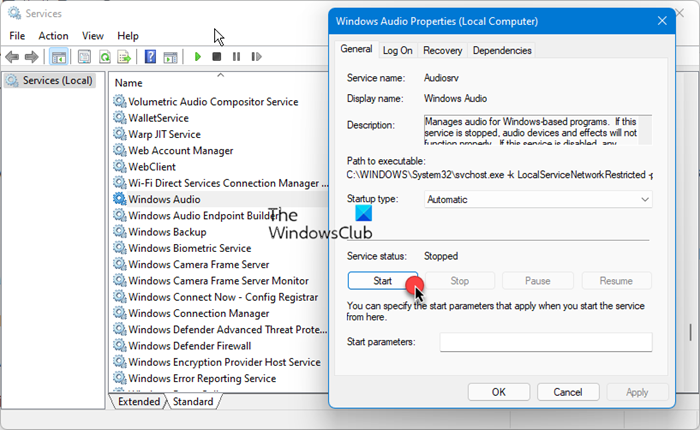
The Audio service running in Windows 11/10 manages audio for programs, and If this service is stopped or disabled on your system, it will affect the sound devices and your audio peripherals will not work properly. In this case, you need to make sure to start/restart the Windows Audio service.
Do the following:
- Press Windows key + R to invoke the Run dialog.
- In the Run dialog box, type services.msc and hit Enter to open Services.
- In the Services window, scroll and locate the Windows Audio service.
- Double-click on the entry to edit its properties.
- In the properties window, click the drop-down on the Startup type and select Automatic.
- Next, make sure the service is started. If the service is already started, right-click the entry and select Restart from the context menu.
- Click Apply > OK to save changes.
- Restart PC.
On boot, check if the issue you’re currently facing is resolved. Otherwise, try the next solution.
3] Update/Reinstall latest driver for the USB Microphone
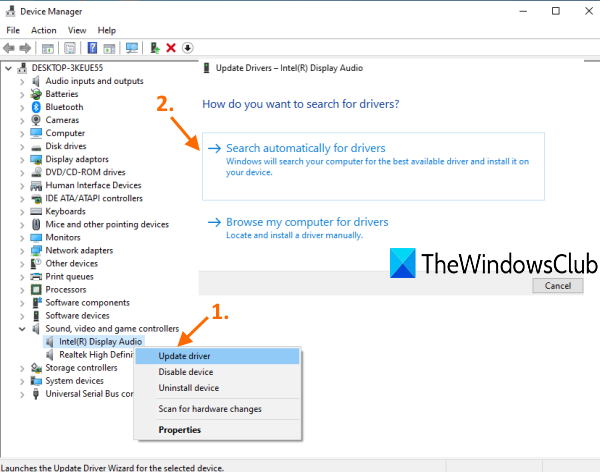
Outdated driver for the USB microphone you installed on your system is a likely culprit here. In this case, to rule out the possibility, you can update your audio driver. To perform this task, you can do so in the following ways:
- You can manually update audio driver for the USB mic via Device Manager if you have already downloaded the .inf or .sys file for the driver.
- You can also update the audio driver via Command Prompt.
- In Windows Update, you can as well get the driver updates on the Optional Updates section.
- Another option available for you, is to automatically update your drivers using any of the free Driver Update software for Windows 11/10 PC.
Keep in mind that updating driver is not always the ultimate solution to fix issues with externally connected hardware devices like microphones – the reason being software vendors often release a buggy update or a partially broken one, which if you have installed that update the issue won’t still be resolved. In this case, you may need to reinstall the driver in case updating doesn’t work properly.
You can uninstall the audio driver, and then restart your PC – on boot, Windows will scan for hardware changes and automatically reinstall the generic driver for the USB mic device. Alternatively, after you uninstall the driver, you can download the latest version of the driver from the microphone hardware manufacturer’s website and then install on your PC.
4] Uninstall and Reinstall the USB microphone
USB or Bluetooth mics, as well as headsets connected to your Windows 11/10 PC will be listed in Devices and Printers applet in the Control Panel. So, to resolve the issue in hand, you can remove the device to uninstall it and then reconnect the device once again to reinstall it properly in Windows. To perform this task, do the following:
- Press Windows key + R to invoke the Run dialog.
- In the Run dialog box, type control and hit Enter to open Control Panel.
- From the top right corner of the window, set the View by option to Large icons or Small icons.
- Click Devices and Printers.
- Next, right-click on the USB microphone attached to the PC.
- Select Remove device option from the context menu.
- Click Yes on the prompt that pops up.
This will uninstall the device. You can disconnect and reconnect the mic to the computer, then check if the error is resolved. If not, try the next solution.
5] Run Hardware and Devices Troubleshooter
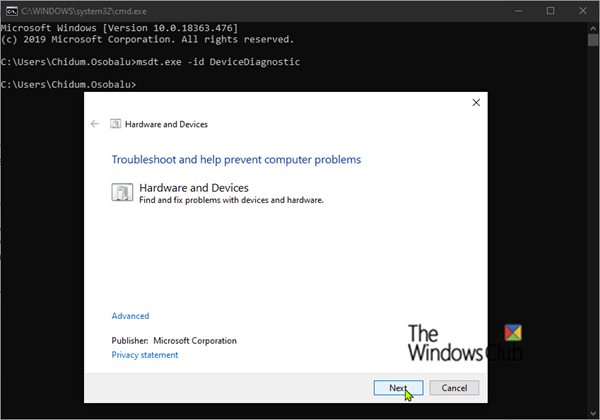
At this point, you may be dealing with faulty hardware, in this case, the USB microphone which may need to be replaced. To be certain the USB microphone is faulty, you can run the Hardware and Devices Troubleshooter to fix problematic devices. You can also manually check for faulty hardware by trying another USB microphone on the PC or try the problematic mic on another system and see if it works. If the issue isn’t with the hardware, you can check for faulty components, including batteries if the mic requires it to operate.
Any of these solutions should work for you!
Related post: Intel SST microphone not working on Windows
Why does my microphone not work on Windows 11?
If your microphone isn’t detected after updating Windows 11, you may need to give your apps permission to use it. Here’s how:
- Select Start > Settings > Privacy & security > Microphone.
- Now, make sure Microphone access is turned on.
Why is my PC not detecting my USB mic?
If your Windows 11/10 PC is not detecting your USB mic, it could be due to a number of reasons, mainly incompatible drivers. You can uninstall your USB controller driver to quickly fix the issue. You can also update your audio and sound drivers and see if that helps.
Leave a Reply