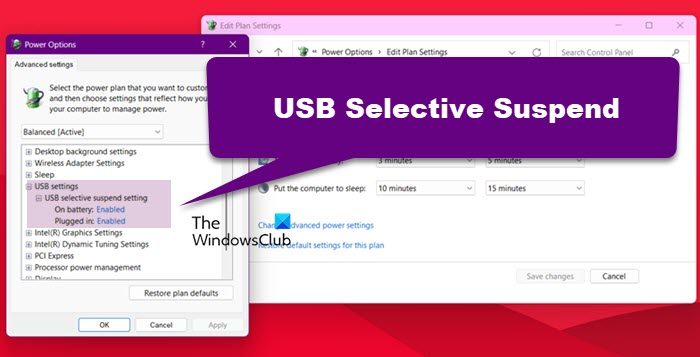
The USB Selective Suspend feature helps your system suspend a few USB ports that are not in use to save power. In this post, we will learn what the feature is and how you can enable or disable it.

What is USB Selective Suspend feature in Windows?
In Windows OS, the Selective Suspend feature allows the system to save power by putting certain USB ports into a suspended mode. It lets the hub driver suspend a single port but does not affect the functioning of other ports. For instance, it’s similar to how users put their laptops or other devices in Sleep Mode – Selective Suspend is almost like that. The feature which makes it so interesting is that it can suspend a specific USB port individually, without affecting the power of the entire USB port. However, the driver for the USB device must support Selective Suspend for it to run right.
The USB Core Stack supports a modified revision of the Universal Serial Bus Specification called ‘selective suspend’. This allows the Hub Driver to suspend a port and help conserve the battery. Suspending services like Fingerprint Readers, etc., which are not required all the time, helps improve power consumption. The behavior of this feature is different for devices operating in Windows XP and kept improving in Windows Vista and later versions.
Users don’t really need this on a system that is already charging and can use the plug-in power whenever needed. This is why Windows lets users enable the USB Selective Suspend based on the computer’s plug-in or battery. But the Selective Suspend feature isn’t a requirement on a desktop machine plugged into power. When a USB port is powered down, it doesn’t necessarily save that much of power on a desktop. That’s why Windows allows you to enable or disable USB Selective Suspend based on the computer being plugged in or on battery power. This feature is incredibly helpful for power-saving purposes on portable computers.
How to enable or disable USB Selective Suspend
Some users have reported that at times the USB port does not get turned back on after Selective Suspend has been applied. Or sometimes even turns itself off without warning. To fix this, you need to disable the USB Selective Suspend feature on your system. Here’s how you can do it:
Related: USB Suspend:USB Device not Entering Selective Suspend
Via Power Options
Open the Control Panel on your Windows PC. To do this, search for Control Panel in the search box.
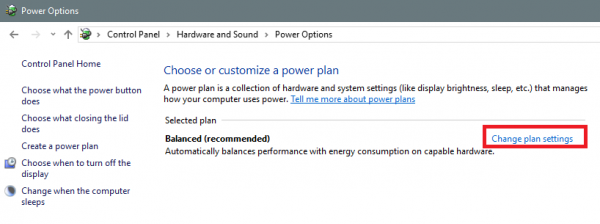
Now, navigate to this path: Control Panel > Hardware and Sound > Power Options.
Click on your selected Power Plan, then click on Change Plan Settings.

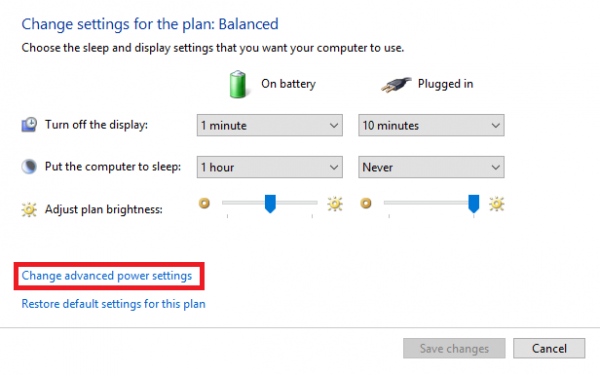
This will take you to a new page where you will need to click on Change advanced power settings.

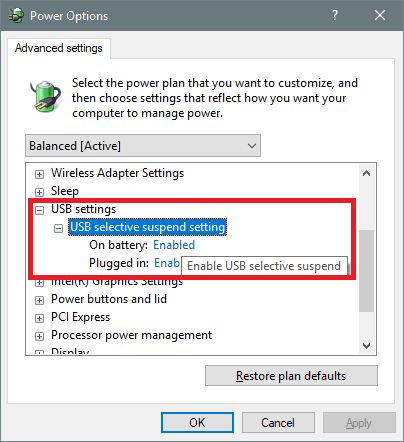
Now a new and more detailed box of Advanced power options will appear. There will be a menu that says USB Settings.
Expand that option, and you will find two sub-options there that will be labeled as On Battery and On Power.

You can choose to enable both of them individually as per your choice.
Click on OK for the change to take place.
Related: Selective Suspend causes USB devices on USB hub to stop functioning.
Using Windows Registry
To disable the Selective Suspend feature via the Registry Editor, do the following:
Since this is a registry operation, it is recommended that you back up the registry or create a system restore point as necessary precautionary measures. Once done, you can proceed as follows:
- Press Windows key + R to invoke the Run dialog.
- In the Run dialog box, type regedit and hit Enter to open Registry Editor.
- Navigate or jump to the registry key path below:
HKEY_LOCAL_MACHINE\SYSTEM\CurrentControlSet\Services\USB
If the USB key is not present, you can right-click on the Services sub-parent folder on the left navigation pane, click New > Key to create the registry key and then rename the key as USB and hit Enter.
- At the location, on the right pane, double-click the DisableSelectiveSuspend entry to edit its properties.
If the key is not present, right-click on the blank space on the right pane and then select New > DWORD (32-bit) Value to create the registry key and then rename the key as DisableSelectiveSuspend and hit Enter.
- Now, double-click on the new entry to edit its properties.
- Input 1 in the Value data field.
- Click OK or hit Enter to save the change.
- Exit Registry Editor.
- Restart your PC.
In our next post, we will see what you can do if the USB Selective Suspend is disabled.
Should I disable the USB selective suspend setting?
Disabling the USB Selective Suspend feature, especially on the battery, is not recommended. However, if you encounter an issue with any of your peripherals, such as keeping them disconnected or not working, you can disable the USB Selective Suspend settings by following the steps mentioned earlier.
Also Read: Bluetooth keyboard or mouse keeps going to Sleep in Windows.