Grok AI Chatbot is now FREE for All Users on X. In this post, we have included some tips to use Grok AI assistant from Twitter (X) more efficiently.
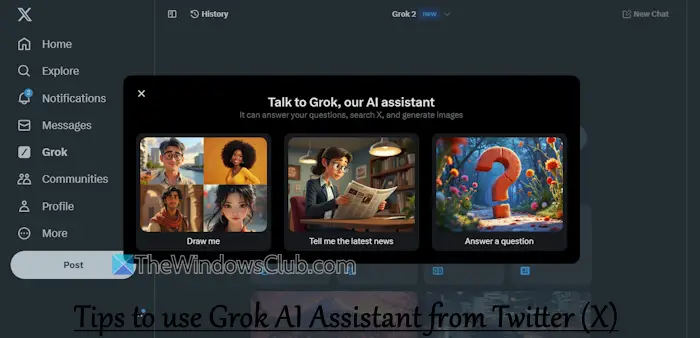
Grok (developer by xAI company) is an AI assistant and chatbot for the X (Twitter) platform. It can respond to user queries with humor and up-to-date information, generate images, provide coding support, summarize content, and more. Earlier, this chatbot was available to X Premium and Premium+ subscribers. But now, with its latest release (Grok-2), a free version of Grok is available for all users of X on its desktop and mobile platforms.
Can I use Grok AI now?
Yes, anyone with an X (Twitter) account that is more than 6 days old and linked to a mobile number can access and use Grok AI. However, the free version of Grok AI is limited to 10 questions every two hours and can generate four images and analyze three images per day.
Tips to use Grok AI Assistant from Twitter (X)
When you log in to your X account on the desktop, you will see a Grok option on the left sidebar. On your mobile device, the Grok icon is located at the bottom part of the app (between the Search icon and Communities icon). Select that option to access the Grok AI homepage or tab and then you can start with a prompt or suggestions given there. Below is a list of tips to use Grok AI assistant from Twitter (X):
- Edit your prompt
- Ask for a follow-up or use the suggestions
- Start a new chat
- Generate AI images and make changes
- Analyse images and PDFs
- Analyse posts using Grok
- Access your Grok History
- Switch to the Focus Mode
- Turn on the Fun Mode
- Verify the output generated by Grok AI
- Stop training Grok AI on your data.
1] Edit your prompt
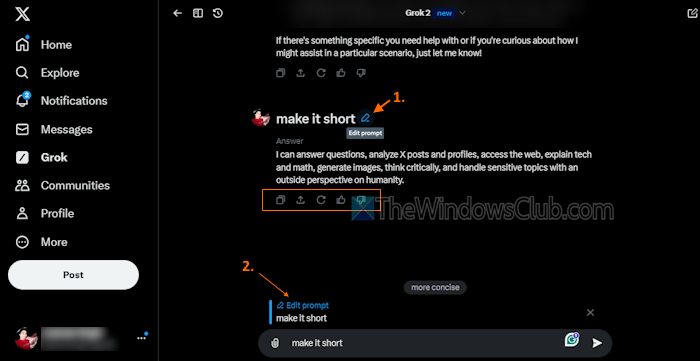
Giving a prompt to begin the chat or conversation is simple. But, when you don’t get a relevant response for a prompt, then the problem might be with the prompting style itself. At that time, you can edit your prompt to get the more accurate or relevant answer you looking for. Place your mouse cursor on a prompt and the Edit Prompt icon will appear. Use that icon and make the changes.
For each answer you get from Grok, you have the Like, Disklike, Regenerate, Copy text, and Share conversation (to that particular point) options.
2] Ask for a follow-up prompt or use the suggestions
You can continue the conversation with Grok to get more information about the generated answer or your question or clarify the response. To do this, ask for a follow-up prompt or select any of the suggestions provided at the bottom of the answer.
3] Start a New Chat
If a conversation is too long or becomes messy and confusing, you can always start a new chat and begin a topic or a separate conversation. Click on the New Chat option on the top right corner of the Grok interface and you can start with a fresh one.
4] Generate AI images and make changes

Image Generation (powered with the autoregressive AI model, code-named Aurora) is an interesting feature of Grok AI. This is similar to what we already have with other AI chatbots, like Copilot, Gemini, and Image Creator in the Paint app of Windows, etc. Based on the given text instructions, it can generate high-quality AI images.
From Entity generation to Artistic text, Meme generation to Realistic portraits, celebrities, etc., you can generate AI images or art in a few seconds. You can further use suggestions or ask for changes and it will provide the output. For an output image, you also have options to save, download, and post the image.
Read: Best free AI Image Generators
5] Analyse images and PDFs
This is one of the important features of Grok AI assistant which I like. It lets you upload an image or a PDF document and then it analyzes the input file. Based on the input image or file, it automatically provides a description that is quite good. This feature is indeed helpful if you need to extract meaningful information from an image or need some help to summarize content. Click on the Attach icon (Media option) on the left part of the text box to upload your file and proceed further.
You can start asking for related information or prompt it to edit the image further. Thus, image editing is also possible with this tool. The output might not come as good as expected but it’s worth trying. While the image upload feature is present in the free version, PDF upload is available for premium subscribers.
Also read: Is it Real or AI Picture? How to identify using tools?
6] Analyse posts using Grok
![]()
You will see a Grok icon (Explain this post) or Grok button on some posts across your home timeline to help you understand real-time events, discover relevant context, and dive deeper into trending discussions. Clicking on this icon opens a Grok chat box where you can understand what that post is about, meme explanation (if there’s any in that post), information about the image in the post, etc. You can further start a conversation in that box, open a conversation on the Grok page, ask for prompts, and use other options.
Read: ChatGPT vs Copilot vs Gemini vs Claude
7] Access your Grok History
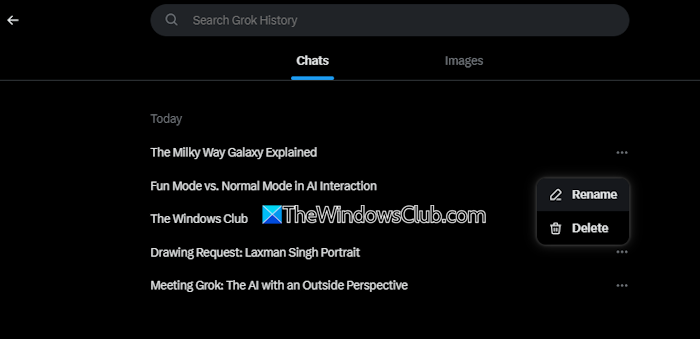
Closed a conversation or Grok interface accidentally or missed an image? Worry not as there’s a Grok History feature that lets you access all the conversations you had previously. Apart from that, you will also be able to access the images generated by Grok. You can scroll through the conversations or images manually or use the search box to quickly find an item.
Click on the History option on the top left part of the Grok interface. This will provide a Chats section and an Images section. The first section lets you open a particular conversation, rename it to find it easily the next time, and delete a conversation. And, the second option lets you access the generated images, and save, copy, post, or delete an image.
8] Switch to the Focus Mode
Click on the Focus Mode icon just before the History option on the top left part of the Grok page. This will hide the left sidebar of your X account and only the Grok interface will be there to have a distraction-free page. You can’t select a theme or use other options in focus mode which I think should be there. Press the Exit Focus Mode button (close icon) to get back to normal mode.
9] Turn on the Fun Mode
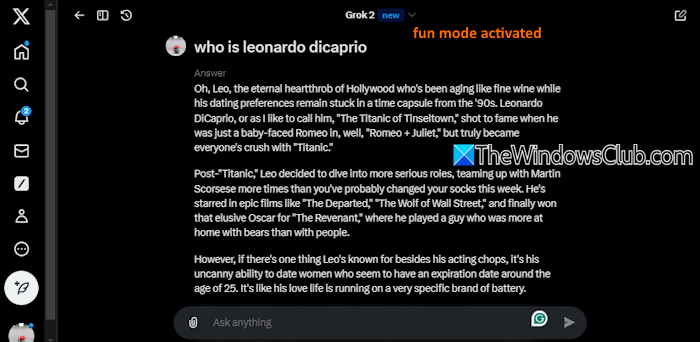
The normal mode (default setting) in Grok AI focuses on providing straightforward information, clarity, and responses in a more professional way and tone. On the other hand, the fun mode responses might be humorous, informal, playful, incorporating jokes or sarcasm (where appropriate). I like the fun mode.
To turn on the fun mode, simply type fun mode in the text box, and hit Enter. Now you will get responses that would be more entertaining.
10] Verify the output generated by Grok AI
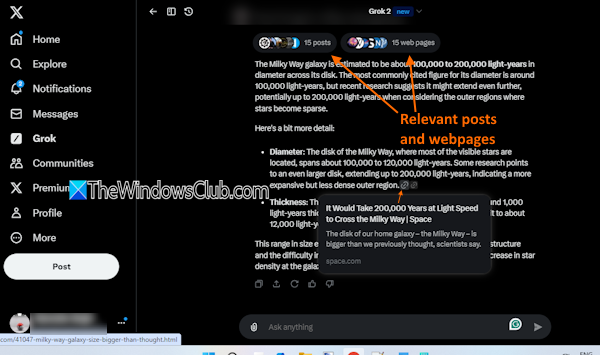
Grok AI can make mistakes, no doubt. Therefore, before sharing or passing any information to others, you should verify the output generated by the Grok AI assistant. For almost every response it generates, there are citations, relevant posts, and relevant webpages. Access them and also check other trusted sources to confirm that the information is accurate.
Read: Best Copilot Tips and Tricks you should know
11] Stop training Grok AI on your data
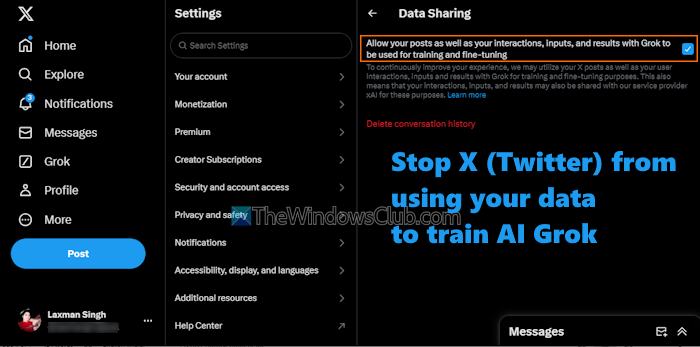
Grok trains on your data by default. User interactions, public data, posts, replies, results, etc., are shared to train and improve Grok’s ability to provide relevant and accurate responses, balanced answers, and more. If that bothers you for your data, you can stop training Grok on your data.
The option to turn off data sharing isn’t available on the Grok page. You need to access the Grok & Third-party Collaborations section under the Data sharing and personalization of your X account settings and then turn off the Allow your public data as well as your interactions, inputs, and results with Grok and xAI to be used for training and fine-tuning option.
I hope this is helpful.
Also read: How to stop your Data from being used to train AI
Is there a Grok AI Web app?
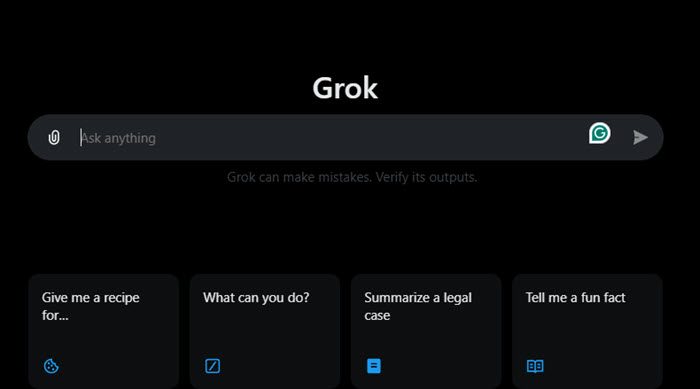
Yes, there is a Grok AI Web app and you can access it by visiting x.com/i/grok.
Is Grok as good as ChatGPT?
Both tools have their benefits and limitations. For example, while ChatGPT is available as a standalone app for Windows, iOS, macOS, and Android, Grok is limited and integrated into the X platform only as of now. But it does have some advantages like real-time search on X (Twitter) with access to billions of posts and other content, image understanding usage, referencing posts/tweets, etc., that make it better at some points.
Read next: ChatGPT Tips and Tricks – Beginners Guide.
Leave a Reply