The Remote Desktop connection allows you to take full control over the connected computer(s). By establishing a Remote Desktop connection, you can access the files on another computer, change its settings, and install and uninstall program(s) on another computer. Hence, it is a useful feature for organizations where all the computers are connected over the Local Area Network. In this article, we will show you how to use Remote Desktop over LAN on Windows 11/10.

How to use Remote Desktop over LAN on Windows 11/10
To use Remote Desktop over LAN on Windows 11/10, you need to assign a static IP address to your computers. Below, we have covered the process of using Remote Desktop over LAN on Windows 11/10 in detail.
Windows 11/10 Pro, Enterprise, and Education editions have a built-in app for establishing the Remote Desktop connection. Hence, you need not rely on a third-party app for this purpose. Windows 11/10 Home editions do not support the Remote Desktop feature. Hence, Windows 11/10 users have to use a third-party app.
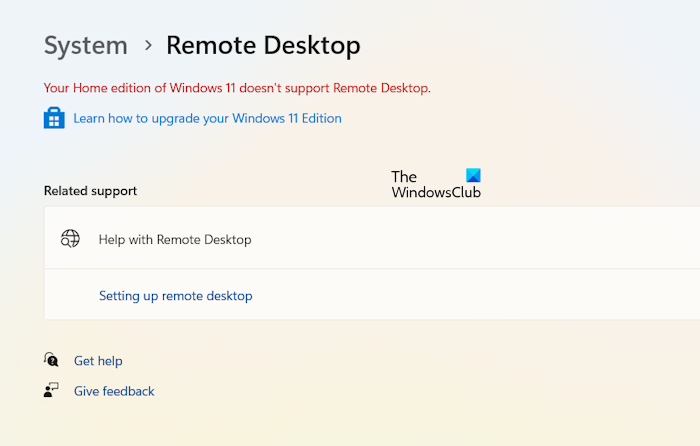
If you are a Windows 11/10 Home user and you open Windows 11/10 Settings and then go to System > Remote Desktop, you will see the following message:
Your Home edition of Windows 11/10 doesn’t support Remote Desktop.
You must go through the following steps to establish the Remote Desktop connection over LAN on your Windows 11/10 computers.
- Enable the Remote Desktop Connection feature on both Host and Client PCs.
- Allow the Remote Desktop Connection through the Windows Firewall on both computers.
- Assign a Static IP address to the Client or targeted PC
- Gain access to the remote desktop
Before we proceed, let us explain the meaning of the Host PC and the Client PC to those new to these terms.
- A Host PC is a computer you use to access the other computers on your Local Area Network via the Remote Desktop Connection feature or a third-party app or software.
- A Client PC is a computer you access using your Host computer. In simple words, the Client computer is the targeted computer.
Let’s start.
1] Enable the Remote Desktop Connection feature on both Host and Client PCs
The first step is to enable the Remote Desktop feature on both Host and Client computers. To do so, follow the steps provided below:
- Open Windows 11/10 Settings.
- Go to System > About.
- Click on the Advanced System Settings link.
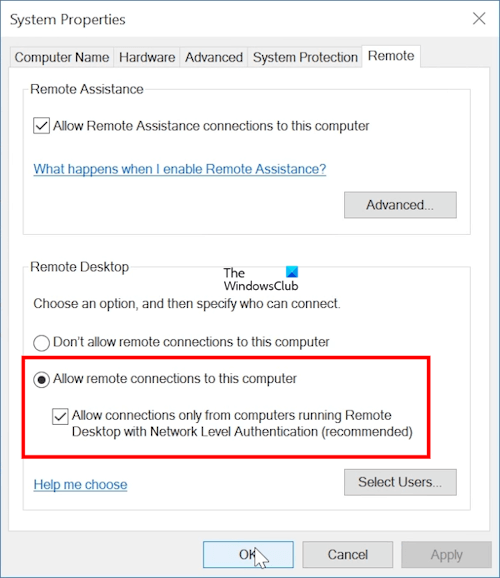
- The System Properties popup window will appear on your screen. Now, go to the Remote tab.
- Click on the Allow remote connections to this computer radio button.
- Select the “Allow connections only from computers running Remote Desktop with Network Level Authentication” checkbox.
- Click Apply and then click OK.
2] Allow the Remote Desktop Connection through the Windows Firewall on both computers
Now, the next step is to allow the Remote Desktop Connection through Windows Firewall. You have to do this on both Host and Client computers. If you are using a third-party firewall, you have to allow the Remote Desktop Connection through it.
- Open the Control Panel.
- Select System and Security. If you do not see the System and Security category, change the View by mode to Category.
- Now, click on the Allow an app through Windows Firewall link under the Windows Defender Firewall.
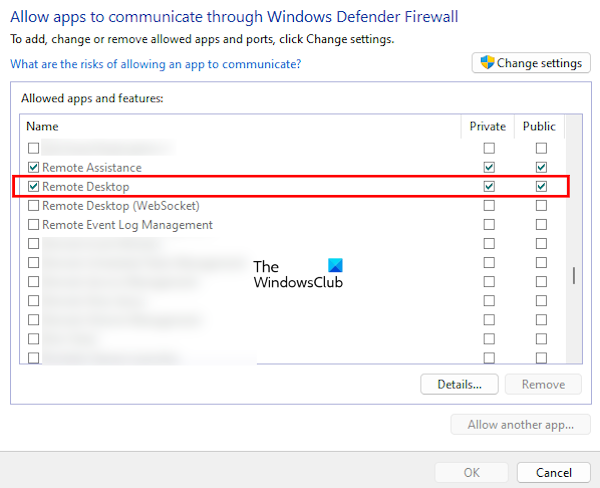
- Click on the Change Settings button. Click Yes in the UAC prompt.
- Select the Remote Desktop checkbox.
- Now, depending on your network profile, select either the Private or the Public checkbox. You can also select both of them.
When you are done, click OK to save the changes.
If you do not know your network profile, here are the steps that guide you on this:

- Open Windows 11/10 Settings.
- Go to Network & internet > Ethernet.
- You will see your network profile there (refer to the above screenshot).
Also, ensure the same network profiles are selected on both Host and Client computers.
Read: How to use Remote Desktop to connect to another computer over the internet
3] Assign a Static IP address to the Client or targeted PC
The third step is to assign a Static IP address to your Client computer. For this, you should have the following details:
- IPv4 address
- IPv4 Default Gateway
- IPv4 DNS Servers
To know the above-mentioned information, go through the following instructions:

- Open the Control Panel.
- Go to Network and Internet > Network and Sharing Center.
- Click on your network connection (Ethernet) name.
- The Ethernet Status popup window will appear on your screen. Now, click on the Details button. This will open the Network Connection Details window.
- Note down the information we have just mentioned above.
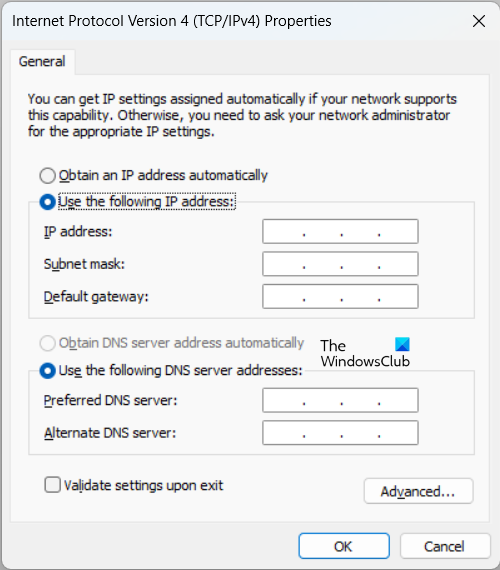
Now, close the Network Connection Details window and click on the Properties button in the Ethernet Status window. The Ethernet Properties window will open. In this window, select the Internet Protocol Version 4 (TCP/IPv4) and then click on Properties. Now, under the General tab, select the following options:
- Use the following IP address
- Use the following DNS server addresses
In the Preferred DNS Server address, type the DNS Server address, you have just noted down from the Network Connection Details window and in the Alternate DNS address, enter 8.8.8.8. Click OK to save the settings.
You have done the settings on the Client computer required to establish a remote connection through the Host computer.
Read: How to use Remote Desktop in Windows 11 Home.
4] Gain access to the remote desktop
Now, the last step is to establish the Remote Desktop Connection and access the Client PC. Go through the following instructions:
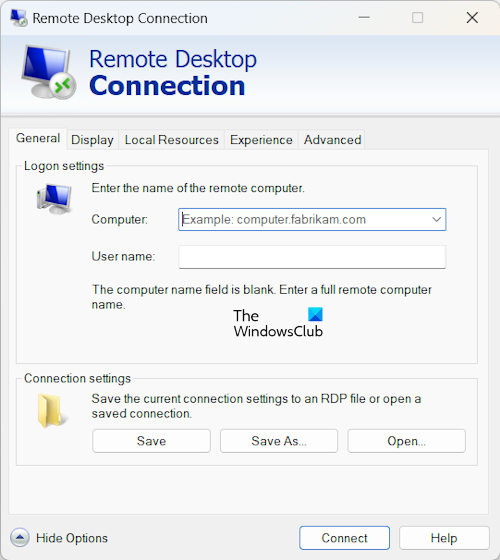
- Click on Windows 11/10 Search and type Remote Desktop Connection.
- Select the matched result from the search results.
- When the Remote Desktop Connection app is launched on your screen, type the Static IP address of the Client PC in the Computer field.
- Type the username in the Username field. If the Client computer has more than one user, type the required username.
- Click Connect. When you click Connect you will be asked to enter the password.
- Enter the password that corresponds to that specific username on the Client PC.
- Click OK.
You can also launch the Remote Desktop Connection app via the Run command box by entering the following command:
mstsc
The Remote Desktop Connection will be established after you complete all the above steps.
That’s it.
Can I Remote Desktop from Windows 11 to Windows 10?
Yes, you can use Remote Desktop from Windows 11 to Windows 10. You need to configure all the settings and the IP address correctly to use the Remote Desktop feature. Do note that the Remote Desktop feature is not available on Windows 11/10 Home editions.
Does Windows 11 support RDP?
RDP stands for Remote Desktop Protocol. It is a secure protocol that establishes a secure connection between the Client and the Host computers. Windows 11 editions except the Windows 11 Home edition support RDP.
Read next: Remote Desktop not working in Windows 11.
Leave a Reply